THEFT DETERRENT / KEYLESS ENTRY ELECTRICAL KEY OSCILLATOR(for Instrument Panel Side) INSTALLATION
CAUTION / NOTICE / HINT
- HINT:
- ·
Use the same procedure for RHD and LHD vehicles.
·The procedure listed below is for LHD vehicles.
PROCEDURE

 899A0
1.INSTALL NO. 1 INDOOR ELECTRICAL KEY ANTENNA ASSEMBLY
- NOTICE:
-
Do not reuse dropped or damaged parts.
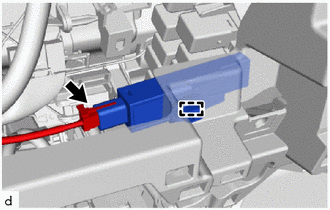
Attach the clamp to install the No. 1 indoor electrical key antenna assembly.
Connect the connector.
86120L
2.INSTALL NAVIGATION RECEIVER ASSEMBLY WITH BRACKET
86140A
3.INSTALL RADIO AND DISPLAY RECEIVER ASSEMBLY WITH BRACKET
86120
4.INSTALL RADIO RECEIVER ASSEMBLY WITH BRACKET
55900
5.INSTALL AIR CONDITIONING CONTROL ASSEMBLY (for Automatic Air Conditioning System)
55909A
6.CONNECT AIR MIX DAMPER CONTROL CABLE SUB-ASSEMBLY (for Manual Air Conditioning System)
55908A
7.CONNECT AIR INLET DAMPER CONTROL CABLE SUB-ASSEMBLY (for Manual Air Conditioning System)
55906A
8.CONNECT DEFROSTER DAMPER CONTROL CABLE SUB-ASSEMBLY (for Manual Air Conditioning System)
84013A
9.INSTALL INTEGRATION PANEL SUB-ASSEMBLY WITH AIR CONDITIONING CONTROL ASSEMBLY (for Manual Air Conditioning System)
55918A
10.INSTALL AIR INLET DAMPER CONTROL LEVER (for Manual Air Conditioning System)
55905J
11.INSTALL CONTROL KNOB SUB-ASSEMBLY (for Manual Air Conditioning System)
55410C
12.INSTALL INSTRUMENT CLUSTER FINISH PANEL ASSEMBLY
55041B
13.INSTALL NO. 1 INSTRUMENT PANEL BOX DOOR SUB-ASSEMBLY
55470
14.INSTALL INSTRUMENT CLUSTER FINISH PANEL GARNISH ASSEMBLY
45100
15.INSTALL STEERING WHEEL ASSEMBLY
16.CONNECT CABLE TO NEGATIVE BATTERY TERMINAL
- NOTICE:
-
When disconnecting the cable, some systems need to be initialized after the cable is reconnected (Click hereGeneral>INTRODUCTION>REPAIR INSTRUCTION>INITIALIZATION).