2GD-FTV EMISSION CONTROL UREA TANK REMOVAL
PROCEDURE

 51569
1.REMOVE PROPELLER SHAFT GUARD (for 4WD)
77851A
2.REMOVE UREA TANK PROTECTOR
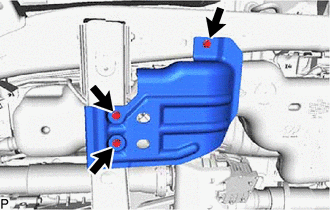
Remove the 3 bolts and urea tank protector from the body.
3.DISCONNECT NO. 1 UREA TUBE WITH HEATER
- NOTICE:
-
Check for dirt or mud on the urea tube with heater assembly and around the urea tube connector before disconnection. Clean if necessary.
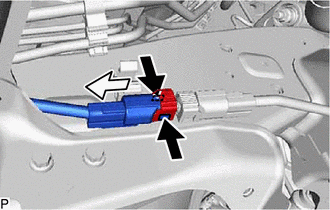
Disconnect the No. 1 urea tube with heater from the urea tube with heater assembly.
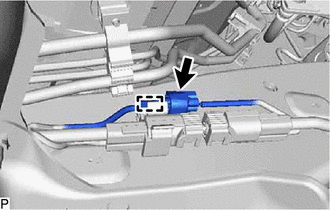
Disconnect the connector from the urea tube with heater assembly.
Detach the connector from the tube clamp.
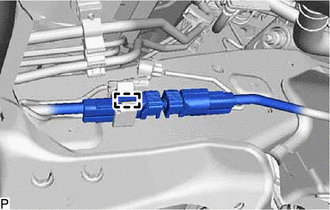
Detach the No. 1 urea tube with heater from the tube clamp.
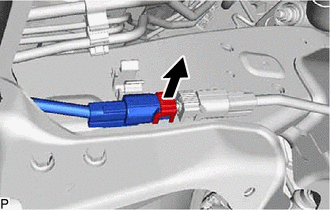

|
Lift Up |
Detach the lock claw by lifting up the cover.
|
|
Pinch |

|
Pull |
Pinch the retainer of the urea tube connector, and then pull the urea tube connector off the No. 1 urea tube with heater.
- NOTICE:
- ·
If there is any solidified urea solution (white solids) on the connection area, clean the solids off with a damp cloth, etc., before disconnecting the urea tube connector.
·Be sure to disconnect the urea tube connector by hand.
·Check for foreign matter in the urea tube with heater assembly and around the urea tube connector. Clean if necessary. Foreign matter may damage the O-ring or cause leaks in the seal between the urea tube with heater assembly and urea tube connector.
·Put the urea tube with heater assembly and urea tube connector ends in plastic bags to prevent damage and foreign matter contamination.
77910
4.DISCONNECT UREA TANK FILLER PIPE ASSEMBLY
- NOTICE:
-
Check for dirt or mud on the urea tank filler pipe assembly and around the urea tube connector before disconnection. Clean if necessary.
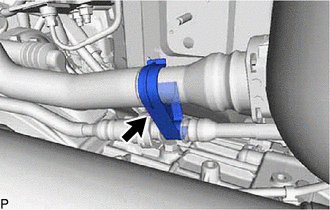
Remove the pipe clamp from the urea tank filler pipe assembly.
Disconnect the No. 1 urea tank breather tube from the No. 2 urea tank breather tube.
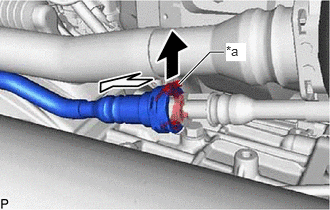
| *a | Retainer |
|
|
Pull |
|
|
Pull Out |
Detach the claw of the retainer of the No. 1 urea tank breather tube connector, pull up the retainer and disconnect the No. 1 urea tank breather tube connector from the No. 2 urea tank breather tube.
- NOTICE:
- ·
If there is any solidified urea solution (white solids) on the connection area, clean the solids off with a damp cloth, etc., before disconnecting the urea tube connector.
·Be sure to disconnect the No. 1 urea tank breather tube connector by hand.
·Check for foreign matter in the No. 2 urea tank breather tube and around the No. 1 urea tank breather tube connector. Clean if necessary. Foreign matter may damage the O-ring or cause leaks in the seal between the No. 2 urea tank breather tube and No. 1 urea tank breather tube connector.
·Put the No. 2 urea tank breather tube and No. 1 urea tank breather tube connector ends in plastic bags to prevent damage and foreign matter contamination.
Disconnect the urea tank filler tube from the urea tank sub-assembly.
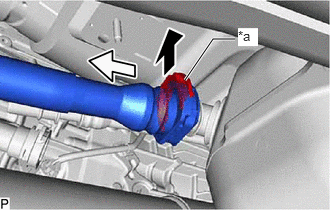
| *a | Retainer |
|
|
Pull |
|
|
Pull Out |
Detach the claw of the retainer of the urea tank filler tube connector, pull up the retainer and disconnect the urea tank filler tube connector from the urea tank sub-assembly.
- NOTICE:
- ·
If there is any solidified urea solution (white solids) on the connection area, clean the solids off with a damp cloth, etc., before disconnecting the connector.
·Be sure to disconnect the urea tank filler tube connector by hand.
·Check for foreign matter in the urea tank sub-assembly and around the urea tank filler tube connector. Clean if necessary. Foreign matter may damage the O-ring or cause leaks in the seal between the urea tank sub-assembly and urea tank filler tube connector.
·Put the urea tank sub-assembly and urea tank filler tube connector ends in plastic bags to prevent damage and foreign matter contamination.
77801A
5.REMOVE UREA TANK SUB-ASSEMBLY
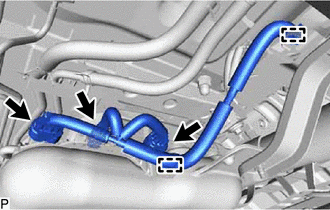
Detach the 2 clamps and disconnect the 3 connectors from the urea tank harness.
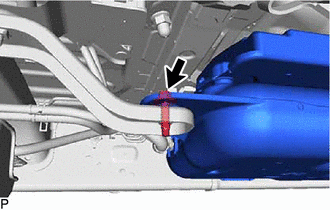
Remove the bolt and disconnect the urea tank sub-assembly from the No. 3 urea tank bracket.
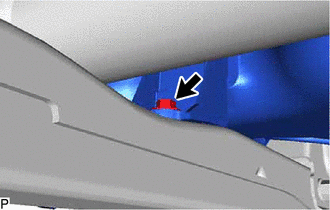
Remove the bolt and disconnect the urea tank sub-assembly from the No. 3 crossmember sub-assembly.
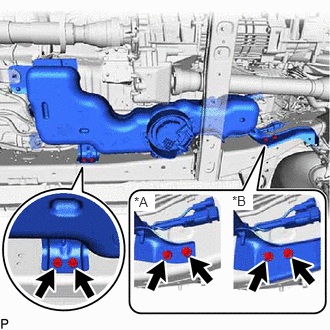
| *A | for Pre-Runner |
| *B | for 4WD |
Remove the 4 bolts and urea tank sub-assembly from the body.
896B1
6.REMOVE UREA PUMP CONTROL ECU
7.REMOVE NO. 2 UREA TANK BREATHER TUBE
- NOTICE:
-
Check for dirt or mud on the urea tank sub-assembly and around the No. 2 urea tank breather tube connector before disconnection. Clean if necessary.
Remove the No. 2 urea tank breather tube from the urea tank sub-assembly.
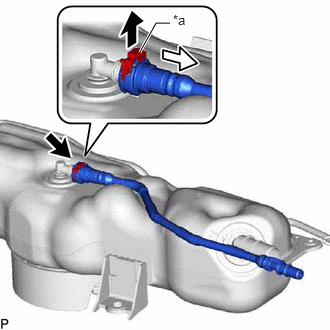
| *a | Retainer |
|
|
Pull |
|
|
Pull Out |
Detach the claw of the retainer of the No. 2 urea tank breather tube connector, pull up the retainer and disconnect the No. 2 urea tank breather tube connector from the urea tank sub-assembly.
- NOTICE:
- ·
If there is any solidified urea solution (white solids) on the connection area, clean the solids off with a damp cloth, etc., before disconnecting the urea tube connector.
·Be sure to disconnect the No. 2 urea tank breather tube connector by hand.
·Check for foreign matter in the urea tank sub-assembly and around the No. 2 urea tank breather tube connector. Clean if necessary. Foreign matter may damage the O-ring or cause leaks in the seal between the urea tank sub-assembly and No. 2 urea tank breather tube connector.
·Put the urea tank sub-assembly and No. 2 urea tank breather tube connector ends in plastic bags to prevent damage and foreign matter contamination.
77861A
8.REMOVE NO. 1 UREA TANK BRACKET (for Pre-Runner)
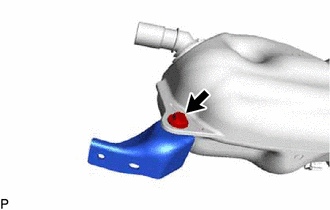
Remove the bolt and No. 1 urea tank bracket from the urea tank sub-assembly.
51568
9.REMOVE PROPELLER SHAFT GUARD BRACKET (for 4WD)
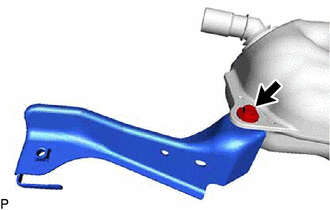
Remove the bolt and propeller shaft guard bracket from the urea tank sub-assembly.
77862A
10.REMOVE NO. 2 UREA TANK BRACKET
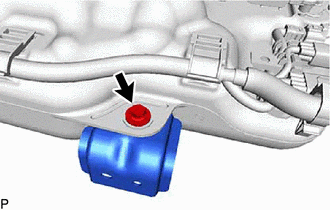
Remove the bolt and No. 2 urea tank bracket from the urea tank sub-assembly.
77871A
11.REMOVE UREA PUMP
12.REMOVE UREA TANK HARNESS
Remove the urea tank harness from the urea tank sub-assembly.