POWER OUTLETS (INT) POWER POINT SOCKET(for Single Socket Type) INSTALLATION
CAUTION / NOTICE / HINT
- HINT:
- ·
Use the same procedure for RHD and LHD vehicles.
·The procedures listed below are for LHD vehicles.
PROCEDURE

 85535B
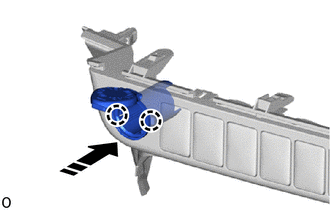
1.INSTALL NO. 1 POWER OUTLET SOCKET COVER

|
Install in this Direction |
Attach the claw to install the No. 1 power outlet socket cover as shown in the illustration.
85530
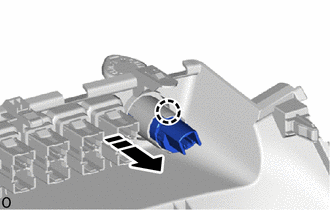
2.INSTALL NO. 1 POWER OUTLET SOCKET ASSEMBLY
|
|
Install in this Direction |
Attach the claw to install the No. 1 power outlet socket assembly as shown in the illustration.
55407C
3.INSTALL LOWER INSTRUMENT COVER SUB-ASSEMBLY
73900
4.INSTALL LOWER NO. 1 INSTRUMENT PANEL AIR BAG ASSEMBLY (w/ Knee Airbag)
55606
5.INSTALL NO. 1 INSTRUMENT PANEL UNDER COVER SUB-ASSEMBLY (w/ Knee Airbag)
55045
6.INSTALL LOWER INSTRUMENT PANEL FINISH PANEL SUB-ASSEMBLY (w/o Knee Airbag)
45287
7.INSTALL STEERING COLUMN LOWER COVER
84013A
8.INSTALL INTEGRATION PANEL SUB-ASSEMBLY (for Manual Air Conditioning System)
55918A
9.INSTALL AIR INLET DAMPER CONTROL LEVER (for Manual Air Conditioning System)
55905J
10.INSTALL CONTROL KNOB SUB-ASSEMBLY (for Manual Air Conditioning System)
55900
11.INSTALL AIR CONDITIONING CONTROL ASSEMBLY (for Automatic Air Conditioning System)
58810J
12.INSTALL CONSOLE BOX ASSEMBLY (w/ Console Box Lid)
58810J
13.INSTALL CONSOLE BOX ASSEMBLY (w/o Console Box Lid)
55410C
14.INSTALL INSTRUMENT CLUSTER FINISH PANEL ASSEMBLY
45100
15.INSTALL STEERING WHEEL ASSEMBLY
16.CONNECT CABLE TO NEGATIVE BATTERY TERMINAL
- NOTICE:
-
When disconnecting the cable, some systems need to be initialized after the cable is reconnected.
-
Click hereGeneral>INTRODUCTION>REPAIR INSTRUCTION>INITIALIZATION
17.CHECK SRS WARNING LIGHT
for Type A:
Click hereVehicle Interior>SUPPLEMENTAL RESTRAINT SYSTEMS>AIRBAG SYSTEM(for Type A)>DIAGNOSIS SYSTEM
for Type B:
Click hereVehicle Interior>SUPPLEMENTAL RESTRAINT SYSTEMS>AIRBAG SYSTEM(for Type B)>DIAGNOSIS SYSTEM