2TR-FE ENGINE MECHANICAL ENGINE UNIT REASSEMBLY
PROCEDURE

 11381
1.INSTALL REAR ENGINE OIL SEAL RETAINER
Clean and degrease the contact surfaces of the rear engine oil seal retainer and cylinder block sub-assembly.
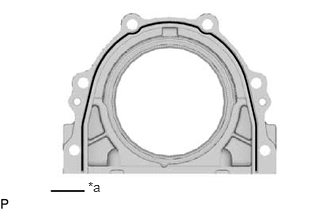
| *a | Seal Packing |
Apply seal packing in a continuous bead as shown in the illustration.
- Seal packing:
Toyota Genuine Seal Packing Black, Three Bond 1207B or equivalent
- Standard seal diameter:
2.0 to 3.0 mm (0.0787 to 0.118 in.)
- NOTICE:
- ·
Remove any oil from the contact surface.
·Install the rear engine oil seal retainer within 3 minutes after applying seal packing.
·Do not start the engine for at least 4 hours after installation.
Install the rear engine oil seal retainer with the 6 bolts.
- Torque:
- 13 N*m (133 kgf*cm, 10 ft.*lbf)
11381A
2.INSTALL REAR ENGINE OIL SEAL
11432A
3.INSTALL NO. 1 TAPER SCREW PLUG
Install the No. 1 taper screw plug to the cylinder block sub-assembly.
- Torque:
- 24.5 N*m (250 kgf*cm, 18 ft.*lbf)
15609
4.INSTALL OIL FILTER BRACKET SUB-ASSEMBLY
Using a hexagon wrench, install the oil filter bracket union.
- Torque:
- 24.5 N*m (250 kgf*cm, 18 ft.*lbf)
Install a new oil filter bracket gasket to the oil filter bracket sub-assembly.
Install a new O-ring to the oil filter bracket union.
- NOTICE:
-
Apply a light coat of engine oil to a new O-ring and oil filter bracket sub-assembly.
Install 2 new gaskets and the 2 screw plugs to the oil filter bracket sub-assembly.
- Torque:
- 49 N*m (500 kgf*cm, 36 ft.*lbf)
Install the oil filter bracket sub-assembly with the 2 bolts and nut.
- Torque:
- 25 N*m (255 kgf*cm, 18 ft.*lbf)
15600A
5.INSTALL OIL FILTER UNION
Using a 27 mm socket wrench, install the oil filter union.
- Torque:
- 43 N*m (439 kgf*cm, 32 ft.*lbf)
15601
6.INSTALL OIL FILTER SUB-ASSEMBLY
13471A
7.INSTALL CRANKSHAFT PULLEY SET KEY
Install the 2 crankshaft pulley set keys to the crankshaft.
13554
8.INSTALL NO. 4 CHAIN VIBRATION DAMPER
Install the No. 4 chain vibration damper with the 2 bolts.
- Torque:
- 18 N*m (184 kgf*cm, 13 ft.*lbf)
13507
9.INSTALL NO. 2 CHAIN SUB-ASSEMBLY
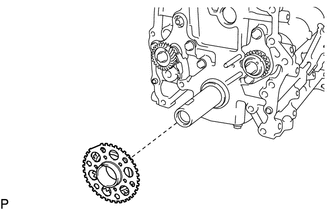
Install the No. 2 crankshaft timing sprocket as shown in the illustration.
- NOTICE:
-
Check that the No. 1 cylinder is at TDC and that the weights of the No. 1 and No. 2 balanceshafts are at the bottom side.
- HINT:
-
Install the No. 2 crankshaft timing sprocket with the front mark facing forward.
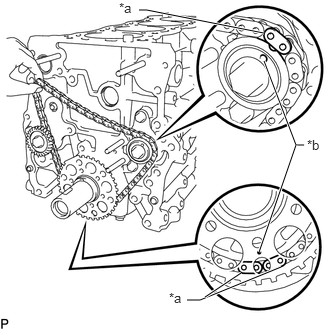
| *a | Mark Plate (Yellow) |
| *b | Timing Mark |
As shown in the illustration, install the No. 2 chain sub-assembly on the No. 2 crankshaft timing sprocket and No. 2 balanceshaft driven gear with the painted marks aligned with the timing marks on the sprocket and gear.
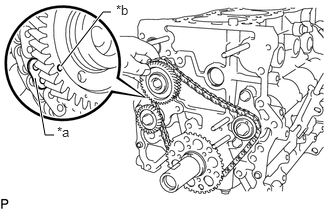
| *a | Mark Plate |
| *b | Timing Mark |
Fit the other mark link of the No. 2 crankshaft timing sprocket behind the large timing mark of the balanceshaft drive gear sub-assembly.
Insert the balanceshaft drive gear shaft through the balanceshaft drive gear sub-assembly so that it fits into the thrust plate hole.
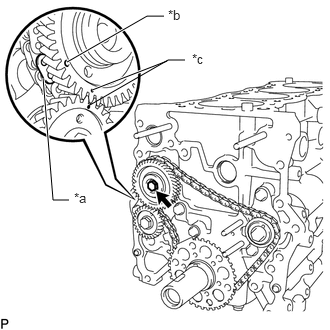
| *a | Mark Plate |
| *b | Large Timing Mark |
| *c | Small Timing Mark |
Align the small timing mark of the balanceshaft drive gear sub-assembly with the timing mark of the No. 1 balanceshaft driven gear.
Install the bolt to the balanceshaft drive gear sub-assembly and tighten it.
- Torque:
- 25 N*m (255 kgf*cm, 18 ft.*lbf)
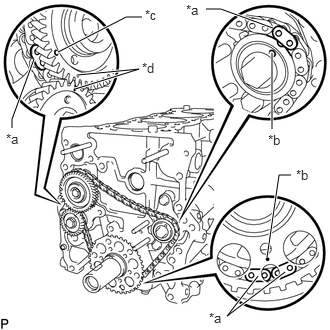
| *a | Mark Plate |
| *b | Timing Mark |
| *c | Large Timing Mark |
| *d | Small Timing Mark |
Check that each timing mark is aligned with the corresponding mark plate.
- NOTICE:
-
Check that the No. 1 cylinder is at TDC and that the weights of the No. 1 balanceshaft and No. 2 balanceshaft are at the bottom side.
13550
10.INSTALL NO. 2 CHAIN TENSIONER ASSEMBLY
Install the No. 2 chain tensioner assembly with the nut.
- Torque:
- 18 N*m (184 kgf*cm, 13 ft.*lbf)
- NOTICE:
-
Assemble the No. 2 chain tensioner assembly with the pin installed, then remove the pin after assembly. When doing this, do not push the chain vibration damper against the No. 2 chain sub-assembly.
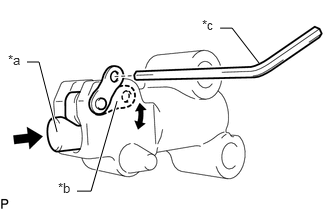
| *a | Plunger |
| *b | Stopper Plate |
| *c | Hexagon Wrench |
Move the stopper plate downward to release the lock and push the plunger deep into the tensioner.
Move the stopper plate upward to set the lock and insert a hexagon wrench into the stopper plate hole.
13563
11.INSTALL NO. 3 CHAIN VIBRATION DAMPER
Install the No. 3 chain vibration damper with the 2 bolts.
- Torque:
- 18 N*m (184 kgf*cm, 13 ft.*lbf)
13562
12.INSTALL NO. 2 CHAIN VIBRATION DAMPER
Install the No. 2 chain vibration damper with the bolt.
- Torque:
- 27 N*m (275 kgf*cm, 20 ft.*lbf)
15678A
13.INSTALL OIL CONTROL VALVE FILTER
Check that no foreign matter is on the mesh part of the oil control valve filter.
If foreign matter is present, clean the part thoroughly.
Using an 8 mm hexagon wrench, install a new gasket and the oil control valve filter with the screw plug.
- Torque:
- 30 N*m (306 kgf*cm, 22 ft.*lbf)
11115
14.INSTALL CYLINDER HEAD GASKET
11101
15.INSTALL CYLINDER HEAD SUB-ASSEMBLY
13070A
16.INSTALL CAMSHAFT TIMING EXHAUST GEAR ASSEMBLY
13050
17.INSTALL CAMSHAFT TIMING GEAR ASSEMBLY
13716
18.INSTALL VALVE STEM CAP
13750
19.INSTALL VALVE LASH ADJUSTER ASSEMBLY
13801
20.INSTALL NO. 1 VALVE ROCKER ARM SUB-ASSEMBLY
13512
21.INSTALL NO. 2 CAMSHAFT
13511
22.INSTALL CAMSHAFT
23.INSTALL CAMSHAFT BEARING CAP
13521
24.INSTALL CRANKSHAFT TIMING GEAR OR SPROCKET
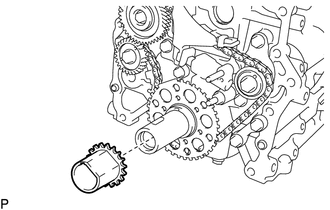
Install the crankshaft timing gear or sprocket as shown in the illustration.
13561
25.INSTALL NO. 1 CHAIN VIBRATION DAMPER
Install the No. 1 chain vibration damper with the bolt and nut.
- Torque:
- for bolt : 21 N*m (214 kgf*cm, 15 ft.*lbf)
- for nut : 18 N*m (184 kgf*cm, 13 ft.*lbf)
Remove the hexagon wrench from the No. 2 chain tensioner assembly and release the plunger.
13506
26.INSTALL CHAIN SUB-ASSEMBLY
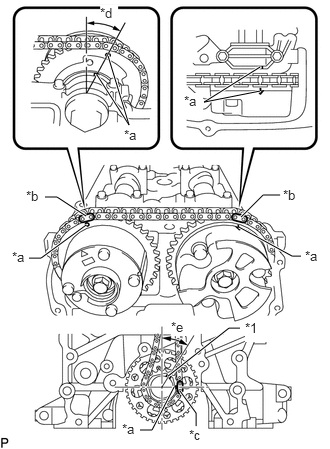
| *1 | Crankshaft Pulley Set Key |
| *a | Timing Mark |
| *b | Mark Plate (Pink) |
| *c | Mark Plate (Yellow) |
| *d | Approximately 13° |
| *e | Approximately 30° |
As shown in the illustration, install the chain sub-assembly to the camshaft timing exhaust gear assembly and camshaft timing gear assembly with the mark plates aligned with the timing marks on the camshaft timing exhaust gear assembly and camshaft timing gear assembly.
- HINT:
- ·
The camshaft mark plate is pink.
·The crankshaft mark plate is yellow.
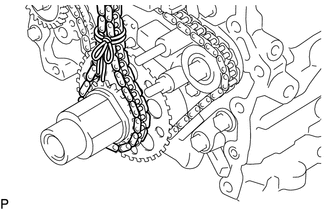
Use a rope to tie the chain sub-assembly of the crankshaft timing gear or sprocket. Tie the rope near the crankshaft timing gear or sprocket.
- NOTICE:
-
After the chain tensioner has been installed, the rope must be removed.
- HINT:
-
The rope is tied so that the chain sub-assembly will not jump a tooth.
13559
27.INSTALL CHAIN TENSIONER SLIPPER
Install the chain tensioner slipper with the bolt.
- Torque:
- 21 N*m (214 kgf*cm, 15 ft.*lbf)
13540
28.INSTALL NO. 1 CHAIN TENSIONER ASSEMBLY
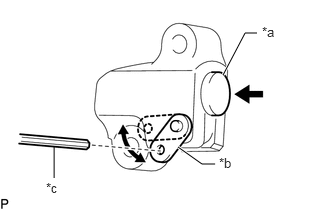
| *a | Plunger |
| *b | Stopper Plate |
| *c | Hexagon Wrench |
Move the stopper plate upward to release the lock and push the plunger deep into the tensioner.
Move the stopper plate downward to set the lock and insert a hexagon wrench into the hole of the stopper plate.
Install a new gasket and the No. 1 chain tensioner assembly with the bolt and nut.
- Torque:
- 10 N*m (102 kgf*cm, 7 ft.*lbf)
Remove the hexagon wrench from the No. 1 chain tensioner assembly and release the plunger.
13566B
29.INSTALL TIMING CHAIN GUIDE
Install a new O-ring to the No. 1 camshaft bearing cap.
Install the timing chain guide with the 2 bolts.
- Torque:
- 10 N*m (102 kgf*cm, 7 ft.*lbf)
30.CHECK NO. 1 CYLINDER TO TDC/COMPRESSION
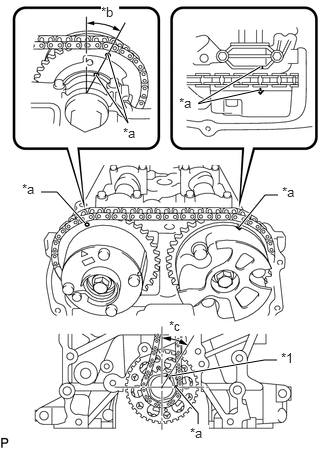
| *1 | Crankshaft Pulley Set Key |
| *a | Timing Mark |
| *b | Approximately 13° |
| *c | Approximately 30° |
Check that the No. 1 cylinder is set to TDC/compression.
Rotate the crankshaft two full rotations, and then check that all timing marks are in the position shown in the illustration.
If the timing marks do not match, set the chain sub-assembly again.
11204
31.INSTALL CYLINDER HEAD COVER CONNECTOR SUB-ASSEMBLY
Install a new No. 2 camshaft bearing cap oil hole gasket and 3 new No. 3 camshaft bearing cap oil hole gaskets to the No. 1 camshaft bearing cap.
Install the cylinder head cover connector sub-assembly with the 2 bolts.
- Torque:
- 10 N*m (102 kgf*cm, 7 ft.*lbf)
16100
32.INSTALL ENGINE WATER PUMP ASSEMBLY
11302
33.INSTALL TIMING CHAIN COVER SUB-ASSEMBLY
16620D
34.INSTALL V-RIBBED BELT TENSIONER ASSEMBLY
11303A
35.INSTALL TIMING CHAIN CASE OIL SEAL
11421
36.INSTALL OIL PAN STUD BOLT
- NOTICE:
-
If an oil pan stud bolt is deformed or its threads are damaged, replace it.
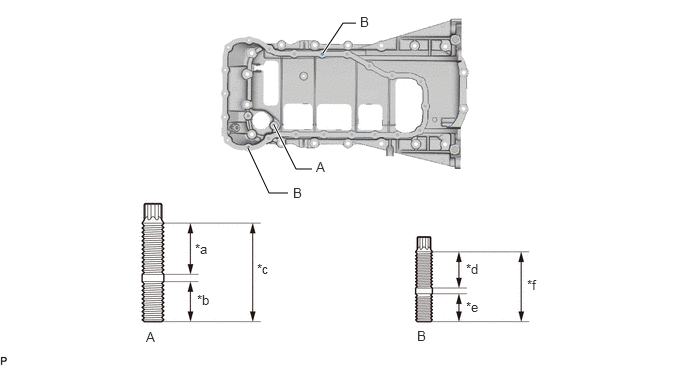
| *a | 16 mm (0.630 in.) | *b | 9.0 mm (0.354 in.) |
| *c | 27 mm (1.06 in.) | *d | 8.5 mm (0.335 in.) |
| *e | 8.0 mm (0.315 in.) | *f | 18 mm (0.709 in.) |
Using E5 and E6 "TORX" socket wrenches, install the oil pan stud bolts.
- Torque:
- 3.0 N*m (31 kgf*cm, 27 in.*lbf)
12101
37.INSTALL OIL PAN SUB-ASSEMBLY
15104
38.INSTALL OIL STRAINER SUB-ASSEMBLY
12102A
39.INSTALL NO. 2 OIL PAN SUB-ASSEMBLY
12144
40.INSTALL OIL PAN COVER SILENCER
13471
41.INSTALL CRANKSHAFT PULLEY
16331A
42.INSTALL THERMOSTAT
16321
43.INSTALL WATER INLET
12233
44.INSTALL NO. 1 VENTILATION CONNECTOR
Install the No. 1 ventilation connector to the cylinder head cover sub-assembly with the 2 bolts.
- Torque:
- 9.0 N*m (92 kgf*cm, 80 in.*lbf)
11201
45.INSTALL CYLINDER HEAD COVER SUB-ASSEMBLY
11101J
46.INSTALL CAMSHAFT TIMING OIL CONTROL VALVE ASSEMBLY (for Intake Side)
47.INSTALL CAMSHAFT TIMING OIL CONTROL VALVE ASSEMBLY (for Exhaust Side)
11301K
48.INSTALL CRANKSHAFT POSITION SENSOR
11301M
49.INSTALL CAMSHAFT POSITION SENSOR (for Intake Side)
50.INSTALL CAMSHAFT POSITION SENSOR (for Exhaust Side)
12204
51.INSTALL PCV VALVE SUB-ASSEMBLY
12108
52.INSTALL OIL FILLER CAP SUB-ASSEMBLY
Install the gasket to the oil filler cap sub-assembly.
Install the oil filler cap sub-assembly.
89422
53.INSTALL ENGINE COOLANT TEMPERATURE SENSOR
89615
54.INSTALL KNOCK SENSOR
83530
55.INSTALL ENGINE OIL PRESSURE SWITCH ASSEMBLY
19100P
56.INSTALL SPARK PLUG