HEATING / AIR CONDITIONING FRONT AIR CONDITIONING UNIT INSTALLATION
CAUTION / NOTICE / HINT
- HINT:
-
A bolt without a torque specification is shown in the standard bolt chart.
-
Click hereGeneral>SPECIFICATIONS>STANDARD BOLT>SPECIFIED TORQUE FOR STANDARD BOLTS
PROCEDURE

 87211B
1.INSTALL NO. 3 AIR DUCT
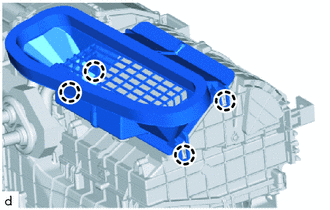
Attach the claw to install the No. 3 air duct.
2.INSTALL AIR CONDITIONING UNIT ASSEMBLY
- NOTICE:
- ·
Be sure to support the air conditioning unit assembly when installing it because failure to do so may cause the bracket of the air conditioning unit assembly to break.
·When installing the air conditioning unit assembly, eliminate static electricity by touching the vehicle body to prevent the components from being damaged.
Temporarily install the air conditioning unit assembly and instrument panel reinforcement assembly with the nut.
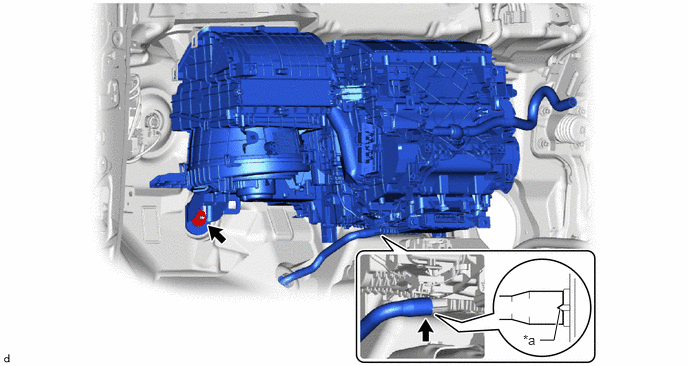
| *a | Standard Position | - | - |
Align the standard position, install the drain cooler hose.
Tighten the nut.
- Torque:
- 9.8 N*m (100 kgf*cm, 87 in.*lbf)
55950G
3.INSTALL DEFROSTER NOZZLE ASSEMBLY
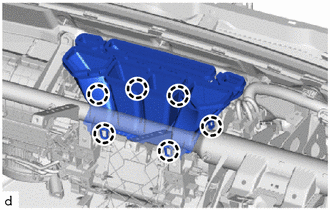
Attach the claw to install the defroster nozzle assembly.
55330B
4.INSTALL INSTRUMENT PANEL REINFORCEMENT ASSEMBLY
- NOTICE:
- ·
Be sure to support the air conditioning unit assembly when installing it because failure to do so may cause the bracket of the air conditioning unit assembly to break.
·When installing the air conditioning unit assembly, eliminate static electricity by touching the vehicle body to prevent the components from being damaged.
for Automatic Transmission:
Install the 11 bolts.
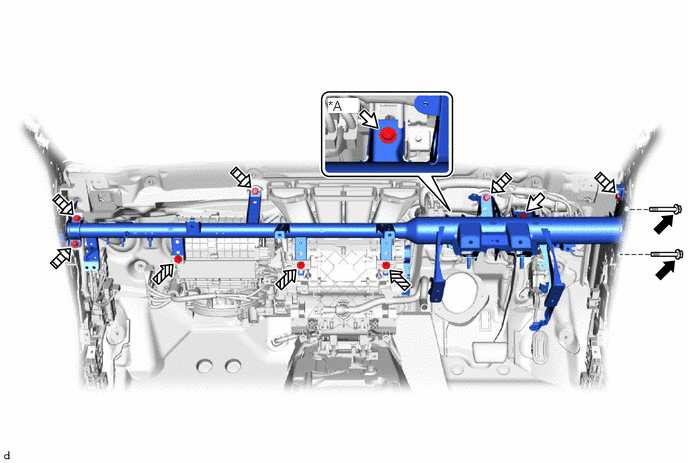
| *A | for Manual Transmission | - | - |

|
Bolt A | 
|
Bolt B |

|
Bolt C | 
|
Bolt D |
- Torque:
- Bolt A : 20 N*m (204 kgf*cm, 15 ft.*lbf)
- Bolt B : 18 N*m (184 kgf*cm, 13 ft.*lbf)
for Manual Transmission:
Install the 12 bolts.
- Torque:
- Bolt A : 20 N*m (204 kgf*cm, 15 ft.*lbf)
- Bolt B : 18 N*m (184 kgf*cm, 13 ft.*lbf)
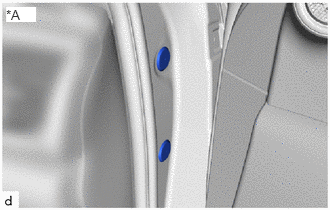
| *A | for Driver Side |
Install 2 new hole plugs.
55306A
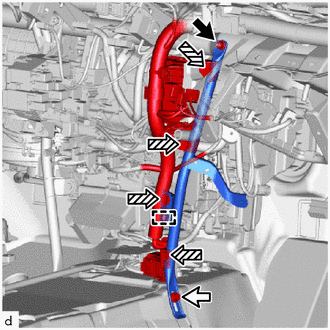
5.INSTALL NO. 1 INSTRUMENT PANEL BRACE SUB-ASSEMBLY
|
|
Nut |
|
|
Bolt |
|
|
Screw |
Install the No. 1 instrument panel brace sub-assembly with the nut, bolt and 4 screws.
- Torque:
- Bolt, Nut : 20 N*m (204 kgf*cm, 15 ft.*lbf)
Attach the clamp.
55307C
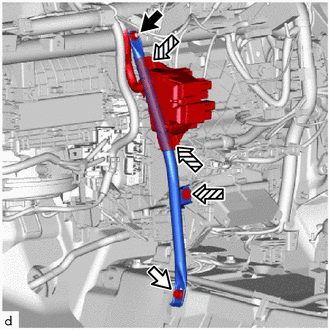
6.INSTALL NO. 2 INSTRUMENT PANEL BRACE SUB-ASSEMBLY
|
|
Nut |
|
|
Bolt |
|
|
Screw |
Install the No. 2 instrument panel brace sub-assembly with the nut, bolt and 3 screws.
- Torque:
- Bolt, Nut : 20 N*m (204 kgf*cm, 15 ft.*lbf)
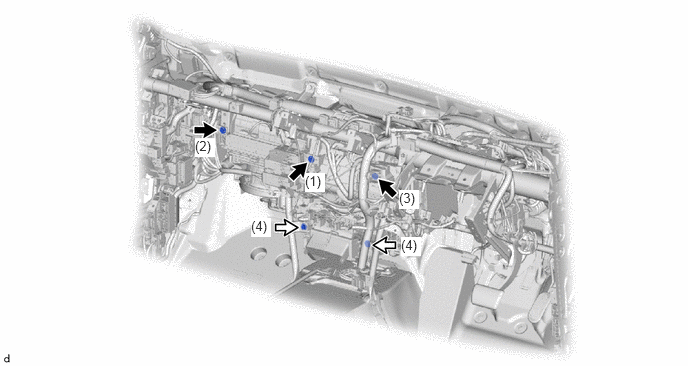
7.TIGHTEN AIR CONDITIONER UNIT ASSEMBLY
Tighten the 2 screws and 3 bolts in the order shown in the illustration.
- Torque:
- Bolt : 9.8 N*m (100 kgf*cm, 87 in.*lbf)
|
|
Bolt |
|
Screw |
82141
8.CONNECT INSTRUMENT PANEL WIRE
Install each bolt, nut and screw, and then connect the instrument panel wire.
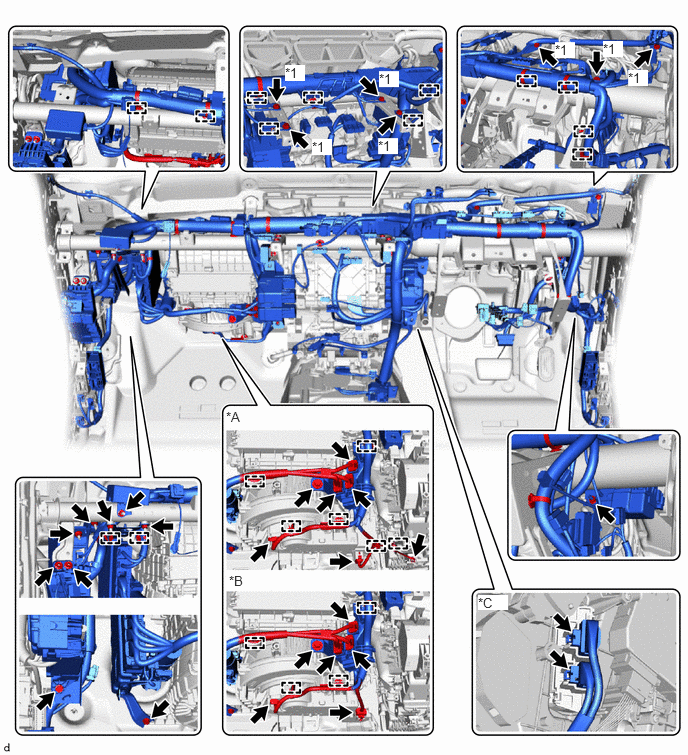
| *A | for Manual Air Conditioning System | *B | for Automatic Air Conditioning System |
| *C | w/ PTC Heater | - | - |
| *1 | Ground Wire | - | - |
Connect each connector and attach each clamp.
Install each bolt and each ground wire.
- Torque:
- 8.3 N*m (85 kgf*cm, 73 in.*lbf)
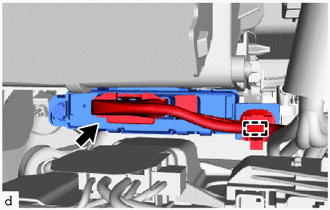
for Automatic Air Conditioning System:
Attach the clamp.
Connect the connector.
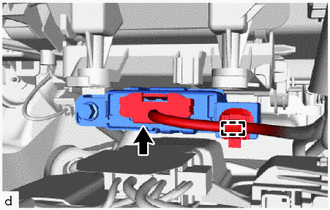
for Manual Air Conditioning System:
Attach the clamp.
Connect the connector.
87212
9.INSTALL NO. 1 REAR AIR DUCT
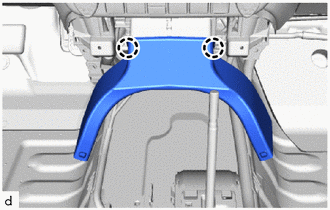
Install the No. 1 rear air duct with the 2 clips.
87212G
10.INSTALL NO. 3 REAR AIR DUCT
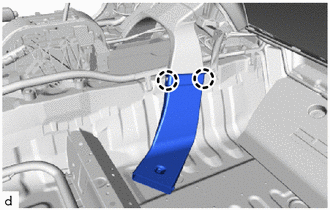
Attach the claw to install the No. 3 rear air duct.
87213
11.INSTALL NO. 2 REAR AIR DUCT
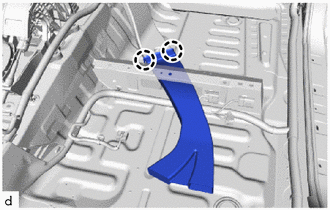
Attach the claw to install the No. 2 rear air duct.
87216A
12.INSTALL NO. 5 REAR AIR DUCT
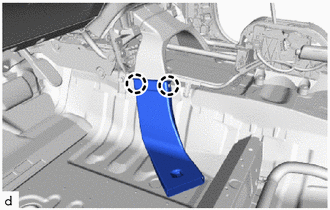
Attach the claw to install the No. 5 rear air duct.
87216B
13.INSTALL NO. 4 REAR AIR DUCT
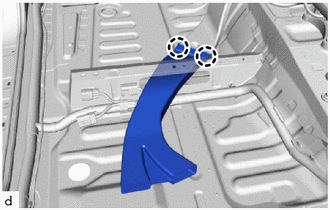
Attach the claw to install the No. 4 rear air duct.
55215D
14.INSTALL NO. 3 DASH PANEL INSULATOR PAD
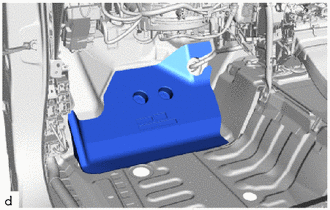
Install the No. 3 dash panel insulator pad.
55214C
15.INSTALL NO. 2 DASH PANEL INSULATOR PAD
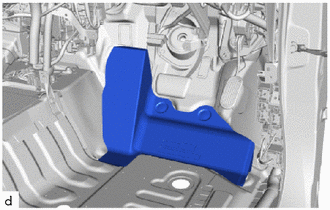
Install the No. 2 dash panel insulator pad.
16.INSTALL FRONT FLOOR CARPET ASSEMBLY
Attach the guide to install the front floor carpet assembly to the original position as shown in the illustration.
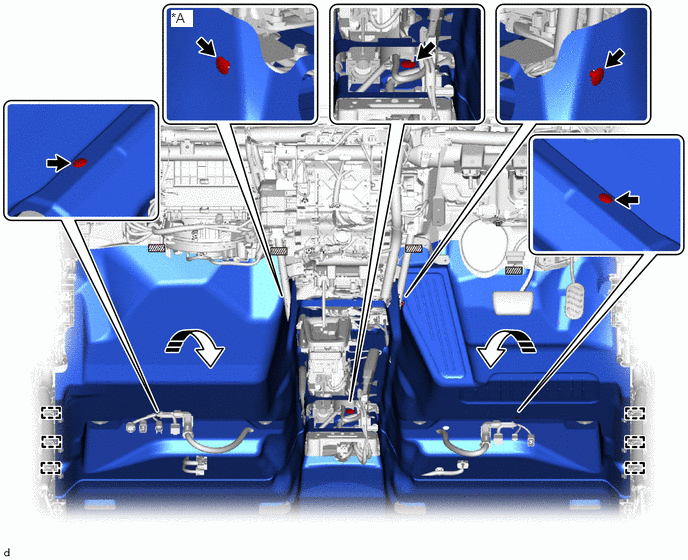

|
Fastener | 
|
Install in this Direction |
Attach each fastener.
Install the 5 clips.
62414A
17.INSTALL LOWER CENTER PILLAR GARNISH LH
62413A
18.INSTALL LOWER CENTER PILLAR GARNISH RH
67918E
19.INSTALL REAR DOOR SCUFF PLATE LH
67917C
20.INSTALL REAR DOOR SCUFF PLATE RH
62112
21.INSTALL COWL SIDE TRIM BOARD LH
67914B
22.INSTALL FRONT DOOR SCUFF PLATE LH
62111C
23.INSTALL COWL SIDE TRIM BOARD RH
67913B
24.INSTALL FRONT DOOR SCUFF PLATE RH
25.INSTALL STEERING COLUMN ASSEMBLY
87211A
26.INSTALL NO. 2 AIR DUCT
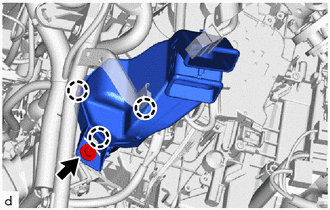
Attach the claw to install the No. 2 air duct.
- NOTICE:
-
If the No. 2 air duct is reused, it may fall off or abnormal noise may occur. Therefore, make sure to replace it with a new one.
Install the bolt.
- Torque:
- 9.8 N*m (100 kgf*cm, 87 in.*lbf)
87211
27.INSTALL NO. 1 AIR DUCT
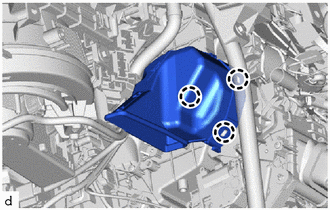
Attach the claw to install the No. 1 air duct.
- NOTICE:
-
If the No. 1 air duct is reused, it may fall off or abnormal noise may occur. Therefore, make sure to replace it with a new one.
55303B
28.INSTALL LOWER INSTRUMENT PANEL SUB-ASSEMBLY
29.INSTALL FRONT SEAT ASSEMBLY LH
for Manual Seat:
Click hereVehicle Interior>SEAT>FRONT SEAT ASSEMBLY(for Manual Seat)>INSTALLATION
for Power Seat:
Click hereVehicle Interior>SEAT>FRONT SEAT ASSEMBLY(for Power Seat)>INSTALLATION
30.INSTALL FRONT SEAT ASSEMBLY RH
- HINT:
-
Use the same procedure described for the LH side.
87128
31.INSTALL HEATER GROMMET
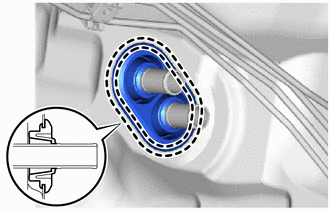
Press the marked parts to attach the claw and install the heater grommet.
- NOTICE:
- ·
Securely install the heater grommet in order to prevent water ingress.
·Install the heater grommet so that there is no clearance between the grommet and heater pipe.
32.CONNECT HEATER WATER INLET HOSE
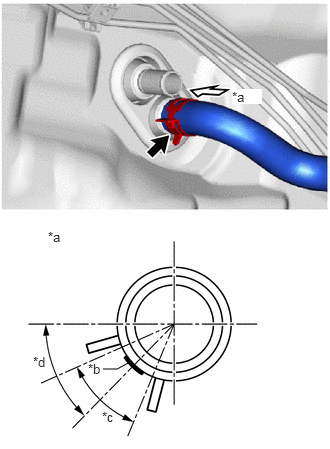
| *a | View A |
| *b | Marking (Yellow) |
| *c | Clip Installation Angle (40°) |
| *d | 45° |
Connect the heater water inlet hose with the marking facing left and attach the clip within the area shown in the illustration.
- NOTICE:
-
Do not apply excessive force to the heater water inlet hose.
33.CONNECT HEATER WATER OUTLET HOSE
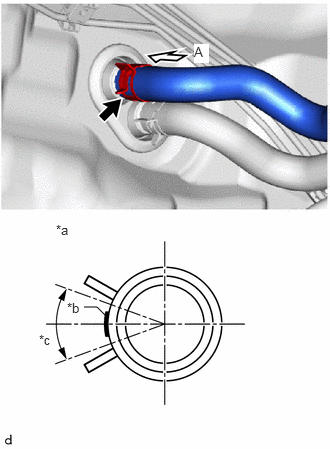
| *a | View A |
| *b | Marking (White) |
| *c | Clip Installation Angle (40°) |
Connect the heater water outlet hose with the marking facing left and attach the clip within the area shown in the illustration.
- NOTICE:
-
Do not apply excessive force to the heater water outlet hose.
88710E
34.CONNECT AIR CONDITIONER TUBE AND ACCESSORY ASSEMBLY
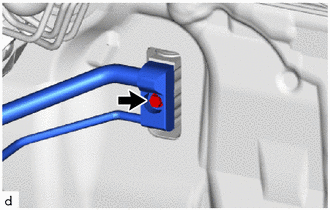
Remove the vinyl tape from the air conditioner tube and accessory assembly.
Sufficiently apply compressor oil to 2 new O-rings and the fitting surface of the air conditioner tube and accessory assembly.
- Compressor Oil:
ND-OIL 8 or equivalent
Install the 2 O-rings to the air conditioner tube and accessory assembly.
- NOTICE:
-
Keep the O-rings and O-ring fitting surfaces free of foreign matter.
Connect the air conditioner tube and accessory assembly.
Tighten the bolt.
- Torque:
- 5.4 N*m (55 kgf*cm, 48 in.*lbf)
35.ADD ENGINE COOLANT
36.INSPECT FOR COOLANT LEAK
37. CHARGE AIR CONDITIONING SYSTEM WITH REFRIGERANT
38. WARM UP ENGINE
39.INSPECT FOR REFRIGERANT LEAK
40. INITIALIZATION SERVO MOTOR (for Automatic Air Conditioning System)