INTERIOR PANELS / TRIM ROOF HEADLINING REMOVAL
CAUTION / NOTICE / HINT
The necessary procedures (adjustment, calibration, initialization or registration) that must be performed after parts are removed, installed or replaced during the roof headlining removal/installation are shown below.
| Replacement Part or Procedure | Necessary Procedures | Effects / Inoperative when not Performed | Link |
|---|---|---|---|
| Disconnect cable from negative battery terminal | w/ Power Back Door System:
Reset back door close position |
Power door lock control system | ( ) |
- CAUTION:
-
-
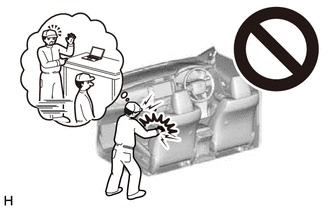
Some of these service operations affect the SRS airbag system. Read the precautionary notices concerning the SRS airbag system before servicing.
-
Click hereVehicle Interior>SUPPLEMENTAL RESTRAINT SYSTEMS>AIRBAG SYSTEM(for Type B)>PRECAUTION
PROCEDURE

 1. PRECAUTION
- NOTICE:
-
After turning the ignition switch off, waiting time may be required before disconnecting the cable from the battery terminal. Therefore, make sure to read the disconnecting the cable from the battery terminal notice before proceeding with work.
-
Click hereGeneral>INTRODUCTION>REPAIR INSTRUCTION>PRECAUTION
2.DISCONNECT CABLE FROM NEGATIVE BATTERY TERMINAL
- CAUTION:
-
Wait at least 90 seconds after disconnecting the cable from the negative (-) battery terminal to disable the SRS system.
- NOTICE:
-
When disconnecting the cable, some systems need to be initialized after the cable is reconnected.
-
Click hereGeneral>INTRODUCTION>REPAIR INSTRUCTION>INITIALIZATION
3.REMOVE REAR NO. 2 SEAT ASSEMBLY LH
4.REMOVE REAR NO. 2 SEAT ASSEMBLY RH
74603
5.REMOVE FRONT ASSIST GRIP SUB-ASSEMBLY
62212
6.REMOVE FRONT PILLAR GARNISH LH
62211
7.REMOVE FRONT PILLAR GARNISH RH
67914B
8.REMOVE FRONT DOOR SCUFF PLATE LH
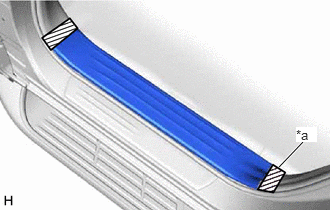
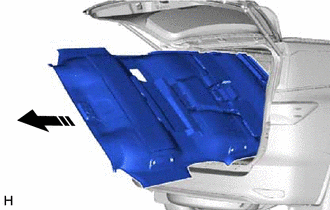
| *a | Protective Tape |
Put protective tape around the front door scuff plate LH.
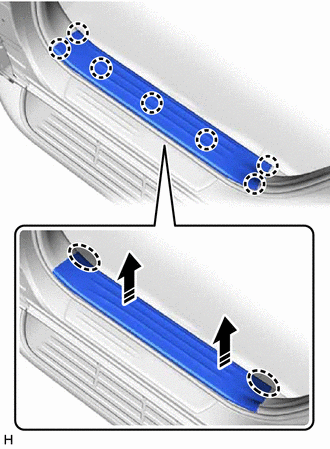

|
Place Hands Here |

|
Remove in this Direction |
Place your hands at the position shown in the illustration and pull as shown to detach the claw and remove the front door scuff plate LH.
67913B
9.REMOVE FRONT DOOR SCUFF PLATE RH
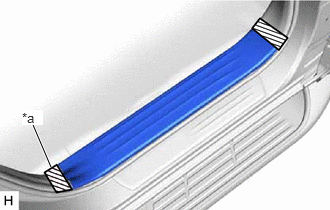
| *a | Protective Tape |
Put protective tape around the front door scuff plate RH.
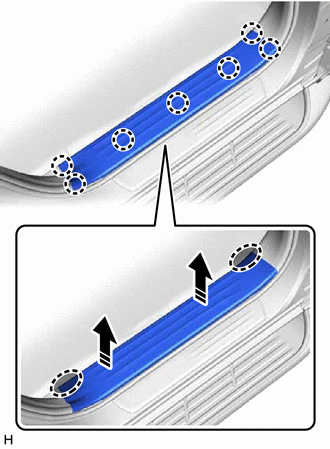
|
|
Place Hands Here |
|
|
Remove in this Direction |
Place your hands at the position shown in the illustration and pull as shown to detach the claw and remove the front door scuff plate RH.
67918E
10.REMOVE REAR DOOR SCUFF PLATE LH
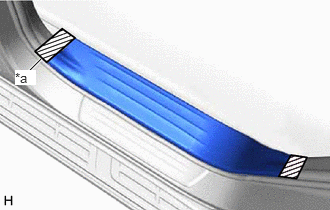
| *a | Protective Tape |
Put protective tape around the rear door scuff plate LH.
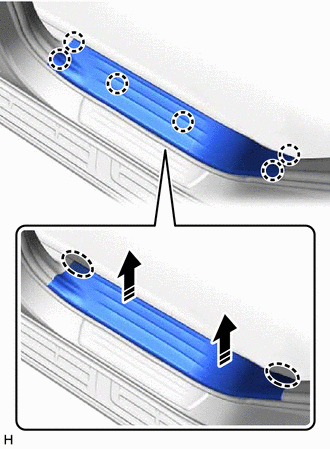
|
|
Place Hands Here |
|
|
Remove in this Direction |
Place your hands at the position shown in the illustration and pull as shown to detach the claw and remove the rear door scuff plate LH.
67917C
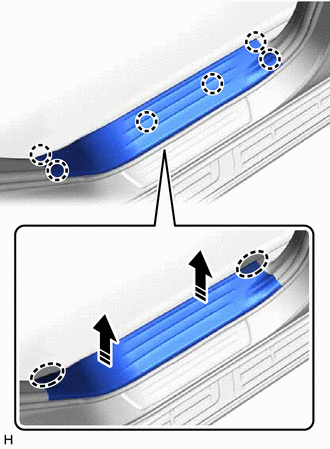
11.REMOVE REAR DOOR SCUFF PLATE RH
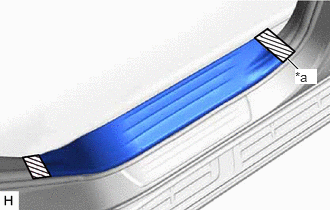
| *a | Protective Tape |
Put protective tape around the rear door scuff plate RH.
|
|
Place Hands Here |
|
|
Remove in this Direction |
Place your hands at the position shown in the illustration and pull as shown to detach the claw and remove the rear door scuff plate RH.
73233
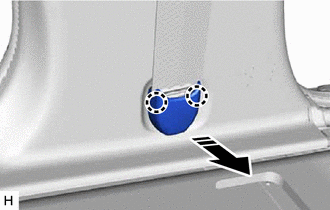
12.REMOVE OUTER LAP BELT ANCHOR COVER
- HINT:
-
Use the same procedure for both outer lap belt anchor covers.
|
|
Remove in this Direction |
Detach the claw and remove the outer lap belt anchor cover as shown in the illustration.
62414A
13.REMOVE LOWER CENTER PILLAR GARNISH LH
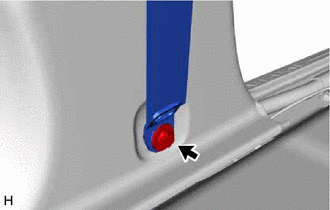
Remove the bolt and disconnect the front seat outer belt assembly LH.
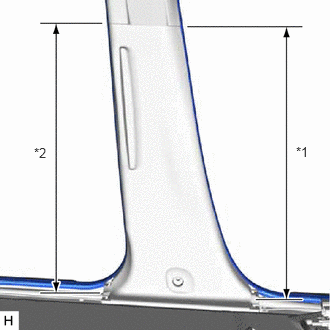
| *1 | Front Door Opening Trim Weatherstrip LH |
| *2 | Rear Door Opening Trim Weatherstrip LH |
Disconnect the front door opening trim weatherstrip LH and rear door opening trim weatherstrip LH in the range shown in the illustration.
|
|
Place Hands Here |
|
|
Remove in this Direction |
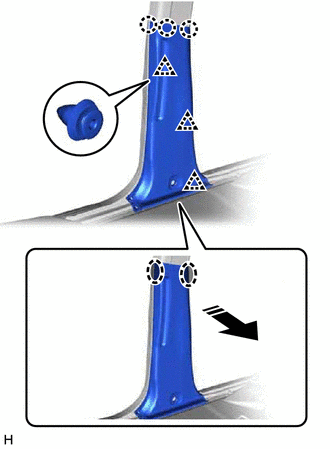
Place your hands at the position shown in the illustration and pull as shown to detach the claw and clip and remove the lower center pillar garnish LH.
62413A
14.REMOVE LOWER CENTER PILLAR GARNISH RH
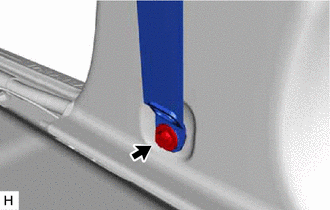
Remove the bolt and disconnect the front seat outer belt assembly RH.
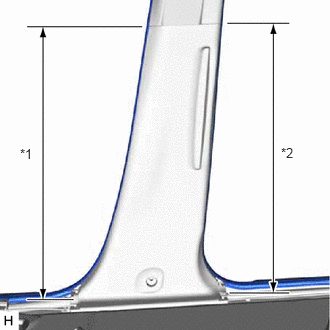
| *1 | Front Door Opening Trim Weatherstrip RH |
| *2 | Rear Door Opening Trim Weatherstrip RH |
Disconnect the front door opening trim weatherstrip RH and rear door opening trim weatherstrip RH in the range shown in the illustration.
|
|
Place Hands Here |
|
|
Remove in this Direction |
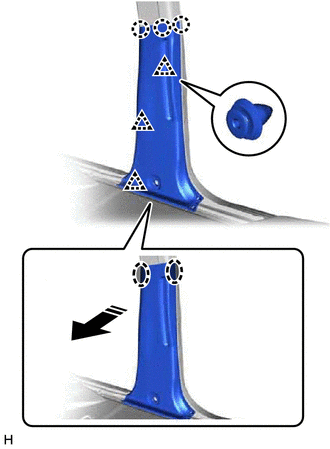
Place your hands at the position shown in the illustration and pull as shown to detach the claw and clip and remove the lower center pillar garnish RH.
73178A
15.REMOVE SEAT BELT ANCHOR COVER CAP
- HINT:
-
Use the same procedure for both seat belt anchor cover caps.
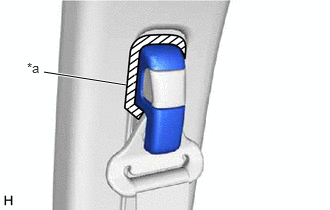
| *a | Protective Tape |
Put protective tape around the seat belt anchor cover cap.
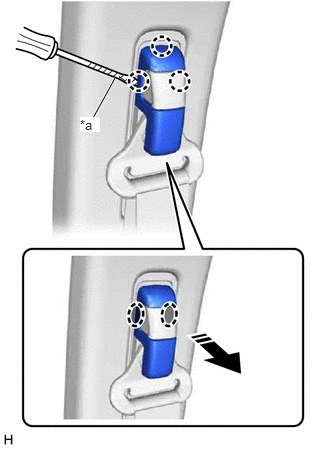
| *a | Protective Tape |
|
|
Insert Thin-bladed Screwdriver Here |
|
|
Remove in this Direction |
Insert a thin-bladed screwdriver at the position shown in the illustration and detach the claw and remove the seat belt anchor cover cap.
- HINT:
-
Tape the thin-bladed screwdriver tip before use.
62412B
16.REMOVE UPPER CENTER PILLAR GARNISH LH
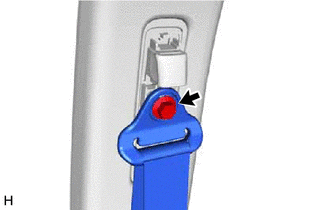
Remove the bolt and disconnect the front seat outer belt assembly LH.
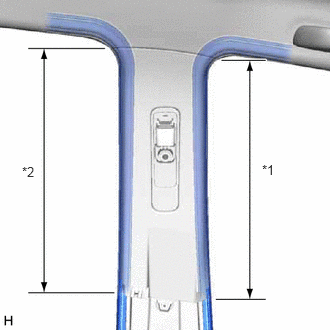
| *1 | Front Door Opening Trim Weatherstrip LH |
| *2 | Rear Door Opening Trim Weatherstrip LH |
Disconnect the front door opening trim weatherstrip LH and rear door opening trim weatherstrip LH in the range shown in the illustration.
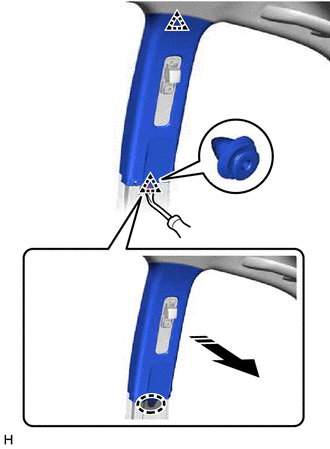
|
|
Insert Clip Remover Here |
|
|
Remove in this Direction |
Insert a clip remover at the position shown in the illustration and pull as shown to detach the clip and remove the upper center pillar garnish LH.
62411B
17.REMOVE UPPER CENTER PILLAR GARNISH RH
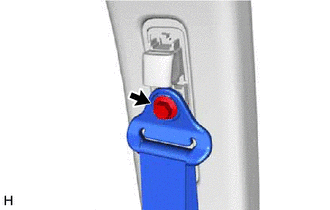
Remove the bolt and disconnect the front seat outer belt assembly RH.
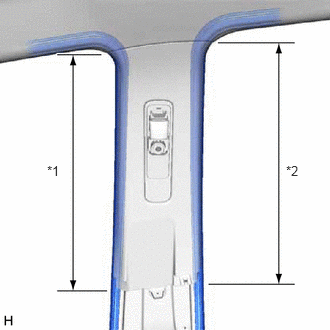
| *1 | Front Door Opening Trim Weatherstrip RH |
| *2 | Rear Door Opening Trim Weatherstrip RH |
Disconnect the front door opening trim weatherstrip RH and rear door opening trim weatherstrip RH in the range shown in the illustration.
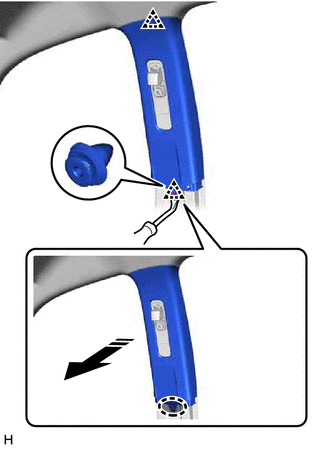
|
|
Insert Clip Remover Here |
|
|
Remove in this Direction |
Insert a clip remover at the position shown in the illustration and pull as shown to detach the clip and remove the upper center pillar garnish RH.
67935
18.REMOVE BACK DOOR SCUFF PLATE
Put protective tape around the back door scuff plate.
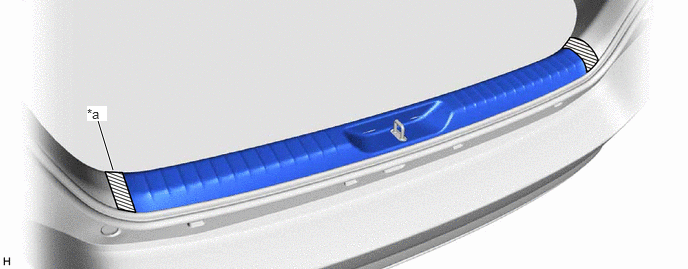
| *a | Protective Tape | - | - |
Place your hands at the position shown in the illustration and pull as shown to detach the claw and clip and remove the back door scuff plate.
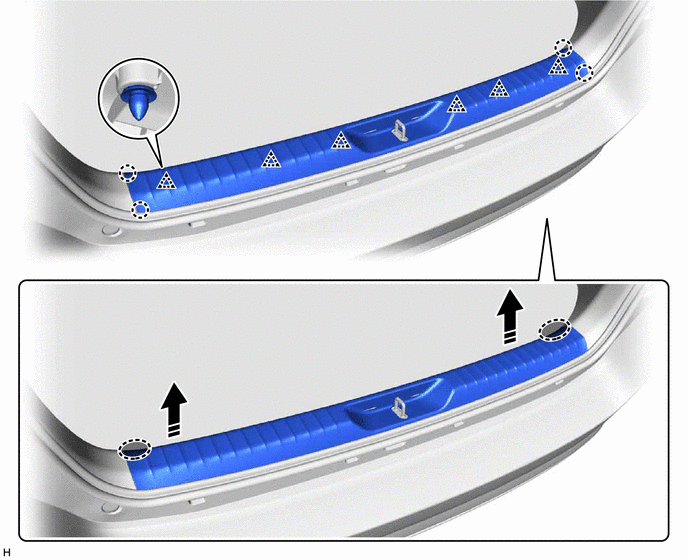
|
|
Place Hands Here |
|
Remove in this Direction |
73233A
19.REMOVE REAR NO. 1 SEAT OUTER LAP BELT ANCHOR COVER
- HINT:
-
Use the same procedure for both rear No. 1 seat outer lap belt anchor covers.
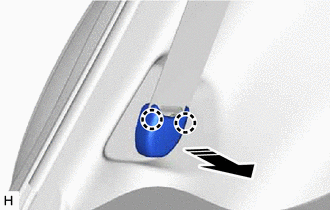
|
|
Remove in this Direction |
Detach the claw and remove the rear No. 1 seat outer lap belt anchor cover as shown in the illustration.
73233B
20.REMOVE REAR NO. 2 SEAT OUTER LAP BELT ANCHOR COVER
- HINT:
-
Use the same procedure for both rear No. 2 seat outer lap belt anchor covers.
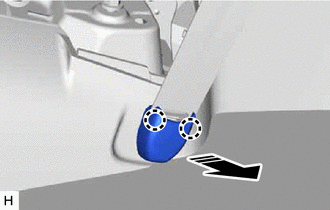
|
|
Remove in this Direction |
Detach the claw and remove the rear No. 2 seat outer lap belt anchor cover as shown in the illustration.
62512
21.REMOVE QUARTER INSIDE TRIM BOARD LH
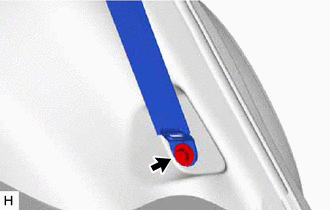
Remove the bolt and disconnect the rear No. 1 seat outer belt assembly LH.
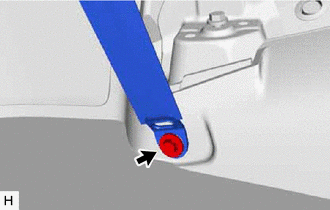
Remove the bolt and disconnect the rear No. 2 seat outer belt assembly LH.
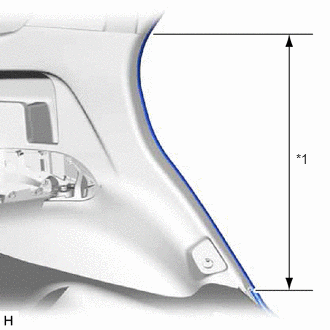
| *1 | Rear Door Opening Trim Weatherstrip LH |
Disconnect the rear door opening trim weatherstrip LH in the range shown in the illustration.
|
|
Place Hands Here |
|
|
Remove in this Direction |
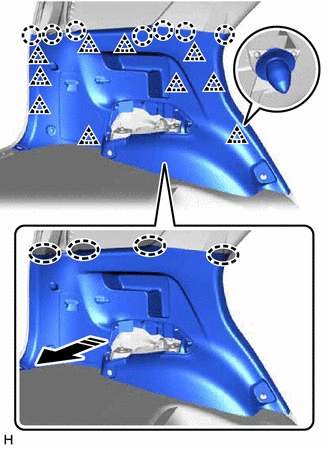
Place your hands at the position shown in the illustration and pull as shown to detach the claw and clip and remove the quarter inside trim board LH.
62511
22.REMOVE QUARTER INSIDE TRIM BOARD RH
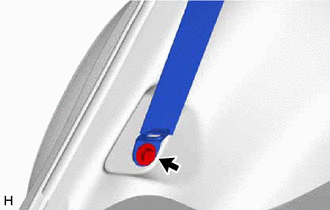
Remove the bolt and disconnect the rear No. 1 seat outer belt assembly RH.
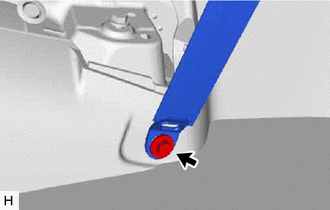
Remove the bolt and disconnect the rear No. 2 seat outer belt assembly RH.
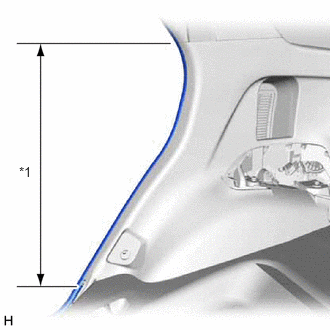
| *1 | Rear Door Opening Trim Weatherstrip RH |
Disconnect the rear door opening trim weatherstrip RH in the range shown in the illustration.
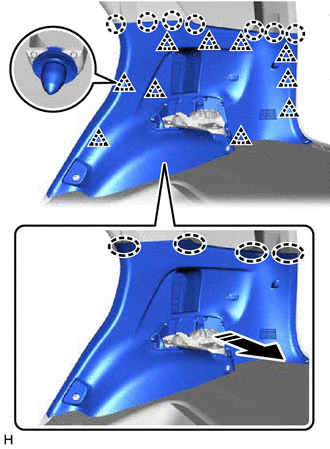
|
|
Place Hands Here |
|
|
Remove in this Direction |
Place your hands at the position shown in the illustration and pull as shown to detach the claw and clip.
Disconnect the connector and remove the quarter inside trim board RH.
73178B
23.REMOVE SEAT BELT ANCHOR COVER CAP
- HINT:
-
Use the same procedure for both seat belt anchor cover caps.
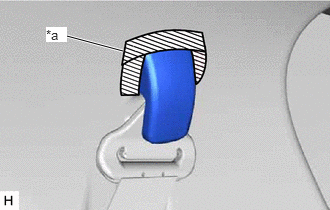
| *a | Protective Tape |
Put protective tape around the seat belt anchor cover cap.
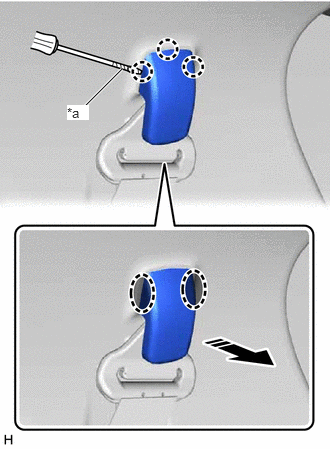
| *a | Protective Tape |
|
|
Insert Thin-bladed Screwdriver Here |
|
|
Remove in this Direction |
Insert a thin-bladed screwdriver at the position shown in the illustration and detach the claw and remove the seat belt anchor cover cap.
- HINT:
-
Tape the thin-bladed screwdriver tip before use.
62639A
24.REMOVE QUARTER PILLAR GARNISH LH
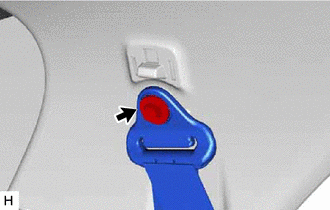
Remove the bolt and disconnect the rear No. 1 seat outer belt assembly LH.
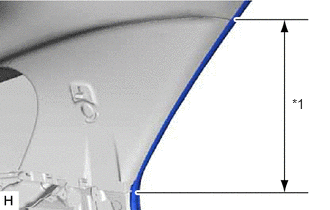
| *1 | Rear Door Opening Trim Weatherstrip LH |
Disconnect the rear door opening trim weatherstrip LH in the range shown in the illustration.
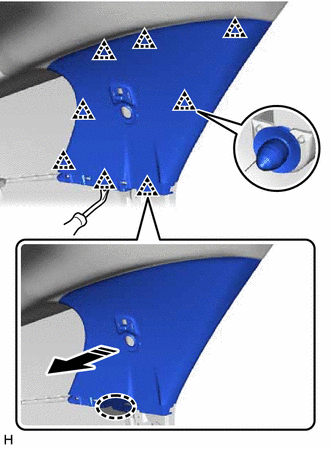
|
|
Insert Clip Remover Here |
|
|
Remove in this Direction |
Insert a clip remover at the position shown in the illustration and pull as shown to detach the clip and remove the quarter pillar garnish LH.
62638A
25.REMOVE QUARTER PILLAR GARNISH RH
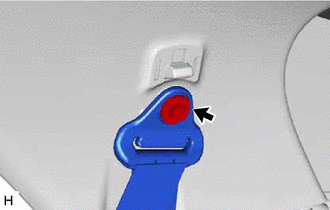
Remove the bolt and disconnect the rear No. 1 seat outer belt assembly RH.
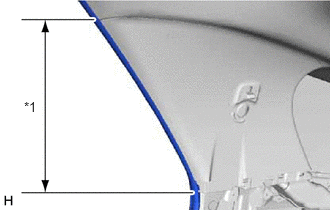
| *1 | Rear Door Opening Trim Weatherstrip RH |
Disconnect the rear door opening trim weatherstrip RH in the range shown in the illustration.
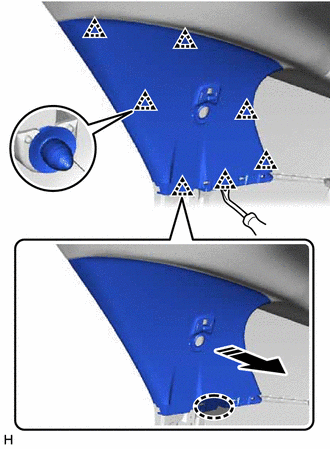
|
|
Insert Clip Remover Here |
|
|
Remove in this Direction |
Insert a clip remover at the position shown in the illustration and pull as shown to detach the clip and remove the quarter pillar garnish RH.
73178B
26.REMOVE SEAT BELT ANCHOR COVER CAP
- HINT:
-
Use the same procedure for both seat belt anchor cover caps.
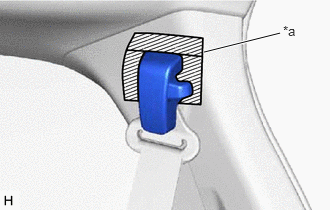
| *a | Protective Tape |
Put protective tape around the seat belt anchor cover cap.
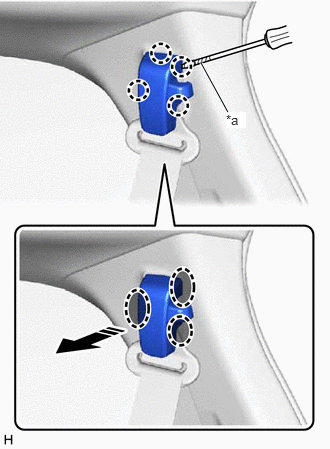
| *a | Protective Tape |
|
|
Insert Thin-bladed Screwdriver Here |
|
|
Remove in this Direction |
Insert a thin-bladed screwdriver at the position shown in the illustration and detach the claw and remove the seat belt anchor cover cap.
- HINT:
-
Tape the thin-bladed screwdriver tip before use.
62472D
27.REMOVE UPPER REAR PILLAR GARNISH LH
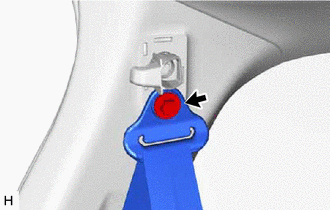
Remove the bolt and disconnect the rear No. 2 seat outer belt assembly LH.
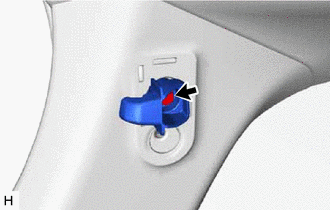
Remove the bolt and rear seat hook.
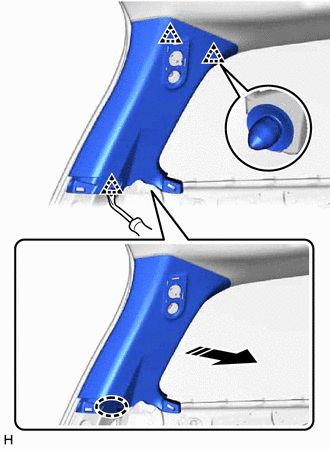
|
|
Insert Clip Remover Here |
|
|
Remove in this Direction |
Insert a clip remover at the position shown in the illustration and pull as shown to detach the clip and remove the upper rear pillar garnish LH.
62471D
28.REMOVE UPPER REAR PILLAR GARNISH RH
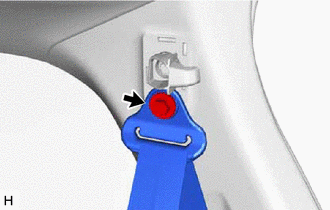
Remove the bolt and disconnect the rear No. 2 seat outer belt assembly RH.
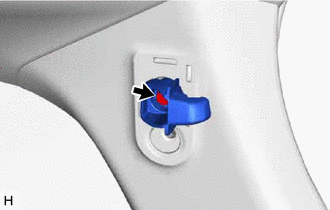
Remove the bolt and rear seat hook.
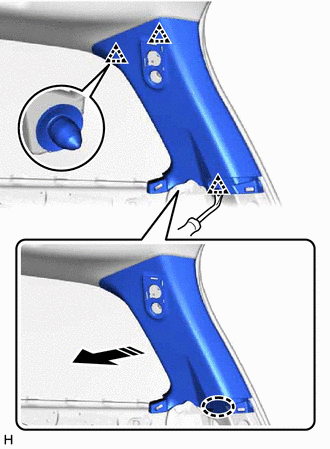
|
|
Insert Clip Remover Here |
|
|
Remove in this Direction |
Insert a clip remover at the position shown in the illustration and pull as shown to detach the clip and remove the upper rear pillar garnish RH.
81260A
29.REMOVE MAP LIGHT ASSEMBLY
81360T
30.REMOVE SPOT LIGHT ASSEMBLY
81240
31.REMOVE NO. 1 ROOM LIGHT ASSEMBLY
73139C
32.REMOVE REAR SEAT BELT COVER
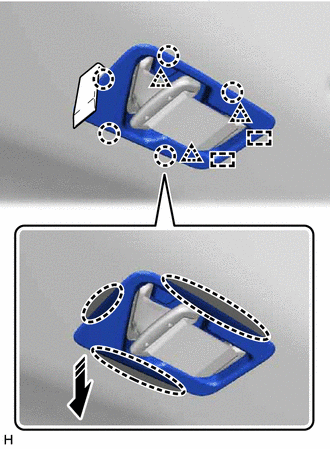
|
|
Insert Moulding Remover D Here |
|
|
Remove in this Direction |
Insert moulding remover D at the position shown in the illustration and pull as shown to detach the clip, claw and guide and remove the rear seat belt cover.
74325
33.REMOVE VISOR BRACKET COVER LH
Open the visor assembly LH.
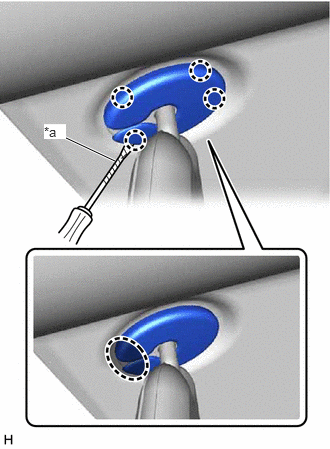
| *a | Protective Tape |
|
|
Insert Thin-bladed Screwdriver Here |
Insert a thin-bladed screwdriver at the position shown in the illustration and detach the claw and remove the visor bracket cover LH.
- HINT:
-
Tape the thin-bladed screwdriver tip before use.
74325
34.REMOVE VISOR BRACKET COVER RH
Open the visor assembly RH.
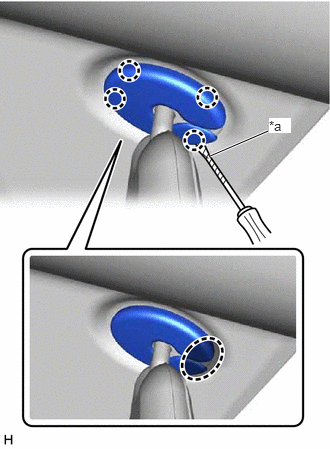
| *a | Protective Tape |
|
|
Insert Thin-bladed Screwdriver Here |
Insert a thin-bladed screwdriver at the position shown in the illustration and detach the claw and remove the visor bracket cover RH.
- HINT:
-
Tape the thin-bladed screwdriver tip before use.
74320
35.REMOVE VISOR ASSEMBLY LH
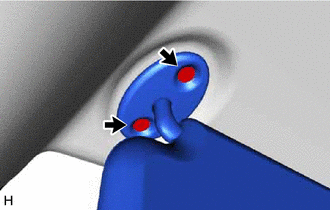
Remove the 2 screws.
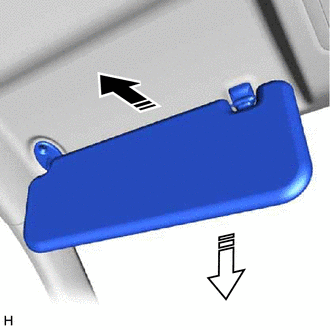
|
|
Remove in this Direction (1) |

|
Remove in this Direction (2) |
Pull in the direction (1) shown in the illustration to disconnect the visor assembly LH from the visor holder.
Pull in the direction (2) shown in the illustration to remove the visor assembly LH.
74310
36.REMOVE VISOR ASSEMBLY RH
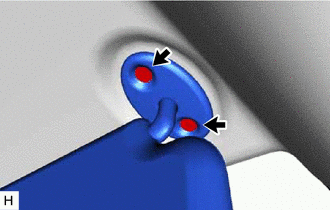
Remove the 2 screws.
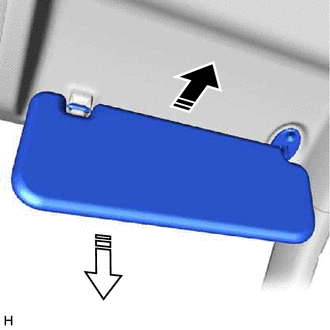
|
|
Remove in this Direction (1) |
|
|
Remove in this Direction (2) |
Pull in the direction (1) shown in the illustration to disconnect the visor assembly RH from the visor holder.
Pull in the direction (2) shown in the illustration to remove the visor assembly RH.
74348
37.REMOVE VISOR HOLDER
- HINT:
-
Use the same procedure for both visor holders.
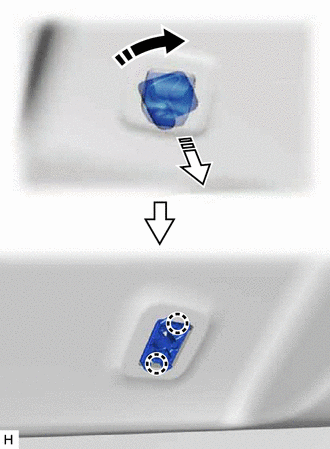
|
|
Remove in this Direction (1) |
|
|
Remove in this Direction (2) |
Turn the visor holder clockwise approximately 45° and pull it out as shown in the illustration.
Detach the claw and remove the visor holder.
74610A
38.REMOVE ASSIST GRIP SUB-ASSEMBLY
- HINT:
-
Use the same procedure for all assist grip sub-assemblies.
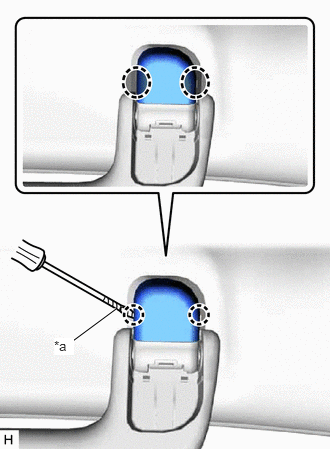
| *a | Protective Tape |
|
|
Insert Thin-bladed Screwdriver Here |
Insert a thin-bladed screwdriver at the position shown in the illustration and detach the claw and remove the assist grip cover.
- HINT:
- ·
Use the same procedure for both assist grip covers.
·Tape the thin-bladed screwdriver tip before use.
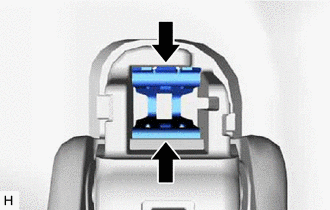
Pinch the clip with needle-nose pliers.
- HINT:
-
Use the same procedure for both clips.
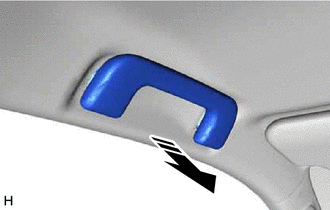
|
|
Remove in this Direction |
Hold the handle and pull as shown in the illustration to remove the assist grip sub-assembly.
Using needle-nose pliers, remove the clip.
74620B
39.REMOVE REAR ASSIST GRIP ASSEMBLY
- HINT:
-
Use the same procedure for both rear assist grip assemblies.
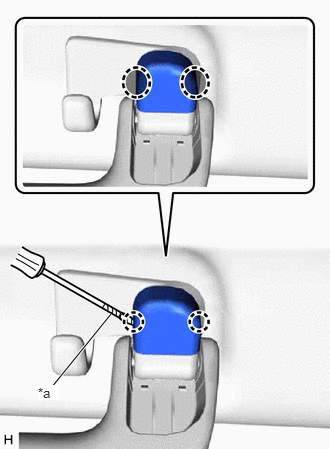
| *a | Protective Tape |
|
|
Insert Thin-bladed Screwdriver Here |
Insert a thin-bladed screwdriver at the position shown in the illustration and detach the claw and remove the assist grip cover.
- HINT:
- ·
Use the same procedure for both assist grip covers.
·Tape the thin-bladed screwdriver tip before use.
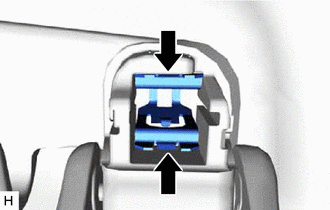
Pinch the clip with needle-nose pliers.
- HINT:
-
Use the same procedure for both clips.
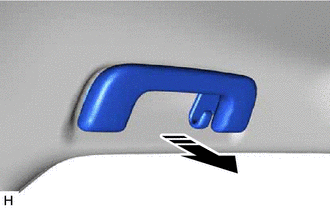
|
|
Remove in this Direction |
Hold the handle and pull as shown in the illustration to remove the rear assist grip assembly.
Using needle-nose pliers, remove the clip.
63310
40.REMOVE ROOF HEADLINING ASSEMBLY
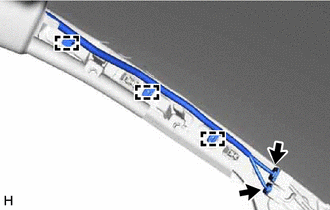
Disconnect the connector and detach the clamp from the front pillar LH.
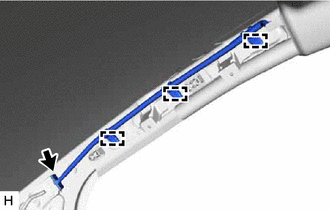
Disconnect the connector and detach the clamp from the front pillar RH.
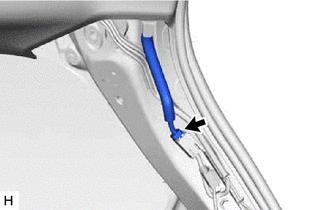
Disconnect the connector from the rear pillar RH.
Disconnect the front door opening trim weatherstrip LH and rear door opening trim weatherstrip LH in the range shown in the illustration.
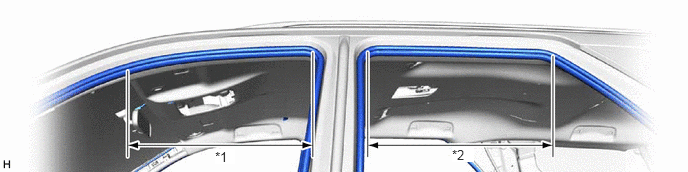
| *1 | Front Door Opening Trim Weatherstrip LH | *2 | Rear Door Opening Trim Weatherstrip LH |
Disconnect the front door opening trim weatherstrip RH and rear door opening trim weatherstrip RH in the range shown in the illustration.
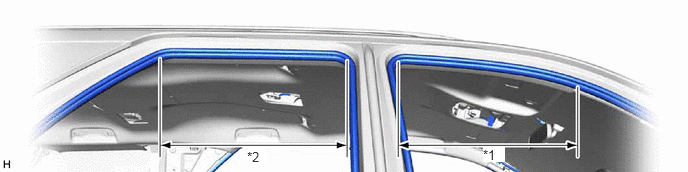
| *1 | Front Door Opening Trim Weatherstrip RH | *2 | Rear Door Opening Trim Weatherstrip RH |
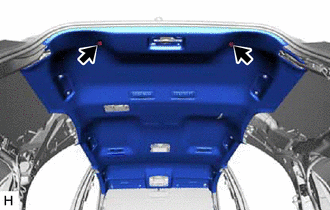
Using a clip remover, remove the 2 clips.
|
|
Remove in this Direction |
Turn the roof headlining assembly diagonally and bend slightly to remove it from the back door.
- NOTICE:
- ·
Make sure wrinkles do not form in the roof headlining assembly during removal.
·Make sure that the roof headlining assembly does not get caught on anything as it may become bent or damaged.
·Do not damage the roof headlining assembly or vehicle interior.