Viscous Heater with Magnet Clutch Circuit
Circuit diagnosis · Vehicles built Aug 2013 – Jul 2014
Versions by build date: Aug 2013 – Jul 2014 from Aug 2014
DESCRIPTION
When the heater switch assembly is pushed, the air conditioning amplifier assembly turns on the viscous heater relay and operates the viscous heater. If the viscous heater does not operate when the heater switch assembly is pushed, there may be a problem in the circuit shown below.WIRING DIAGRAM
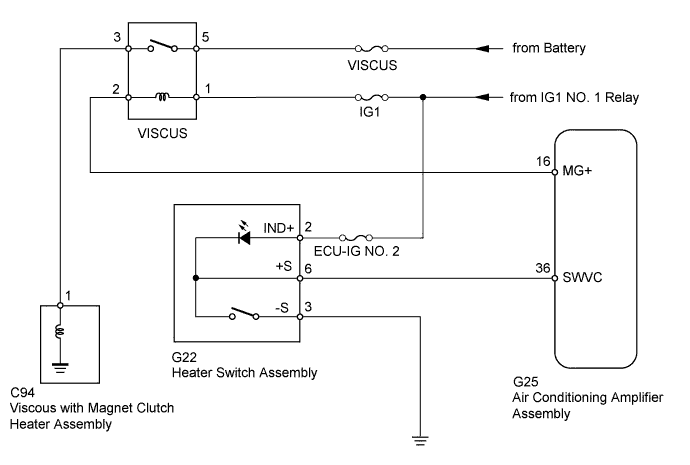

INSPECTION PROCEDURE
- NOTICE:
- Inspect the fuses for circuits related to this system before performing the following inspection procedure.
| 1. READ VALUE USING INTELLIGENT TESTER (HEATER SWITCH) |

Use the Data List to check if the heater switch assembly is functioning properly (Click here).
Air Conditioner Tester Display
Measurement Item/Range
Normal Condition
Diagnostic Note
IDLE UP/PWR HEAT Switch
Heater switch assembly / ON or OFF
ON: Heater switch assembly on
OFF: Heater switch assembly off
-
- OK:
- The display is as specified in the normal condition column.
|
|
||||

| OK | ||
 |
||
| ||
| 2. INSPECT HEATER SWITCH ASSEMBLY |
Remove the heater switch assembly (Click here).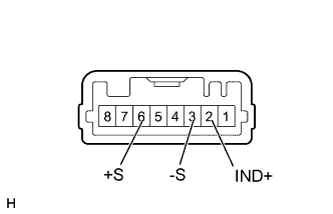
Measure the resistance according to the value(s) in the table below.
- Standard Resistance:
Tester Connection
Switch Condition
Specified Condition
6 (+S) - 3 (-S)
Heater switch assembly on
Below 1 Ω
6 (+S) - 3 (-S)
Heater switch assembly off
10 kΩ or higher
Apply battery voltage to the heater switch assembly connector and check that the heater switch assembly illuminates.
- OK:
Measurement Condition
Specified Condition
Battery positive (+) → Terminal 2 (IND+)
Battery negative (-) → Terminal 6 (+S)
LED illuminates
|
|
||||

| OK | |
 |
| 3. CHECK HARNESS AND CONNECTOR (HEATER SWITCH - AIR CONDITIONING AMPLIFIER) |
Disconnect the G22 switch connector.
Disconnect the G25 amplifier connector.
Measure the resistance according to the value(s) in the table below.
- Standard Resistance:
Tester Connection
Condition
Specified Condition
G22-6 (+S) - G25-36 (SWVC)
Always
Below 1 Ω
G22-6 (+S) - Body ground
Always
10 kΩ or higher
|
|
||||
| OK | |
|
| 4. CHECK HARNESS AND CONNECTOR (HEATER SWITCH - BATTERY AND BODY GROUND) |
Disconnect the G22 switch connector.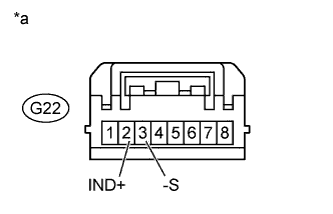
Measure the voltage according to the value(s) in the table below.
- Standard Voltage:
Tester Connection
Switch Condition
Specified Condition
G22-2 (IND+) - Body ground
Ignition switch ON
11 to 14 V
Measure the resistance according to the value(s) in the table below.
- Standard Resistance:
Tester Connection
Condition
Specified Condition
G22-3 (-S) - Body ground
Always
Below 1 Ω
| *a |
Front view of wire harness connector (to Heater Switch Assembly) |
|
|
||||
| OK | |
|
| 5. CHECK HARNESS AND CONNECTOR (ENGINE ROOM NO. 1 RELAY BLOCK, JUNCTION BLOCK - BATTERY) |
Remove the VISCUS relay from the engine room No. 1 relay block, junction block.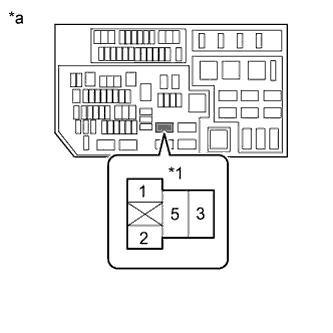
Measure the voltage according to the value(s) in the table below.
- Standard Voltage:
Tester Connection
Condition
Specified Condition
VISCUS relay terminal 5 - Body ground
Ignition switch ON
11 to 14 V
VISCUS relay terminal 2 - Body ground
Always
11 to 14 V
Text in Illustration *1
VISCUS Relay
*a
Component without relay installed
(Engine Room No. 1 Relay Block, Junction Block)
|
|
||||
| OK | |
|
| 6. INSPECT VISCOUS HEATER RELAY (VISCUS) |
Remove the VISCUS relay from the engine room No. 1 relay block, junction block.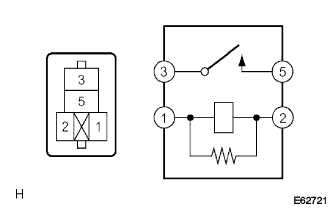
Measure the resistance according to the value(s) in the table below.
- Standard Resistance:
Tester Connection
Condition
Specified Condition
3 - 5
Battery voltage is not applied to terminals 1 and 2
10 kΩ or higher
Battery voltage is applied to terminals 1 and 2
Below 1 Ω
|
|
||||
| OK | |
|
| 7. CHECK HARNESS AND CONNECTOR (ENGINE ROOM NO. 1 RELAY BLOCK, JUNCTION BLOCK - VISCOUS WITH MAGNET CLUTCH HEATER) |
Remove the VISCUS relay from the engine room No. 1 relay block, junction block.
Disconnect the C94 heater connector.
Measure the resistance according to the value(s) in the table below.
- Standard Resistance:
Tester Connection
Condition
Specified Condition
VISCUS relay terminal 3 - C94-1
Always
Below 1 Ω
VISCUS relay terminal 3 - Body ground
Always
10 kΩ or higher
|
|
||||
| OK | |
|
| 8. CHECK HARNESS AND CONNECTOR (ENGINE ROOM NO. 1 RELAY BLOCK, JUNCTION BLOCK - AIR CONDITIONING AMPLIFIER) |
Remove the VISCUS relay from the engine room No. 1 relay block, junction block.
Disconnect the G25 amplifier connector.
Measure the resistance according to the value(s) in the table below.
- Standard Resistance:
Tester Connection
Condition
Specified Condition
VISCUS relay terminal 2 - G25-16 (MG+)
Always
Below 1 Ω
VISCUS relay terminal 2 - Body ground
Always
10 kΩ or higher
|
|
||||
| OK | |
|
| 9. INSPECT VISCOUS WITH MAGNET CLUTCH HEATER ASSEMBLY |
Remove the viscous with magnet clutch heater assembly (Click here).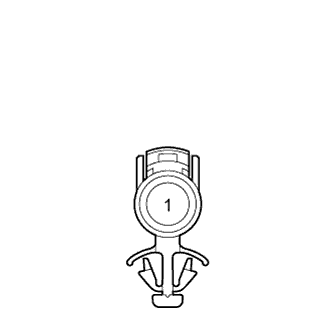
Apply battery voltage to the viscous with magnet clutch heater assembly and check the operation of the viscous with magnet clutch heater assembly.
- OK:
Measurement Condition
Specified Condition
Battery positive (+) → Terminal 1
Battery negative (-) → Body ground
Viscous with magnet clutch heater assembly operating sound can be heard, and magnetic clutch hub and rotor lock.
|
|
||||
| OK | ||
|
||
| ||