P0300 Random / Multiple Cylinder Misfire Detected
Diagnostic trouble codes · Vehicles built from Aug 2014
Also covers:
- P0301 Cylinder 1 Misfire Detected
- P0302 Cylinder 2 Misfire Detected
- P0303 Cylinder 3 Misfire Detected
- P0304 Cylinder 4 Misfire Detected
- P0305 Cylinder 5 Misfire Detected
- P0306 Cylinder 6 Misfire Detected
Versions by build date: Aug 2013 – Jul 2014 from Aug 2014
DESCRIPTION
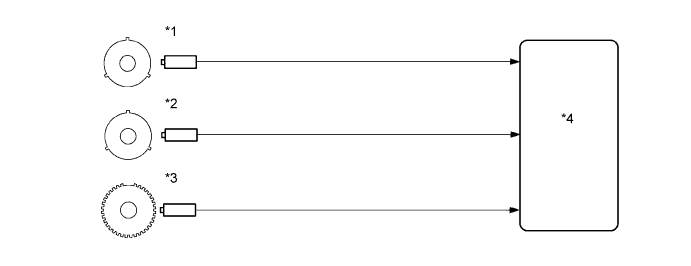

| *1 |
VVT Sensor for Intake Side |
*2 |
VVT Sensor for Exhaust Side |
| *3 |
Crankshaft Position Sensor (36-2 teeth) |
*4 |
ECM |
If the misfire count exceeds the threshold level and could cause emission deterioration, the ECM illuminates the MIL and stores a DTC.
| DTC No. |
DTC Detection Condition |
Trouble Area |
| P0300 |
Simultaneous misfiring of several cylinders occurs and one of the following conditions is detected (2 trip detection logic):
|
|
| P0301 P0302 P0303 P0304 P0305 P0306 |
Misfiring of specific cylinder occurs and one of the following conditions is detected (2 trip detection logic):
|
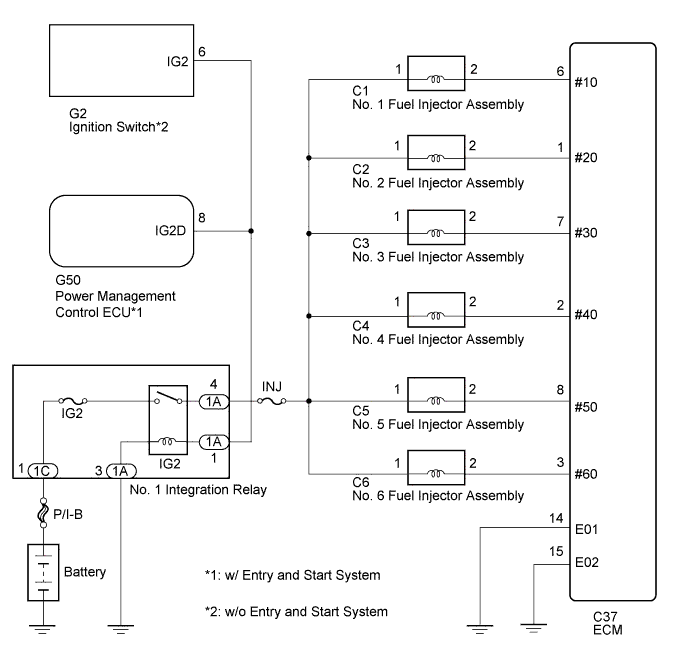
WIRING DIAGRAM
CONFIRMATION DRIVING PATTERN
- Connect the intelligent tester to the DLC3.
- Turn the ignition switch to ON.
- Turn the tester on.
- Record the DTC(s) and freeze frame data.
- Enter the following menus: Powertrain / Engine and ECT / Data List / All Data / Cylinder #1 (to #6) Misfire Count.
- Read the misfire counts of each cylinder (Cylinder #1 (to #6) Misfire Count) with the engine idling. If any misfire count is displayed, skip the following confirmation driving pattern.
- Drive the vehicle several times with the conditions, such as engine speed and engine load, as shown in Misfire RPM and Misfire Load in the Data List.
- HINT:
- In order to store misfire DTCs, it is necessary to operate the vehicle for the period of time shown in the table below, using the Misfire RPM and Misfire Load in the Data List.
Engine Speed
Duration
Idling
8 minutes or more
1000
4.5 minutes or more
2000
2.5 minutes or more
3000
1.5 minutes or more
- Enter the following menus: Powertrain / Engine and ECT / DTC / Pending.
- Check whether misfires have occurred by checking pending DTCs and freeze frame data.
- HINT:
- Do not turn the ignition switch off until the stored DTCs and freeze frame data have been recorded. When the ECM returns to normal mode (default), the stored DTCs, freeze frame data and other data will be cleared.
- Record the pending DTCs, freeze frame data and misfire counts.
- Turn the ignition switch off and wait for at least 5 seconds.
INSPECTION PROCEDURE
- HINT:
- Check the "Fuel Cut Elps Time" in the Data List or the Freeze Frame Data. If the elapsed time is over 0 seconds, then the engine speed is high (engine speed at which fuel cut occurs + 500 rpm). When this has happened, there is the possibility that the valve rocker arm will become loose and a fire could start, so check that the valve rocker arm is properly attached (Click here).
- By clearing the DTC, "Fuel Cut Elps Time" will be cleared.
- If any DTCs other than misfire DTCs are output, troubleshoot those DTCs first.
- Read freeze frame data using the intelligent tester. The ECM records vehicle and driving condition information as freeze frame data the moment a DTC is stored. When troubleshooting, freeze frame data can help determine if the vehicle was moving or stationary, if the engine was warmed up or not, if the air fuel ratio was lean or rich, and other data from the time the malfunction occurred.
- If the misfire does not recur when the vehicle is brought to the workshop, reproduce the conditions stored in the ECM as freeze frame data.
- If the misfire still cannot be reproduced even though the conditions stored in the ECM as freeze frame data have been reproduced, one of the following factors is may be a cause of the problem:
- There was an insufficient amount of fuel in the tank.
- Improper fuel is used.
- The spark plugs have been contaminated.
- After finishing repairs, check the misfire counts of the cylinders (Cylinder #1 Misfire Count to Cylinder #6 Misfire Count).
- Be sure to confirm that no misfiring cylinder DTCs are stored again by conducting the confirmation driving pattern after finishing repairs.
- For 6 cylinders engine, the ECM intentionally does not store the specific misfiring cylinder DTCs at high engine speeds. If misfires occur only at high engine speeds, only DTC P0300 is stored.
In the event of DTC P0300 being output, perform the following operations:
- Clear the DTC (Click here).
- Start the engine and conduct the confirmation driving pattern.
- Read the misfiring rates of each cylinder or the DTCs using the intelligent tester.
- Repair the cylinders that have a high misfiring rate or are indicated by the DTCs.
- After finishing repairs, conduct the confirmation driving pattern again in order to verify that DTC P0300 is not stored.
- When one of Short FT #1, Long FT #1, Short FT #2 or Long FT #2 in the freeze frame data is outside the range of +/-20%, the air fuel ratio may be Rich (-20% or less) or Lean (+20% or more).
- When the Coolant Temp in the freeze frame data is below 75°C (167°F), the misfires have occurred only while the engine is being warmed up.
- An extremely imbalanced drive wheel which causes body vibration may cause misfire DTCs to be stored.
- Check the "Fuel Cut Elps Time" in the Data List or the Freeze Frame Data. If the elapsed time is over 0 seconds, then the engine speed is high (engine speed at which fuel cut occurs + 500 rpm). When this has happened, there is the possibility that the valve rocker arm will become loose and a fire could start, so check that the valve rocker arm is properly attached (Click here).
| 1. CHECK FOR ANY OTHER DTCS OUTPUT (IN ADDITION TO MISFIRE CODES) |

Connect the intelligent tester to the DLC3.
Turn the ignition switch to ON.
Turn the tester on.
Enter the following menus: Powertrain / Engine and ECT / DTC.
Read the DTCs.
Result Result
Proceed to
DTC P0300, P0301, P0302, P0303, P0304, P0305 and/or P0306 are output
A
DTC P0300, P0301, P0302, P0303, P0304, P0305 and/or P0306 and other DTCs are output
B
- HINT:
- If any DTCs other than P0300, P0301, P0302, P0303, P0304, P0305 and/or P0306 are output, troubleshoot those DTCs first.
|
|
||||

| A | |
 |
| 2. CHECK PCV HOSE (HOSE CONNECTIONS) |
Check the PCV hose connections.
- OK:
- PCV hose is connected correctly and is not damaged.
|
|
||||
| OK | |
|
| 3. READ VALUE USING INTELLIGENT TESTER (MISFIRE RPM AND MISFIRE LOAD) |
Connect the intelligent tester to the DLC3.
Turn the ignition switch to ON.
Turn the tester on.
Enter the following menus: Powertrain / Engine and ECT / Data List / All Data / Misfire RPM and Misfire Load.
Read and note the Misfire RPM and Misfire Load values.
- HINT:
- The Misfire RPM and Misfire Load values indicate the vehicle conditions under which the misfire occurred.
| NEXT | |
|
| 4. READ VALUE USING INTELLIGENT TESTER (CATALYST OT MF F/C) |
Connect the intelligent tester to the DLC3.
Turn the ignition switch to ON.
Turn the tester on.
Enter the following menus: Powertrain / Engine and ECT / Data List / All Data / Catalyst OT MF F/C.
Read the value displayed on the tester.
Result Data List
Tester Display
Proceed to
Catalyst OT MF F/C
Avail
A
Not Avl
B
|
|
||||

| A | |
|
| 5. PERFORM ACTIVE TEST USING INTELLIGENT TESTER |
Connect the intelligent tester to the DLC3.
Turn the ignition switch to ON.
Turn the tester on.
Enter the following menus: Powertrain / Engine and ECT / Active Test / Prohibit the Catalyst OT Misfire prevent F/C.
Perform the Active Test.
- NOTICE:
- When performing the Active Test, make sure that the vehicle is stopped and either idling or being revved at 3000 rpm or less.
| NEXT | |
|
| 6. READ VALUE USING INTELLIGENT TESTER (CYLINDER #1 (TO #6) MISFIRE COUNT) |
Connect the intelligent tester to the DLC3.
Turn the ignition switch to ON.
Turn the tester on (Step "A").
Enter the following menus: Powertrain / Engine and ECT / Data List / All Data / Cylinder #1 (to #6) Misfire Count (Step "B").
Read each value for Cylinder #1 (to #6) Misfire Count displayed on the tester. If no misfire counts occur in any cylinders, perform the following procedure:
Start the engine and let it idle.
Move the shift lever to D.
Check the Cylinder #1 (to #6) Misfire Count.
If misfire counts are still not displayed, perform steps ("A") and ("B").
Drive the vehicle while satisfying the Misfire RPM and Misfire Load values noted in the "Read Value Using Intelligent Tester (Misfire RPM and Misfire Load)" procedure above.
Read Cylinder #1 (to #6) Misfire Count or the DTCs displayed on the tester.
Result Misfire Count
Proceed to
Most misfires occur in only 1 or 2 cylinders
A
3 cylinders or more have equal misfire counts
B
- HINT:
- If it is difficult to reproduce misfires for each cylinder, check the Data List item called Misfire Margin. Try to find vehicle driving conditions that lower the Misfire Margin value. Values above 30% are considered normal.
- If the Coolant Temp value of the freeze frame data is below 75°C (167°F), the misfire may be detected only when the engine is cold.
- If the Engine Run Time value of the freeze frame data is below 120 seconds, the misfire may be detected immediately after the engine is started.
- If it is difficult to reproduce misfires for each cylinder, check the Data List item called Misfire Margin. Try to find vehicle driving conditions that lower the Misfire Margin value. Values above 30% are considered normal.
|
|
||||
| A | |
|
| 7. CHECK SPARK PLUG |
Remove the ignition coil assembly and the spark plug of the misfiring cylinder.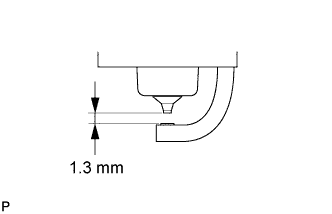
Measure the spark plug electrode gap.
- Maximum gap:
- 1.3 mm (0.0512 in.)
Check the electrode for carbon deposits.
Recommended Spark Plug Manufacturer
Product
DENSO
SK20HR11
- NOTICE:
- If the electrode gap is larger than the maximum, replace the spark plug. Do not adjust the electrode gap.
Reinstall the ignition coil assembly and spark plug.
|
|
||||
| OK | |
|
| 8. CHECK FOR SPARK (SPARK TEST) |
Perform a spark test.
- CAUTION:
- During the test, disconnect all fuel injector assembly connectors.
- NOTICE:
- Do not crank the engine for more than 2 seconds.
Remove the ignition coil assembly from the cylinder head.
Install the spark plug to the ignition coil assembly.
Disconnect the 6 fuel injector assembly connectors.
Touch the spark plug to the cylinder head.
Crank the engine for less than 2 seconds and check for a spark.
- OK:
- Spark jumps across electrode gap.
Reconnect the 6 fuel injector assembly connectors.
Reinstall the ignition coil assembly.
|
|
||||
| OK | |
|
| 9. CHECK CYLINDER COMPRESSION PRESSURE OF MISFIRING CYLINDER |
Measure the cylinder compression pressure of the misfiring cylinder (Click here).
|
|
||||
| OK | |
|
| 10. CHECK FUEL INJECTOR ASSEMBLY (POWER SOURCE) |
Disconnect the fuel injector assembly connectors.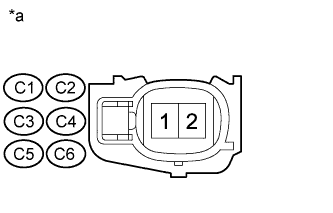
Turn the ignition switch to ON.
Measure the voltage according to the value(s) in the table below.
- Standard Voltage:
Tester Connection
Switch Condition
Specified Condition
C1-1 - Body ground
Ignition switch ON
11 to 14 V
C2-1 - Body ground
Ignition switch ON
11 to 14 V
C3-1 - Body ground
Ignition switch ON
11 to 14 V
C4-1 - Body ground
Ignition switch ON
11 to 14 V
C5-1 - Body ground
Ignition switch ON
11 to 14 V
C6-1 - Body ground
Ignition switch ON
11 to 14 V
Text in Illustration *a
Front view of wire harness connector
(to Fuel Injector Assembly)
Reconnect the fuel injector assembly connectors.
|
|
||||
| OK | |
|
| 11. CHECK HARNESS AND CONNECTOR (FUEL INJECTOR ASSEMBLY - ECM) |
Disconnect the fuel injector assembly connectors.
Disconnect the ECM connector.
Measure the resistance according to the value(s) in the table below.
- Standard Resistance (Check for Open):
Tester Connection
Condition
Specified Condition
C1-2 - C37-6 (#10)
Always
Below 1 Ω
C2-2 - C37-1 (#20)
Always
Below 1 Ω
C3-2 - C37-7 (#30)
Always
Below 1 Ω
C4-2 - C37-2 (#40)
Always
Below 1 Ω
C5-2 - C37-8 (#50)
Always
Below 1 Ω
C6-2 - C37-3 (#60)
Always
Below 1 Ω
- Standard Resistance (Check for Short):
Tester Connection
Condition
Specified Condition
C1-2 or C37-6 (#10) - Body ground
Always
10 kΩ or higher
C2-2 or C37-1 (#20) - Body ground
Always
10 kΩ or higher
C3-2 or C37-7 (#30) - Body ground
Always
10 kΩ or higher
C4-2 or C37-2 (#40) - Body ground
Always
10 kΩ or higher
C5-2 or C37-8 (#50) - Body ground
Always
10 kΩ or higher
C6-2 or C37-3 (#60) - Body ground
Always
10 kΩ or higher
Reconnect the fuel injector assembly connectors.
Reconnect the ECM connector.
|
|
||||
| OK | |
|
| 12. INSPECT ECM TERMINAL OF MISFIRING CYLINDER (#10, #20, #30, #40, #50 AND/OR #60 VOLTAGE) |
Turn the ignition switch to ON.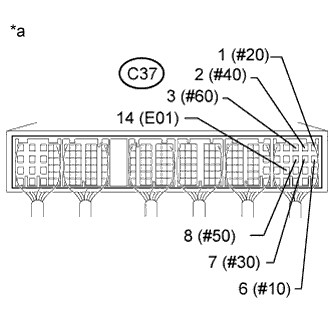
Measure the voltage according to the value(s) in the table below.
- Standard Voltage:
Tester Connection
Switch Condition
Specified Condition
C37-6 (#10) - C37-14 (E01)
Ignition switch ON
11 to 14 V
C37-1 (#20) - C37-14 (E01)
Ignition switch ON
11 to 14 V
C37-7 (#30) - C37-14 (E01)
Ignition switch ON
11 to 14 V
C37-2 (#40) - C37-14 (E01)
Ignition switch ON
11 to 14 V
C37-8 (#50) - C37-14 (E01)
Ignition switch ON
11 to 14 V
C37-3 (#60) - C37-14 (E01)
Ignition switch ON
11 to 14 V
Text in Illustration *a
Component with harness connected
(ECM)
Reconnect the ECM connector.
|
|
||||
| OK | |
|
| 13. CHECK FUEL INJECTOR ASSEMBLY OF MISFIRING CYLINDER |
Check the fuel injector assembly injection (whether fuel volume is high or low, and whether injection pattern is poor) (Click here).
|
|
||||
| OK | |
|
| 14. INSPECT INTAKE SYSTEM |
Check the intake system for vacuum leaks (Click here).
- OK:
- No leaks in intake system.
|
|
||||
| OK | |
|
| 15. CHECK FUEL PRESSURE |
Check the fuel pressure (Click here).
|
|
||||
| OK | |
|
| 16. READ VALUE USING INTELLIGENT TESTER (COOLANT TEMP) |
Connect the intelligent tester to the DLC3.
Turn the ignition switch to ON.
Turn the tester on.
Enter the following menus: Powertrain / Engine and ECT / Data List / All Data / Coolant Temp.
Read the Coolant Temp twice when the engine is both cold and warmed up.
- Standard:
- With cold engine:
- Same as ambient temperature.
- With warm engine:
- Between 75°C and 95°C (167°F and 203°F).
|
|
||||
| OK | |
|
| 17. INSPECT MASS AIR FLOW METER |
Inspect the mass air flow meter (Click here).
|
|
||||
| OK | |
|
| 18. CHECK VALVE TIMING |
Check the valve timing (Click here).
|
|
||||
| OK | ||
 |
||
| ||
| 19. CHECK INTAKE SYSTEM |
Check the intake system for vacuum leaks (Click here).
- OK:
- No leaks in intake system.
|
|
||||
| OK | |
|
| 20. CHECK FUEL PRESSURE |
Check the fuel pressure (Click here).
|
|
||||
| OK | |
|
| 21. READ VALUE USING INTELLIGENT TESTER (COOLANT TEMP) |
Connect the intelligent tester to the DLC3.
Turn the ignition switch to ON.
Turn the tester on.
Enter the following menus: Powertrain / Engine and ECT / Data List / All Data / Coolant Temp.
Read the Coolant Temp twice when the engine is both cold and warmed up.
- Standard:
- With cold engine:
- Same as ambient air temperature.
- With warm engine:
- Between 75°C and 95°C (167°F and 203°F).
|
|
||||
| OK | |
|
| 22. INSPECT MASS AIR FLOW METER |
Inspect the mass air flow meter (Click here).
|
|
||||
| OK | |
|
| 23. CHECK VALVE TIMING |
Check the valve timing (Click here).
|
|
||||
| OK | |
|
| 24. CHECK SPARK PLUG |
Remove the ignition coil assembly and the spark plug of the misfiring cylinder.
Measure the spark plug electrode gap.
- Maximum gap:
- 1.3 mm (0.0512 in.)
Check the electrode for carbon deposits.
Recommended Spark Plug Manufacturer
Product
DENSO
SK20HR11
- NOTICE:
- If the electrode gap is larger than the maximum, replace the spark plug. Do not adjust the electrode gap.
Reinstall the ignition coil assembly and spark plug.
|
|
||||
| OK | |
|
| 25. CHECK FOR SPARK (SPARK TEST) |
Perform a spark test.
- CAUTION:
- During the test, disconnect all fuel injector assembly connectors.
- NOTICE:
- Do not crank the engine for more than 2 seconds.
Remove the ignition coil assembly from the cylinder head.
Install the spark plug to the ignition coil assembly.
Disconnect the 6 fuel injector assembly connectors.
Touch the spark plug to the cylinder head.
Crank the engine for less than 2 seconds and check for a spark.
- OK:
- Spark jumps across electrode gap.
Reconnect the 6 fuel injector assembly connectors.
Reinstall the ignition coil assembly.
|
|
||||
| OK | |
|
| 26. CHECK CYLINDER COMPRESSION PRESSURE OF MISFIRING CYLINDER |
Measure the cylinder compression pressure of the misfiring cylinder (Click here).
|
|
||||
| OK | |
|
| 27. CHECK FUEL INJECTOR ASSEMBLY (POWER SOURCE) |
Disconnect the fuel injector assembly connectors.
Turn the ignition switch to ON.
Measure the voltage according to the value(s) in the table below.
- Standard Voltage:
Tester Connection
Switch Condition
Specified Condition
C1-1 - Body ground
Ignition switch ON
11 to 14 V
C2-1 - Body ground
Ignition switch ON
11 to 14 V
C3-1 - Body ground
Ignition switch ON
11 to 14 V
C4-1 - Body ground
Ignition switch ON
11 to 14 V
C5-1 - Body ground
Ignition switch ON
11 to 14 V
C6-1 - Body ground
Ignition switch ON
11 to 14 V
Text in Illustration *a
Front view of wire harness connector
(to Fuel Injector Assembly)
Reconnect the fuel injector assembly connectors.
|
|
||||
| OK | |
|
| 28. CHECK HARNESS AND CONNECTOR (FUEL INJECTOR ASSEMBLY - ECM) |
Disconnect the fuel injector assembly connectors.
Disconnect the ECM connector.
Measure the resistance according to the value(s) in the table below.
- Standard Resistance (Check for Open):
Tester Connection
Condition
Specified Condition
C1-2 - C37-6 (#10)
Always
Below 1 Ω
C2-2 - C37-1 (#20)
Always
Below 1 Ω
C3-2 - C37-7 (#30)
Always
Below 1 Ω
C4-2 - C37-2 (#40)
Always
Below 1 Ω
C5-2 - C37-8 (#50)
Always
Below 1 Ω
C6-2 - C37-3 (#60)
Always
Below 1 Ω
- Standard Resistance (Check for Short):
Tester Connection
Condition
Specified Condition
C1-2 or C37-6 (#10) - Body ground
Always
10 kΩ or higher
C2-2 or C37-1 (#20) - Body ground
Always
10 kΩ or higher
C3-2 or C37-7 (#30) - Body ground
Always
10 kΩ or higher
C4-2 or C37-2 (#40) - Body ground
Always
10 kΩ or higher
C5-2 or C37-8 (#50) - Body ground
Always
10 kΩ or higher
C6-2 or C37-3 (#60) - Body ground
Always
10 kΩ or higher
Reconnect the fuel injector assembly connectors.
Reconnect the ECM connector.
|
|
||||
| OK | |
|
| 29. INSPECT ECM TERMINAL OF MISFIRING CYLINDER (#10, #20, #30, #40, #50 AND/OR #60 VOLTAGE) |
Turn the ignition switch to ON.
Measure the voltage according to the value(s) in the table below.
- Standard Voltage:
Tester Connection
Switch Condition
Specified Condition
C37-6 (#10) - C37-14 (E01)
Ignition switch ON
11 to 14 V
C37-1 (#20) - C37-14 (E01)
Ignition switch ON
11 to 14 V
C37-7 (#30) - C37-14 (E01)
Ignition switch ON
11 to 14 V
C37-2 (#40) - C37-14 (E01)
Ignition switch ON
11 to 14 V
C37-8 (#50) - C37-14 (E01)
Ignition switch ON
11 to 14 V
C37-3 (#60) - C37-14 (E01)
Ignition switch ON
11 to 14 V
Text in Illustration *a
Component with harness connected
(ECM)
Reconnect the ECM connector.
|
|
||||
| OK | |
|
| 30. CHECK FUEL INJECTOR ASSEMBLY OF MISFIRING CYLINDER |
Check the fuel injector assembly injection (whether fuel volume is high or low, and whether injection pattern is poor) (Click here).
|
|
||||
| OK | ||
|
||
| ||
| 31. CHANGE TO KNOWN GOOD SPARK PLUG AND CHECK SPARK OF MISFIRING CYLINDER |
Change the installed spark plug to a known good spark plug.
Perform a spark test.
- CAUTION:
- During the test, disconnect all fuel injector assembly connectors.
- NOTICE:
- Do not crank the engine for more than 2 seconds.
Remove the ignition coil assembly from the cylinder head.
Install the spark plug to the ignition coil assembly.
Disconnect the 6 fuel injector assembly connectors.
Touch the spark plug to the cylinder head.
Crank the engine for less than 2 seconds and check for a spark.
- OK:
- Spark jumps across electrode gap.
Reconnect the 6 fuel injector assembly connectors.
Reinstall the ignition coil assembly.
|
|
||||
| OK | ||
|
||
| ||
| 32. CHANGE TO KNOWN GOOD IGNITION COIL ASSEMBLY AND CHECK SPARK OF MISFIRING CYLINDER |
Change the installed ignition coil assembly to a known good ignition coil assembly.
Perform a spark test.
- CAUTION:
- During the test, disconnect all fuel injector assembly connectors.
- NOTICE:
- Do not crank the engine for more than 2 seconds.
Remove the ignition coil assembly from the cylinder head.
Install the spark plug onto the ignition coil assembly.
Disconnect the 6 fuel injector assembly connectors.
Touch the spark plug to the cylinder head.
Crank the engine for less than 2 seconds and check for spark.
- OK:
- Spark jumps across electrode gap.
Reconnect the 6 fuel injector assembly connectors.
Reinstall the ignition coil assembly.
|
|
||||
| OK | ||
|
||
| ||
| 33. CHECK FUEL LINE |
Check the fuel lines for leaks or blockage.
Result Result
Proceed to
NG
A
OK (for Single Tank Type)
B
OK (for Double Tank Type)
C
|
|
||||
|
|
||||
| A | ||
|
||
| ||