INSTALLATION
Removal / installation · Vehicles built from Aug 2014
Versions by build date: Aug 2013 – Jul 2014 from Aug 2014
- NOTICE:
- When replacing the injectors (including shuffling the injectors between the cylinders), common rail or cylinder head, it is necessary to replace the injection pipes with new ones.
- When replacing the fuel supply pump, common rail, cylinder block, cylinder head, cylinder head gasket or timing gear case, it is necessary to replace the fuel inlet pipe with a new one.
- After removing the injection pipes, clean them with a brush and compressed air.
- When replacing the injectors (including shuffling the injectors between the cylinders), common rail or cylinder head, it is necessary to replace the injection pipes with new ones.
| 1. INSTALL ENGINE WATER PUMP ASSEMBLY |

Temporarily install a new gasket and the engine water pump assembly without cover to the water pump cover with the bolt.
Temporarily install a new gasket and the engine water pump assembly to the cylinder block sub-assembly with the 2 nuts and 5 bolts.
Fully tighten the 5 bolts A and the 2 nuts.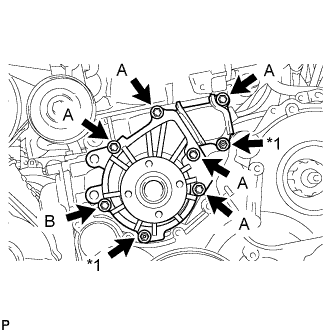

- Torque:
- 13 N*m{ 133 kgf*cm , 10 ft.*lbf }
Text in Illustration *1
Nut
Fully tighten the bolt B.
- Torque:
- 9.1 N*m{ 93 kgf*cm , 81 in.*lbf }
| 2. INSTALL CYLINDER BLOCK INSULATOR |
Install the cylinder block insulator to the cylinder head.
| 3. INSTALL NO. 2 TIMING BELT COVER |
Apply seal packing (FIPG) to the specified areas shown in the illustration.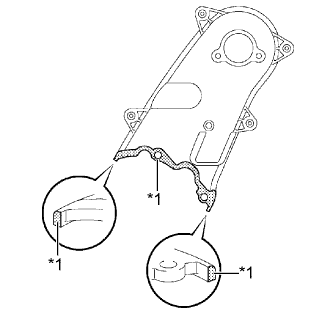
- Seal packing:
- Toyota Genuine Seal Packing Black, Three Bond 1207B or equivalent
Text in Illustration *1
Seal Packing
- NOTICE:
- After applying seal packing, install the No. 2 timing belt cover within 3 minutes and tighten the bolts and nut within 15 minutes.
Install the No. 2 timing belt cover with the 4 bolts and nut.
- Torque:
- 10 N*m{ 102 kgf*cm , 7 ft.*lbf }
| 4. INSTALL NO. 1 TIMING BELT IDLER SUB-ASSEMBLY |
Install the timing belt cover and 6 washers with the 6 bolts.
- Torque:
- 6.0 N*m{ 61 kgf*cm , 53 in.*lbf }
| 5. INSTALL CAMSHAFT TIMING PULLEY |
Install the camshaft timing pulley.
Install the bolt of the camshaft timing pulley while holding the camshaft with a wrench.
- Torque:
- 98 N*m{ 1000 kgf*cm , 72 ft.*lbf }
| 6. INSTALL TIMING BELT |
Check that the timing marks are aligned as shown in the illustration.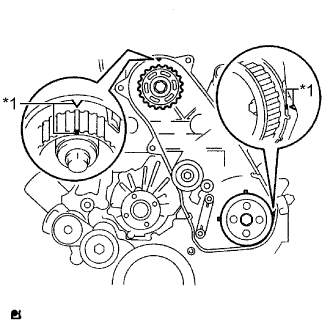
Text in Illustration *1
Timing Mark
- HINT:
- If reusing the timing belt, align the points marked during removal, and install the belt with the arrow pointing in the direction of crankshaft revolution.
- NOTICE:
- Make sure that the engine is cold.
- When turning the crankshaft, the valve heads will hit against the piston. Do not turn the crankshaft more than necessary.
- Make sure that the engine is cold.
Install the timing belt to the pump drive shaft pulley, camshaft timing pulley and No. 1 timing belt idler in sequence.
Place the tensioner upright. Then set a press on the top of the tensioner.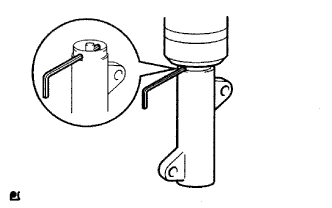
- NOTICE:
- Do not scratch or deform the rod end.
- Press in the tensioner rod.
- Protect the tip of the push rod with a cloth in order to prevent damage.
- Do not scratch or deform the rod end.
Using the press, slowly push in the push rod using 981 to 9807 N (100 to 1000 kgf, 220 to 2205 lbf) of force.
- NOTICE:
- Do not apply a load of over 9807 N (1000 kgf, 2205 lbf) to the push rod.
Align the holes of the push rod and housing. Then pass a 1.5 mm hexagon wrench through the holes to fix the push rod in place.
Temporarily install the timing belt tensioner with the 2 bolts while pushing the idler pulley toward the timing belt.
Tighten the 2 bolts.
- Torque:
- 13 N*m{ 133 kgf*cm , 10 ft.*lbf }
- NOTICE:
- Uniformly tighten the 2 bolts.
Remove the 1.5 mm hexagon wrench from the tensioner.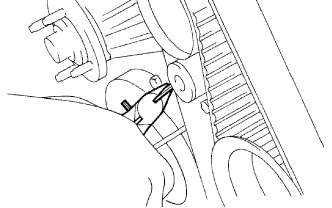
Turn the crankshaft clockwise 720° and check that the timing marks are aligned as shown in the illustration.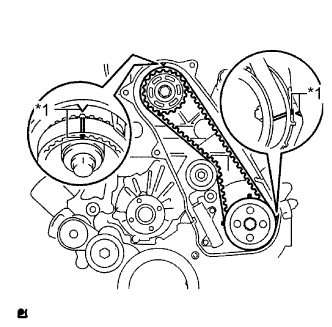
Text in Illustration *1
Timing Mark
| 7. INSTALL NO. 1 TIMING BELT COVER |
Install the timing belt cover and 6 washers with the 6 bolts.
- Torque:
- 6.0 N*m{ 61 kgf*cm , 53 in.*lbf }
| 8. INSTALL CYLINDER HEAD COVER SUB-ASSEMBLY |
Install 4 new No. 3 cylinder head cover gaskets to the cylinder head cover sub-assembly in the directions shown in the illustration.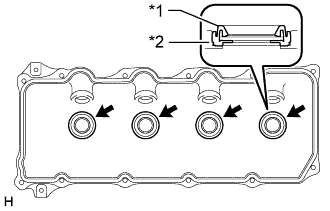
Text in Illustration *1
No. 3 Cylinder Head Cover Gasket
*2
Cylinder Head Cover Sub-assembly
- NOTICE:
- Do not install the No. 3 cylinder head cover gaskets at an angle.
- Check that there is no foreign matter at the installation location of the No. 3 cylinder head cover gaskets.
- Do not install the No. 3 cylinder head cover gaskets at an angle.
Remove any old seal packing (FIPG material) from the cylinder head sub-assembly.
Apply seal packing to the areas shown in the illustration.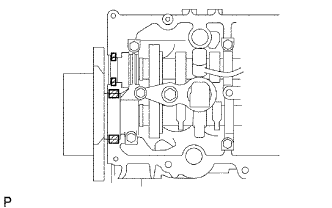
- Seal packing:
- Toyota Genuine Seal Packing Black, Three Bond 1207B or equivalent
Text in Illustration 
Seal Packing
- NOTICE:
- Remove any oil from the contact surface.
- Install the cylinder head cover sub-assembly within 3 minutes after applying seal packing.
- Do not start the engine for at least 2 hours after installing the cylinder head cover sub-assembly.
- Remove any oil from the contact surface.
Install a new cylinder head cover gasket to the cylinder head cover sub-assembly.
Temporarily install the cylinder head cover sub-assembly with the 10 bolts and 2 nuts in the order shown in the illustration. Then, tighten the 10 bolts and 2 nuts in the order shown in the illustration in 2 progressive steps.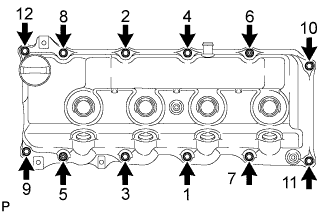
- Torque:
- 9.0 N*m{ 92 kgf*cm , 80 in.*lbf }
Install 4 new nozzle holder seals.
| 9. INSTALL VENTILATION PIPE |
Connect the 2 ventilation hoses and install the ventilation pipe to the cylinder head sub-assembly with the bolt.
- Torque:
- 18 N*m{ 184 kgf*cm , 13 ft.*lbf }
Type A
Connect the No. 3 turbo water hose and No. 4 turbo water hose to the ventilation pipe.
| 10. INSTALL NO. 2 CYLINDER HEAD COVER SUB-ASSEMBLY |
Install the No. 2 cylinder head cover sub-assembly with the 4 bolts.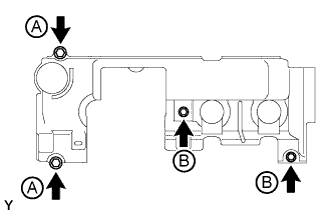
- Torque:
- for bolt A:
- 18 N*m{ 184 kgf*cm , 13 ft.*lbf }
- for bolt B:
- 8.0 N*m{ 82 kgf*cm , 71 in.*lbf }
| 11. INSTALL NO. 4 INJECTION PIPE SUB-ASSEMBLY |
- NOTICE:
- When replacing an injector assembly, it is necessary to replace the 4 injection pipe sub-assemblies with new ones.
- Keep the joints of the injection pipe sub-assembly clean.
- When replacing an injector assembly, it is necessary to replace the 4 injection pipe sub-assemblies with new ones.
Temporarily install the No. 4 injection pipe with the union nuts.
Install the 2 No. 2 injection pipe clamps with the bolt and nut.
- Torque:
- 6.5 N*m{ 66 kgf*cm , 58 in.*lbf }
Using a 17 mm union nut wrench, tighten the No. 4 injection pipe sub-assembly union nut on the common rail assembly side.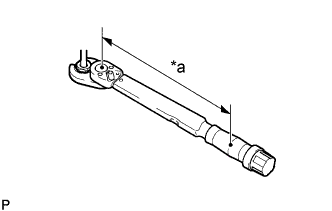
- Torque:
- Specified tightening torque:
- 35 N*m{ 357 kgf*cm , 26 ft.*lbf }
Text in Illustration *a
Torque Wrench Fulcrum Length
- HINT:
- Calculate the torque wrench reading when changing the fulcrum length of the torque wrench (Click here).
- When using a union nut wrench (fulcrum length of 30 mm (1.1811 in.)) + torque wrench (fulcrum length of 300 mm (11.8110 in.)): 32 N*m (324 kgf*cm, 23 ft.*lbf)
- Calculate the torque wrench reading when changing the fulcrum length of the torque wrench (Click here).
Using a 17 mm union nut wrench, tighten the injection pipe sub-assembly union nuts on the injector assembly side.
- Torque:
- Specified tightening torque:
- 35 N*m{ 357 kgf*cm , 26 ft.*lbf }
Text in Illustration *a
Torque Wrench Fulcrum Length
- HINT:
- Calculate the torque wrench reading when changing the fulcrum length of the torque wrench (Click here).
- When using a union nut wrench (fulcrum length of 30 mm (1.1811 in.)) + torque wrench (fulcrum length of 300 mm (11.8110 in.)): 32 N*m (324 kgf*cm, 23 ft.*lbf)
- Calculate the torque wrench reading when changing the fulcrum length of the torque wrench (Click here).
| 12. INSTALL NO. 1 FUEL PIPE |
Temporarily install the No. 1 fuel pipe with the 4 bolts.
Temporarily install a new gasket with the union bolt.
Tighten the union bolt and 4 bolts in the order shown in the illustration.
- Torque:
- for union bolt:
- 30 N*m{ 306 kgf*cm , 22 ft.*lbf }
- for bolt:
- 6.5 N*m{ 66 kgf*cm , 58 in.*lbf }
Connect the No. 2 fuel pipe (Click here).
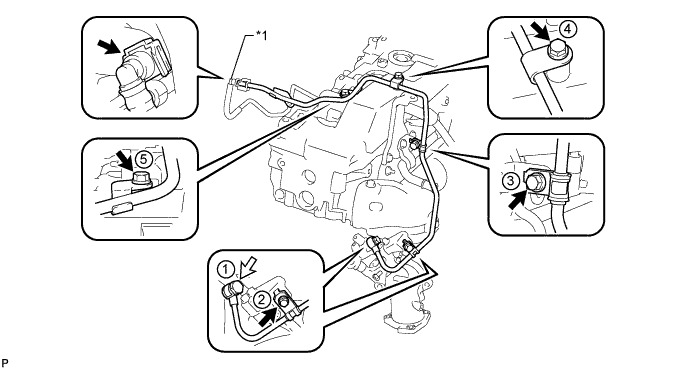
Text in Illustration *1
No. 2 Fuel Pipe
-
-

Union Bolt
-
-
| 13. INSTALL GAS FILTER BRACKET |
Install the gas filter bracket with the bolt.
- Torque:
- 8.0 N*m{ 82 kgf*cm , 71 in.*lbf }
Attach the clamp and connect the wire harness.
| 14. INSTALL INTAKE AIR CONNECTOR |
Set a new gasket on the intake manifold.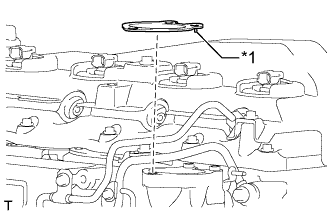
Text in Illustration *1
Claw
- NOTICE:
- Make sure the claw of the gasket faces the intake manifold as shown in the illustration.
Install the intake air connector with the 3 bolts.
- Torque:
- 20 N*m{ 204 kgf*cm , 15 ft.*lbf }
| 15. INSTALL NO. 1 GAS FILTER |
Install the No. 1gas filter to the gas filter bracket.
Connect the vacuum hose.
| 16. INSTALL THROTTLE BODY BRACKET |
Temporarily install the throttle body bracket with the 3 bolts.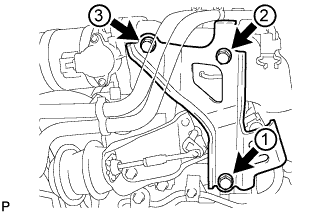
Tighten the 3 bolts of the throttle body bracket in the order shown in the illustration.
- Torque:
- 20 N*m{ 204 kgf*cm , 15 ft.*lbf }
| 17. INSTALL EMISSION CONTROL VALVE BRACKET |
Install the emission control valve bracket with the bolt.
- Torque:
- 13 N*m{ 133 kgf*cm , 10 ft.*lbf }
| 18. INSTALL MANIFOLD ABSOLUTE PRESSURE SENSOR |
Install the manifold absolute pressure sensor with the bolt.
- Torque:
- 8.0 N*m{ 82 kgf*cm , 71 in.*lbf }
Connect the vacuum hose and manifold absolute pressure sensor connector.
| 19. CONNECT WIRE HARNESS |
Attach the 5 clamps and connect the wire harness to the cowl top panel.
for LHD:
Connect the wire harness with the bolt.- Torque:
- 22 N*m{ 219 kgf*cm , 16 ft.*lbf }
Connect the wire harness with the bolt.
- Torque:
- 13 N*m{ 131 kgf*cm , 9 ft.*lbf }
| 20. INSTALL ELECTRIC EGR CONTROL VALVE ASSEMBLY |
| 21. INSTALL NO. 1 COMPRESSOR MOUNTING BRACKET |
Install the No. 1 compressor mounting bracket with the 5 bolts.
- Torque:
- 21 N*m{ 214 kgf*cm , 15 ft.*lbf }
- HINT:
- Firmly press and hold the No. 1 compressor mounting bracket against the cylinder block to eliminate any gaps. Then uniformly tighten the 5 bolts.
| 22. INSTALL NO. 2 IDLER PULLEY ASSEMBLY |
Install the spacer, No. 2 idle pulley and pulley plate with the bolt.
- Torque:
- 50 N*m{ 510 kgf*cm , 37 ft.*lbf }
| 23. INSTALL GENERATOR ASSEMBLY |
Install the generator with the 2 bolts.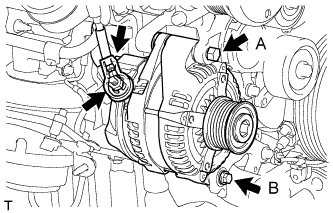
- Torque:
- for bolt A:
- 62 N*m{ 632 kgf*cm , 46 ft.*lbf }
- for bolt B:
- 21 N*m{ 214 kgf*cm , 15 ft.*lbf }
Install the generator wire with the nut.
- Torque:
- 9.8 N*m{ 100 kgf*cm , 87 in.*lbf }
Install the terminal cap.
Connect the generator connector.
| 24. INSTALL GENERATOR BRACKET |
Install the generator bracket with the bolt.
- Torque:
- 21 N*m{ 214 kgf*cm , 15 ft.*lbf }
| 25. INSTALL COOLER COMPRESSOR ASSEMBLY (w/ Air Conditioning System) |
Connect the cooler compressor with the 4 bolts.
- Torque:
- 25 N*m{ 250 kgf*cm , 18 ft.*lbf }
Connect the compressor connector.
| 26. INSTALL NO. 1 VISCOUS HEATER BRACKET SUB-ASSEMBLY (for Cold Area Specification Vehicles) |
Install the No. 1 viscous heater bracket with the 4 bolts.
- Torque:
- 45 N*m{ 459 kgf*cm , 33 ft.*lbf }
| 27. INSTALL VISCOUS WITH MAGNET CLUTCH HEATER ASSEMBLY (for Cold Area Specification Vehicles) |
Install the viscous heater with magnet clutch with the 2 bolts.
- Torque:
- 45 N*m{ 459 kgf*cm , 33 ft.*lbf }
Connect the water by-pass hose and water hose.
Connect the viscous heater connector.
| 28. INSTALL COMPRESSOR OUTLET ELBOW |
Install the compressor outlet elbow with the 2 bolts and tighten the hose clamp.
- Torque:
- for bolt:
- 20 N*m{ 204 kgf*cm , 15 ft.*lbf }
- for hose clamp:
- 6.5 N*m{ 66 kgf*cm , 58 in.*lbf }
Install the wire harness bracket with the bolt.
- Torque:
- 8.0 N*m{ 82 kgf*cm , 71 in.*lbf }
Attach the 3 wire harness clamps.
| 29. INSTALL AIR CLEANER CASE SUB-ASSEMBLY |
Install the air cleaner case sub-assembly with the 3 bolts.
- Torque:
- 12 N*m{ 122 kgf*cm , 9 ft.*lbf }
| 30. INSTALL AIR CLEANER FILTER ELEMENT SUB-ASSEMBLY |
| 31. INSTALL AIR CLEANER CAP SUB-ASSEMBLY |
Attach the 4 clamps to install the air cleaner cap sub-assembly.
except Cold Area Specification Vehicles:
Attach the 2 clamps and connect the mass air flow meter connector.
for Cold Area Specification Vehicles:
Attach the 3 clamps and connect the mass air flow meter connector.
| 32. INSTALL NO. 1 AIR CLEANER HOSE |
Install the No. 1 air cleaner hose with the 2 hose clamps.
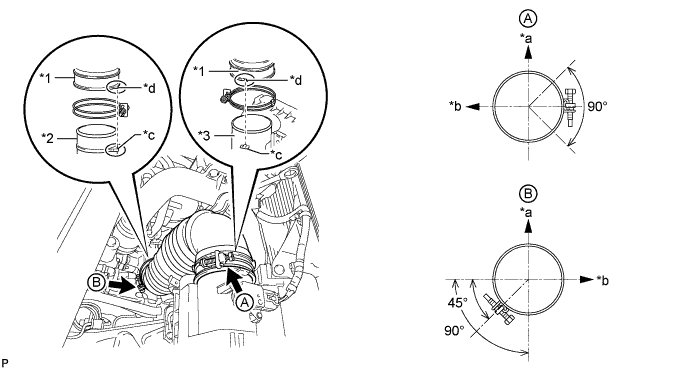
Text in Illustration *1
No. 1 Air Cleaner Hose
*2
Compressor Inlet Elbow
*3
Air Cleaner Cap
-
-
*a
Upper Side
*b
Front Side of Vehicle
*c
Protrusion
*d
Groove
- NOTICE:
- When installing the No. 1 air cleaner hose, align the protrusion of the No. 1 air cleaner hose with the protrusion of the compressor inlet elbow as shown in the illustration.
- When installing the No. 1 air cleaner hose, align the groove of the No. 1 air cleaner hose with the protrusion of the air cleaner cap as shown in the illustration.
- When installing the No. 1 air cleaner hose, align the protrusion of the No. 1 air cleaner hose with the protrusion of the compressor inlet elbow as shown in the illustration.
Tighten the 2 hose clamps.
- Torque:
- 5.0 N*m{ 51 kgf*cm , 44 in.*lbf }
- NOTICE:
- When tightening the 2 hose clamps, make sure that they are positioned as shown in the illustration.
| 33. INSTALL FAN SHROUD |
Install the fan pulley to the engine water pump assembly.
Install the No. 2 water by-pass hose to the water inlet.
Temporarily install the shroud together with the fan with fluid coupling to the engine water pump assembly with the 4 nuts. Tighten the nuts as much as possible by hand.
Attach the claws of the shroud to the radiator as shown in the illustration.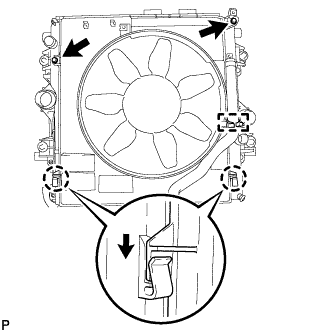
Install the fan shroud to the radiator with the 2 bolts.
- Torque:
- 5.0 N*m{ 51 kgf*cm , 44 in.*lbf }
Install the fan and generator V belt (Click here).
Install the fan with fluid coupling to the engine water pump assembly with the 4 nuts.
- Torque:
- 23 N*m{ 235 kgf*cm , 17 ft.*lbf }
Attach the No. 2 water by-pass hose to the clamp on the fan shroud.
for Automatic Transmission:
Connect the 2 oil cooler hoses.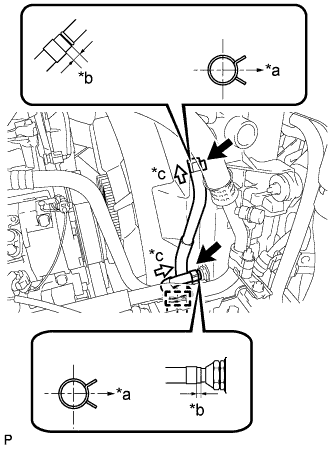
Text in Illustration *a
RH Side
*b
2.0 to 7.0 mm
*c
View A
- HINT:
- Position the hose clamps as shown in the illustration.
- Position the clips so that the distance from the end of the hose is 2.0 to 7.0 mm (0.0787 to 0.275 in.).
- Position the hose clamps as shown in the illustration.
Attach the 2 oil cooler hoses to the clamp on the fan shroud.
Connect the No. 2 water by-pass hose to the radiator reservoir.
Connect the No. 1 water by-pass hose to the fan shroud and attach the 2 clamps.
Install the radiator reservoir with the 3 bolts.
- Torque:
- 5.0 N*m{ 51 kgf*cm , 44 in.*lbf }
| 34. INSTALL INTERCOOLER AIR HOSE |
- NOTICE:
- Before installation, remove any oil residue from the inside of the inlet pipe and intercooler.
Align the paint mark of the intercooler air hose with the embossed mark of the intake pipe and install the intercooler air hose.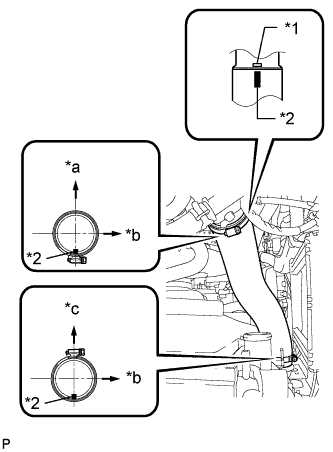
Text in Illustration *1
Embossed Mark
*2
Paint Mark
*a
Rear Side of Vehicle
*b
LH Side
*c
Top
Tighten the 2 clamps.
- Torque:
- 5.0 N*m{ 51 kgf*cm , 44 in.*lbf }
Connect the vacuum transmitting hose.
| 35. INSTALL NO. 1 AIR HOSE |
- NOTICE:
- Before installation, remove any oil residue from the inside of the inlet pipe and intercooler.
Align the paint mark of the No. 1 air hose with the embossed mark of the intercooler and install the No. 1 air hose.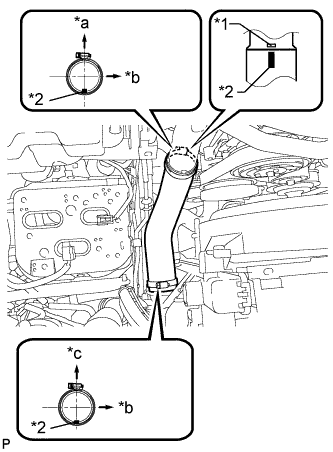
Text in Illustration *1
Embossed Mark
*2
Paint Mark
*a
Rear Side of Vehicle
*b
LH Side
*c
Top
Tighten the 2 clamps.
- Torque:
- 5.0 N*m{ 51 kgf*cm , 44 in.*lbf }
| 36. INSTALL NO. 3 ENGINE WIRE (for Cold Area Specification Vehicles) |
Install the 2 nuts to the battery terminals.
- Torque:
- 7.5 N*m{ 76 kgf*cm , 66 in.*lbf }
Attach the 3 wire harness clamps to the fan shroud.
| 37. INSTALL NO. 1 RADIATOR HOSE |
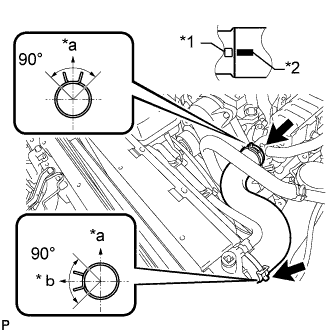 |
Install the radiator hose and attach the clamp.
Text in Illustration *1
Protrusion
*2
Paint Mark
*a
Top
*b
LH Side
- HINT:
- Make sure the direction of the hose clamp is as shown in the illustration.
| 38. CONNECT HEATER WATER PIPE SUB-ASSEMBLY |
Install the heater water pipe with the bolt.
- Torque:
- 26 N*m{ 260 kgf*cm , 19 ft.*lbf }
Attach the water by-pass hose clamp.
| 39. INSTALL COWL TOP VENTILATOR LOUVER SUB-ASSEMBLY |
| 40. CONNECT CABLE TO NEGATIVE BATTERY TERMINAL |
- NOTICE:
- When disconnecting the cable, some systems need to be initialized after the cable is reconnected (Click here).
| 41. ADD COOLANT |
Tighten the radiator drain cock plug by hand.
Tighten the cylinder block drain cock plug.
- Torque:
- 8.0 N*m{ 82 kgf*cm , 71 in.*lbf }
Fill the radiator with TOYOTA Super Long Life Coolant (SLLC) to the B line of the reservoir tank.
- Standard Capacity:
Item
Specified Condition
for Automatic Transmission
w/ Rear Heater
14.9 liters (15.7 US qts, 13.1 Imp. qts)
w/o Rear Heater
13.1 liters (13.8 US qts, 11.5 Imp. qts)
for Manual Transmission
w/ Rear Heater
15.0 liters (15.8 US qts, 13.2 Imp. qts)
w/o Rear Heater
13.2 liters (13.9 US qts, 11.6 Imp. qts)
- HINT:
- TOYOTA vehicles are filled with TOYOTA SLLC at the factory. In order to avoid damage to the engine cooling system and other technical problems, only use TOYOTA SLLC or similar high quality ethylene glycol based non-silicate, non-amine, non-nitrite, non-borate coolant with long-life hybrid organic acid technology (coolant with long-life hybrid organic acid technology consists of a combination of low phosphates and organic acids).
- Please contact your TOYOTA dealer for further details.
- for Cold Area Specification Vehicles:
Please contact any authorized TOYOTA dealer or repairer or another duly qualified and equipped professional for further details.
- TOYOTA vehicles are filled with TOYOTA SLLC at the factory. In order to avoid damage to the engine cooling system and other technical problems, only use TOYOTA SLLC or similar high quality ethylene glycol based non-silicate, non-amine, non-nitrite, non-borate coolant with long-life hybrid organic acid technology (coolant with long-life hybrid organic acid technology consists of a combination of low phosphates and organic acids).
- NOTICE:
- Never use water as a substitute for engine coolant.
Press the No. 1 and No. 2 inlet and No. 1 and No. 2 outlet radiator hoses several times by hand, and then check the level of the coolant.
If the coolant level drops below the B line, add TOYOTA SLLC to the B line.
Install the radiator reservoir cap.
Using a wrench, install the vent plug.
- Torque:
- 2.0 N*m{ 20 kgf*cm , 18 in.*lbf }
Bleed air from the cooling system.
Warm up the engine until the thermostat opens. While the thermostat is open, circulate the coolant for several minutes.
Maintain the engine speed at a speed between 2500 and 3000 rpm.
Press the inlet and outlet radiator hoses several times by hand to bleed air.
- CAUTION:
- When pressing the radiator hoses:
- Wear protective gloves.
- Be careful as the radiator hoses are hot.
- Keep your hands away from the radiator fan.
- Wear protective gloves.
Stop the engine and wait until the coolant cools down to ambient temperature.
- CAUTION:
- Do not remove the radiator reservoir cap while the engine and radiator are still hot. Pressurized, hot engine coolant and steam may be released and cause serious burns.
After the coolant cools down, check that the coolant level is at the FULL line.
If the coolant level is below the FULL line, add TOYOTA SLLC to the FULL line.
| 42. BLEED AIR FROM FUEL SYSTEM |
Using the hand pump mounted on the fuel filter cap, bleed air from the fuel system. Continue pumping until the pump resistance increases.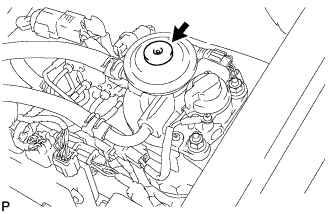
- NOTICE:
- The maximum hand pump pumping speed is 2 strokes per second.
- The hand pump must be pushed with a full stroke during pumping.
- When the fuel pressure at the supply pump inlet port reaches a saturated pressure, the hand pump resistance increases.
- If pumping is interrupted during the air bleeding process, fuel in the fuel line may return to the fuel tank. Continue pumping until the hand pump resistance increases.
- If the hand pump resistance does not increase despite consecutively pumping 200 times or more, there may be a fuel leak between the fuel tank and fuel filter, the hand pump may be malfunctioning, or the vehicle may have run out of fuel.
- If air bleeding using the hand pump is incomplete, the common rail pressure does not rise to the pressure range necessary for normal use and the engine cannot be started.
- The maximum hand pump pumping speed is 2 strokes per second.
Check if the engine starts.
- NOTICE:
- Even if air bleeding using the hand pump has been completed, the starter may need to be cranked for 10 seconds or more to start the engine.
- Do not crank the engine continuously for more than 20 seconds. The battery may be discharged.
- Use a fully-charged battery.
- Even if air bleeding using the hand pump has been completed, the starter may need to be cranked for 10 seconds or more to start the engine.
When the engine can be started, proceed to the next step.
If the engine cannot be started, bleed air again using the hand pump until the hand pump resistance increases (refer to the procedures above). Then start the engine.
Turn the engine switch off.
Connect the intelligent tester to the DLC3.
Turn the engine switch on (IG) and turn the intelligent tester on.
Clear the DTCs (Click here).
Start the engine.*1
Enter the following menus: Powertrain / Engine and ECT / Active Test / Test the Fuel Leak.*2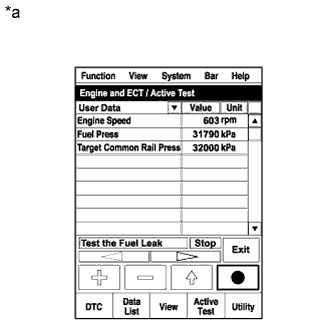
Text in Illustration *a
Reference
(Active Test Operation)
Perform the following test 5 times with on/off intervals of 10 seconds: Active Test / Test the Fuel Leak.*3
Allow the engine to idle for 3 minutes or more after performing the Active Test for the 5th time.
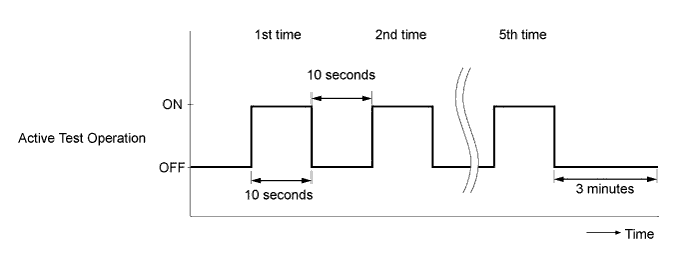
- HINT:
- When the Active Test "Test the Fuel Leak" is used to change the pump control mode, the actual fuel pressure inside the common rail drops below the target fuel pressure when the Active Test is off, but this is normal and does not indicate a pump malfunction.
Enter the following menus: Powertrain / Engine and ECT / DTC.
Read Current DTCs.
Clear the DTCs (Click here).
- HINT:
- It is necessary to clear the DTCs as DTC P1604 or P1605 may be stored when air is bled from the fuel system after replacing or repairing fuel system parts.
Repeat steps *1 to *3.
Enter the following menus: Powertrain / Engine and ECT / DTC.
Read Current DTCs.
- OK:
- No DTCs are output.
| 43. INSPECT FOR ENGINE COOLANT LEAK |
- NOTICE:
- Before each inspection, turn the A/C switch off.
- CAUTION:
- Do not remove the radiator reservoir cap while the engine and radiator are still hot. Pressurized, hot engine coolant and steam may be released and cause serious burns.
Fill the radiator with coolant and attach a radiator cap tester.
Warm up the engine.
Using the radiator cap tester, increase the pressure inside the radiator to 123 kPa (1.3 kgf/cm2, 18 psi), and check that the pressure does not drop.
If the pressure drops, check the hoses, radiator and water pump for leaks. If no external leaks are found, check the heater core, cylinder block and head.
| 44. INSPECT FOR FUEL LEAK |
Perform the Active Test.
Connect the intelligent tester to the DLC3.
Turn the engine switch on (IG).
Turn the intelligent tester on.
Enter the following menus: Powertrain / Engine and ECT / Active Test.
Perform the Active Test.
Intelligent Tester Display
Test Part
Control Range
Diagnostic Note
Test the Fuel Leak
Pressurize common rail interior and check for fuel leaks
Stop/Start
- The fuel pressure inside the common rail increases to the specified value and the engine speed increases to 2000 rpm when the Active Test is performed.
- The above conditions are maintained while the Active Test is being performed.
- The fuel pressure inside the common rail increases to the specified value and the engine speed increases to 2000 rpm when the Active Test is performed.
| 45. INSTALL ENGINE REAR UNDER COVER ASSEMBLY |
Install the rear engine under cover with the 4 bolts.
- Torque:
- 29 N*m{ 296 kgf*cm , 21 ft.*lbf }
| 46. INSTALL NO. 1 ENGINE UNDER COVER SUB-ASSEMBLY |
Install the No. 1 engine under cover with the 4 bolts.
- Torque:
- 29 N*m{ 296 kgf*cm , 21 ft.*lbf }
| 47. INSTALL FRONT BUMPER LOWER COVER |
Install the front bumper lower cover with the clip and 5 bolts.
- Torque:
- 8.0 N*m{ 82 kgf*cm , 71 in.*lbf }
| 48. INSTALL UPPER RADIATOR SUPPORT SEAL |
Install the upper radiator support seal with the 13 clips.