INSTALLATION
Removal / installation · Vehicles built Aug 2013 – Jul 2014
Versions by build date: Aug 2013 – Jul 2014 from Aug 2014
- NOTICE:
- When replacing the injectors (including shuffling the injectors between the cylinders), common rail or cylinder head, it is necessary to replace the injection pipes with new ones.
- When replacing the fuel supply pump, common rail, cylinder block, cylinder head, cylinder head gasket or timing gear case, it is necessary to replace the fuel inlet pipe with a new one.
- When replacing the injectors (including shuffling the injectors between the cylinders), common rail or cylinder head, it is necessary to replace the injection pipes with new ones.
| 1. INSTALL CYLINDER HEAD GASKET |

Find where the piston head protrudes most by slowly turning the crankshaft clockwise and counterclockwise.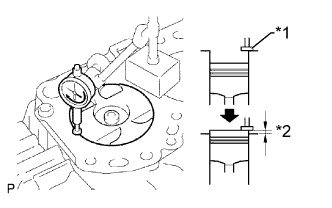

Text in Illustration *1
Measuring Tip
*2
Protrusion
Measure the piston protrusion of each cylinder at 2 points as shown in the illustration.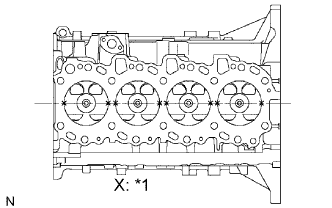
Text in Illustration *1
Measuring Point
For the piston protrusion value of each cylinder, use the average of the 2 measurements of each cylinder.
- Piston protrusion:
- 0.005 to 0.255 mm (0.000197 to 0.0100 in.)
- HINT:
- After installing the piston and connecting rod assembly, if the protrusion is not as specified, remove the piston and connecting rod assembly and reinstall them.
Select a new cylinder head gasket.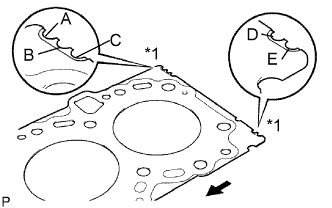
Text in Illustration *1
Cutout Mark

Front
- HINT:
- New cylinder head gaskets are available in 5 sizes, and are marked A, B, C, D or E.
- New Cylinder Head Gasket Thickness:
Mark
Specified Condition
A
0.80 to 0.90 mm (0.0315 to 0.0354 in.)
B
0.85 to 0.95 mm (0.0335 to 0.0374 in.)
C
0.90 to 1.00 mm (0.0354 to 0.0394 in.)
D
0.95 to 1.05 mm (0.0374 to 0.0413 in.)
E
1.00 to 1.10 mm (0.0394 to 0.0433 in.)
Select the largest piston protrusion value from the measurements made. Then select a new gasket according to the table below.
- Gasket Size:
Item
Specified Condition
Piston protrusion
0.005 to 0.054 mm (0.000197 to 0.00213 in.)
0.055 to 0.104 mm (0.00217 to 0.00409 in.)
0.105 to 0.154 mm (0.00413 to 0.00606 in.)
0.155 to 0.204 mm (0.00610 to 0.00803 in.)
0.205 to 0.255 mm (0.00807 to 0.0100 in.)
Gasket to be used
A
B
C
D
E
Place the cylinder head gasket on the cylinder block.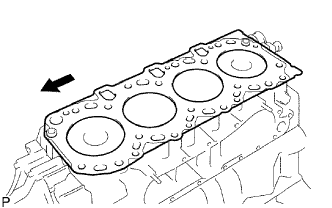
Text in Illustration
Front
- NOTICE:
- Make sure the gasket is installed facing the proper direction.
| 2. INSTALL CYLINDER HEAD SUB-ASSEMBLY |
 |
- HINT:
- The cylinder head bolts are tightened in 3 progressive steps.
- If any bolt is broken or deformed, replace it (Click here).
- The cylinder head bolts are tightened in 3 progressive steps.
Place the cylinder head on the cylinder head gasket.
Apply a light coat of engine oil to the threads and under the heads of the cylinder head bolts.
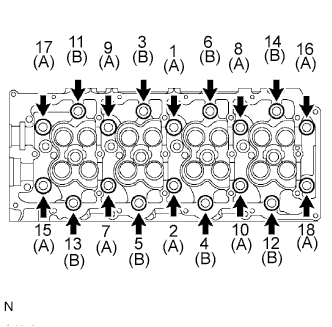
Install the 18 washers with the 18 cylinder head bolts, and uniformly tighten the bolts in several passes in the sequence shown in the illustration.
- Torque:
- 85 N*m{ 867 kgf*cm , 63 ft.*lbf }
- Standard Bolt Length:
Item
Specified Condition
A
110 mm (4.33 in.)
B
167 mm (6.57 in.)
Mark the front of each cylinder head bolt with paint.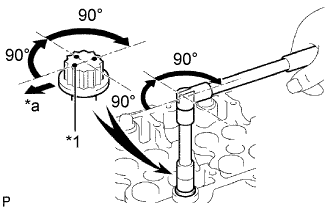
*1
Painted Mark
*a
Front
Further tighten the cylinder head bolts by 90° in the sequence shown in the illustration above.
Tighten the cylinder head bolts by an additional 90°.
Check that the painted marks are now facing rearward.
| 3. INSTALL CAMSHAFT |
Using the crankshaft pulley bolt, set the No. 1 cylinder to 90° BTDC/compression.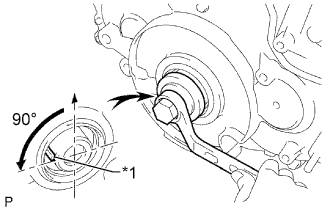
Text in Illustration *1
Key
- HINT:
- Set the No. 1 cylinder to 90° BTDC/compression to prevent the top of the piston from hitting against the valve head.
Install the camshaft.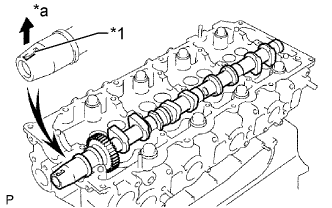
Apply engine oil to the thrust portion of the camshaft.
Place the camshaft on the cylinder head with the key groove facing upward.
Text in Illustration *1
Key Groove
*a
Upward
Align the timing marks (1-dot marks) of the camshaft drive and driven main gears and set the No. 2 camshaft in place.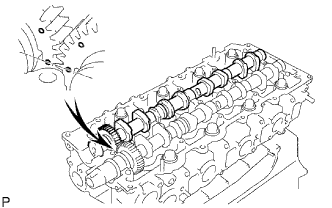
Remove any old seal packing (FIPG material) from the camshaft bearing cap.
Apply seal packing to the specified areas shown in the illustration.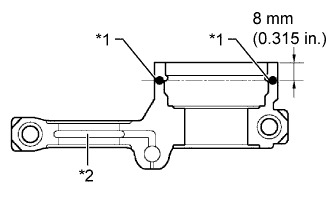
- Seal packing:
- Toyota Genuine Seal Packing Black, Three Bond 1207B or equivalent
- Standard seal diameter:
- 4 mm (0.157 in.)
Text in Illustration *1
Seal Packing
*2
Oil Passage
- NOTICE:
- Do not allow seal packing to contact the oil passage of the bearing cap.
- After applying seal packing, install the camshaft bearing caps within 3 minutes and tighten the bolts within 15 minutes.
- Do not start the engine for at least 2 hours after installation.
- Do not allow seal packing to contact the oil passage of the bearing cap.
Install the 5 bearing caps to their proper locations.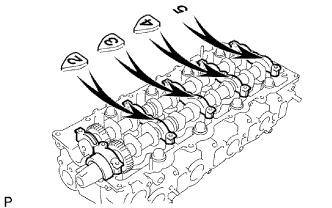
Apply a light coat of engine oil to the threads and under the heads of the bearing cap bolts.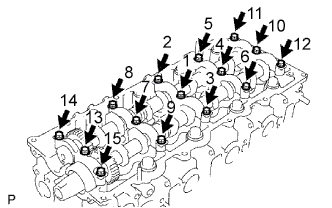
Install and uniformly tighten the 15 bearing cap bolts in several passes in the sequence shown in the illustration.
- Torque:
- 19 N*m{ 194 kgf*cm , 14 ft.*lbf }
Install a new camshaft oil seal.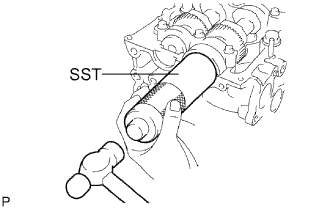
Apply MP grease to the lip of a new oil seal.
Using SST and a hammer, tap in the oil seal until its surface is flush with the surfaces of the camshaft bearing cap and cylinder head.
- SST
- 09608-06041
| 4. INSTALL CYLINDER BLOCK INSULATOR |
Install the cylinder block insulator to the cylinder head.
| 5. INSTALL NO. 2 TIMING BELT COVER |
Apply seal packing (FIPG) to the specified areas shown in the illustration.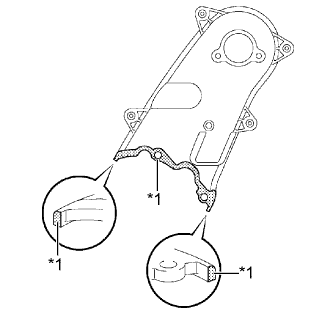
- Seal packing:
- Toyota Genuine Seal Packing Black, Three Bond 1207B or equivalent
Text in Illustration *1
Seal Packing
- NOTICE:
- After applying seal packing, install the No. 2 timing belt cover within 3 minutes and tighten the bolts and nut within 15 minutes.
Install the No. 2 timing belt cover with the 4 bolts and nut.
- Torque:
- 10 N*m{ 102 kgf*cm , 7 ft.*lbf }
| 6. INSTALL CAMSHAFT TIMING PULLEY |
Install the camshaft timing pulley.
Install the bolt of the camshaft timing pulley while holding the camshaft with a wrench.
- Torque:
- 98 N*m{ 1000 kgf*cm , 72 ft.*lbf }
| 7. INSTALL NO. 3 VACUUM TRANSMITTING PIPE SUB-ASSEMBLY |
Install the No. 3 vacuum transmitting pipe with the bolt.
- Torque:
- 18 N*m{ 184 kgf*cm , 13 ft.*lbf }
Connect the 2 vacuum hoses.
| 8. INSTALL NO. 2 INTAKE MANIFOLD INSULATOR |
Install the No. 2 intake manifold insulator.
| 9. INSTALL TIMING BELT |
| 10. INSPECT AND ADJUST VALVE CLEARANCE |
| 11. INSTALL INJECTOR ASSEMBLY |
| 12. INSTALL GLOW PLUG ASSEMBLY |
| 13. INSTALL INTAKE MANIFOLD |
| 14. INSTALL COMMON RAIL ASSEMBLY |
| 15. INSTALL EXHAUST MANIFOLD WITH TURBOCHARGER |
| 16. ADD ENGINE OIL |
Add new engine oil.
- Standard Oil Grade:
Item
Oil Grade
Oil Viscosity (SAE)
w/ DPF
ACEA C2
(Using engine oil other than ACEA C2 may damage catalytic converter)
- 0W-30
- 5W-30
(0W-30 is best choice for fuel economy and good starting in cold weather)
w/o DPF
G-DLD1, API CF-4, CF or ACEA B1
(You may also use API CE or CD)
- 5W-30
- 10W-30
- 15W-40
- 20W-50
- Standard Capacity:
Item
Specified Condition
Drain and refill without oil filter change
6.7 liters (7.1 US qts, 5.9 Imp. qts)
Drain and refill with oil filter change
7.0 liters (7.4 US qts, 6.2 Imp. qts)
Dry fill
7.5 liters (7.9 US qts, 6.6 Imp. qts)
Install the oil filler cap.
| 17. CONNECT CABLE TO NEGATIVE BATTERY TERMINAL |
- NOTICE:
- When disconnecting the cable, some systems need to be initialized after the cable is reconnected (Click here).
| 18. ADD ENGINE COOLANT |
Tighten the radiator drain cock plug by hand.
Tighten the cylinder block drain cock plug.
- Torque:
- 8.0 N*m{ 82 kgf*cm , 71 in.*lbf }
Fill the radiator with TOYOTA Super Long Life Coolant (SLLC) to the B line of the reservoir tank.
- Standard Capacity:
Item
Specified Condition
for Automatic Transmission
w/ Rear Heater
14.9 liters (15.7 US qts, 13.1 Imp. qts)
w/o Rear Heater
13.1 liters (13.8 US qts, 11.5 Imp. qts)
for Manual Transmission
w/ Rear Heater
15.0 liters (15.8 US qts, 13.2 Imp. qts)
w/o Rear Heater
13.2 liters (13.9 US qts, 11.6 Imp. qts)
- HINT:
- TOYOTA vehicles are filled with TOYOTA SLLC at the factory. In order to avoid damage to the engine cooling system and other technical problems, only use TOYOTA SLLC or similar high quality ethylene glycol based non-silicate, non-amine, non-nitrite, non-borate coolant with long-life hybrid organic acid technology (coolant with long-life hybrid organic acid technology consists of a combination of low phosphates and organic acids).
- Please contact your TOYOTA dealer for further details.
- for Cold Area Specification Vehicles:
Please contact any authorized TOYOTA dealer or repairer or another duly qualified and equipped professional for further details.
- TOYOTA vehicles are filled with TOYOTA SLLC at the factory. In order to avoid damage to the engine cooling system and other technical problems, only use TOYOTA SLLC or similar high quality ethylene glycol based non-silicate, non-amine, non-nitrite, non-borate coolant with long-life hybrid organic acid technology (coolant with long-life hybrid organic acid technology consists of a combination of low phosphates and organic acids).
- NOTICE:
- Never use water as a substitute for engine coolant.
Press the inlet and outlet radiator hoses several times by hand, and then check the level of the coolant.
If the coolant level drops below the B line, add TOYOTA SLLC to the B line.
Install the radiator reservoir cap.
Using a wrench, install the vent plug.
- Torque:
- 2.0 N*m{ 20 kgf*cm , 18 in.*lbf }
Bleed air from the cooling system.
Warm up the engine until the thermostat opens. While the thermostat is open, circulate the coolant for several minutes.
Maintain the engine speed at 2500 to 3000 rpm.
Press the inlet and outlet radiator hoses several times by hand to bleed air.
- CAUTION:
- When pressing the radiator hoses:
- Wear protective gloves.
- Be careful as the radiator hoses are hot.
- Keep your hands away from the radiator fan.
- Wear protective gloves.
Stop the engine and wait until the coolant cools down to ambient temperature.
- CAUTION:
- Do not remove the radiator reservoir cap while the engine and radiator are still hot. Pressurized, hot engine coolant and steam may be released and cause serious burns.
After the coolant cools down, check that the coolant level is at the FULL line.
If the coolant level is below the FULL line, add TOYOTA SLLC to the FULL line.
| 19. BLEED AIR FROM FUEL SYSTEM |
Using the hand pump mounted on the fuel filter cap, bleed air from the fuel system. Continue pumping until the pump resistance increases.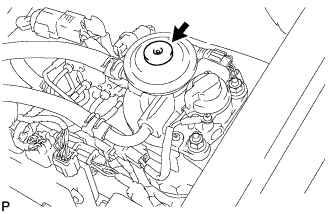
- NOTICE:
- The maximum hand pump pumping speed is 2 strokes per second.
- The hand pump must be pushed with a full stroke during pumping.
- When the fuel pressure at the supply pump inlet port reaches a saturated pressure, the hand pump resistance increases.
- If pumping is interrupted during the air bleeding process, fuel in the fuel line may return to the fuel tank. Continue pumping until the hand pump resistance increases.
- If the hand pump resistance does not increase despite consecutively pumping 200 times or more, there may be a fuel leak between the fuel tank and fuel filter, the hand pump may be malfunctioning, or the vehicle may have run out of fuel.
- If air bleeding using the hand pump is incomplete, the common rail pressure does not rise to the pressure range necessary for normal use and the engine cannot be started.
- The maximum hand pump pumping speed is 2 strokes per second.
Check if the engine starts.
- NOTICE:
- Even if air bleeding using the hand pump has been completed, the starter may need to be cranked for 10 seconds or more to start the engine.
- Do not crank the engine continuously for more than 20 seconds. The battery may be discharged.
- Use a fully-charged battery.
- Even if air bleeding using the hand pump has been completed, the starter may need to be cranked for 10 seconds or more to start the engine.
When the engine can be started, proceed to the next step.
If the engine cannot be started, bleed air again using the hand pump until the hand pump resistance increases (refer to the procedures above). Then start the engine.
Turn the engine switch off.
Connect the intelligent tester to the DLC3.
Turn the engine switch on (IG) and turn the intelligent tester on.
Clear the DTCs (Click here).
Start the engine.*1
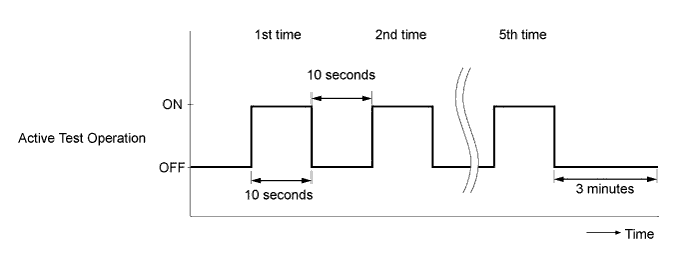
Enter the following menus: Powertrain / Engine and ECT / Active Test / Test the Fuel Leak.*2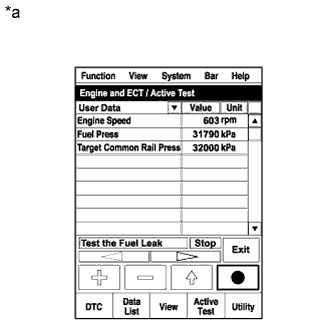
Text in Illustration *a
Reference
(Active Test Operation)
Perform the following test 5 times with on/off intervals of 10 seconds: Active Test / Test the Fuel Leak.*3
Allow the engine to idle for 3 minutes or more after performing the Active Test for the 5th time.
- HINT:
- When the Active Test "Test the Fuel Leak" is used to change the pump control mode, the actual fuel pressure inside the common rail drops below the target fuel pressure when the Active Test is off, but this is normal and does not indicate a pump malfunction.
Enter the following menus: Powertrain / Engine and ECT / DTC.
Read Current DTCs.
Clear the DTCs (Click here).
- HINT:
- It is necessary to clear the DTCs as DTC P1604 or P1605 may be stored when air is bled from the fuel system after replacing or repairing fuel system parts.
Repeat steps *1 to *3.
Enter the following menus: Powertrain / Engine and ECT / DTC.
Read Current DTCs.
- OK:
- No DTCs are output.
| 20. INSPECT FOR COOLANT LEAK |
Tighten the radiator drain cock plug by hand.
Tighten the cylinder block drain cock plug.
- Torque:
- 8.0 N*m{ 82 kgf*cm , 71 in.*lbf }
Fill the radiator with TOYOTA Super Long Life Coolant (SLLC) to the B line of the reservoir tank.
- Standard Capacity:
Item
Specified Condition
for Automatic Transmission
w/ Rear Heater
14.9 liters (15.7 US qts, 13.1 Imp. qts)
w/o Rear Heater
13.1 liters (13.8 US qts, 11.5 Imp. qts)
for Manual Transmission
w/ Rear Heater
15.0 liters (15.8 US qts, 13.2 Imp. qts)
w/o Rear Heater
13.2 liters (13.9 US qts, 11.6 Imp. qts)
- HINT:
- TOYOTA vehicles are filled with TOYOTA SLLC at the factory. In order to avoid damage to the engine cooling system and other technical problems, only use TOYOTA SLLC or similar high quality ethylene glycol based non-silicate, non-amine, non-nitrite, non-borate coolant with long-life hybrid organic acid technology (coolant with long-life hybrid organic acid technology consists of a combination of low phosphates and organic acids).
- Please contact your TOYOTA dealer for further details.
- for Cold Area Specification Vehicles:
Please contact any authorized TOYOTA dealer or repairer or another duly qualified and equipped professional for further details.
- TOYOTA vehicles are filled with TOYOTA SLLC at the factory. In order to avoid damage to the engine cooling system and other technical problems, only use TOYOTA SLLC or similar high quality ethylene glycol based non-silicate, non-amine, non-nitrite, non-borate coolant with long-life hybrid organic acid technology (coolant with long-life hybrid organic acid technology consists of a combination of low phosphates and organic acids).
- NOTICE:
- Never use water as a substitute for engine coolant.
Press the inlet and outlet radiator hoses several times by hand, and then check the level of the coolant.
If the coolant level drops below the B line, add TOYOTA SLLC to the B line.
Install the radiator reservoir cap.
Using a wrench, install the vent plug.
- Torque:
- 2.0 N*m{ 20 kgf*cm , 18 in.*lbf }
Bleed air from the cooling system.
Warm up the engine until the thermostat opens. While the thermostat is open, circulate the coolant for several minutes.
Maintain the engine speed at 2500 to 3000 rpm.
Press the inlet and outlet radiator hoses several times by hand to bleed air.
- CAUTION:
- When pressing the radiator hoses:
- Wear protective gloves.
- Be careful as the radiator hoses are hot.
- Keep your hands away from the radiator fan.
- Wear protective gloves.
Stop the engine and wait until the coolant cools down to ambient temperature.
- CAUTION:
- Do not remove the radiator reservoir cap while the engine and radiator are still hot. Pressurized, hot engine coolant and steam may be released and cause serious burns.
After the coolant cools down, check that the coolant level is at the FULL line.
If the coolant level is below the FULL line, add TOYOTA SLLC to the FULL line.
| 21. INSPECT FOR OIL LEAK |
Start the engine. Make sure that there are no oil leaks from the areas that were worked on.
| 22. INSPECT FOR FUEL LEAK |
Perform the Active Test.
Connect the intelligent tester to the DLC3.
Turn the engine switch on (IG).
Turn the intelligent tester on.
Enter the following menus: Powertrain / Engine and ECT / Active Test.
Perform the Active Test.
Intelligent Tester Display
Test Part
Control Range
Diagnostic Note
Test the Fuel Leak
Pressurize common rail interior and check for fuel leaks
Stop/Start
- The fuel pressure inside the common rail increases to the specified value and the engine speed increases to 2000 rpm when the Active Test is performed.
- The above conditions are maintained while the Active Test is being performed.
- The fuel pressure inside the common rail increases to the specified value and the engine speed increases to 2000 rpm when the Active Test is performed.
| 23. INSPECT ENGINE OIL LEVEL |
Warm up the engine, stop the engine and wait 5 minutes. The engine oil level should be between the dipstick low level mark and full level mark.
If low, check for leakage and add oil up to the full level mark.- NOTICE:
- Do not fill engine oil above the full level mark.
| 24. INSTALL NO. 1 ENGINE UNDER COVER SUB-ASSEMBLY |
Install the No. 1 engine under cover with the 4 bolts.
- Torque:
- 29 N*m{ 296 kgf*cm , 21 ft.*lbf }
| 25. INSTALL FRONT BUMPER LOWER COVER |
Install the front bumper lower cover with the clip and 5 bolts.
- Torque:
- 8.0 N*m{ 82 kgf*cm , 71 in.*lbf }