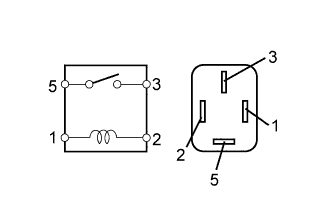
Headlight (HI-BEAM) Circuit
Circuit diagnosis · Vehicles built Aug 2013 – Jul 2014
Versions by build date: Aug 2013 – Jul 2014 from Aug 2014
DESCRIPTION
The main body ECU receives headlight dimmer switch information signals and illuminates the high beam headlights.WIRING DIAGRAM
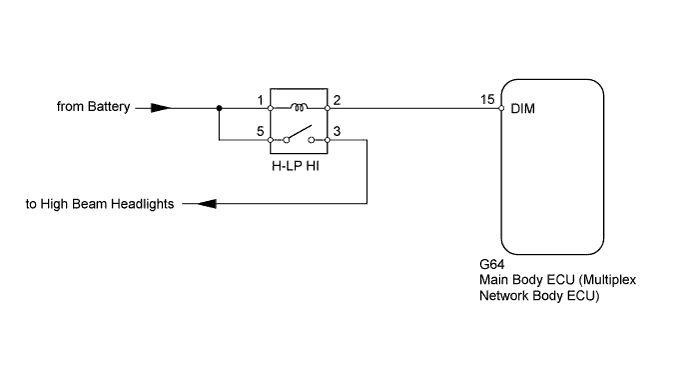

INSPECTION PROCEDURE
- NOTICE:
- Inspect the fuses and bulbs for circuits related to this system before performing the following inspection procedure.
| 1. PERFORM ACTIVE TEST USING INTELLIGENT TESTER (HEADLIGHT) |
 |
Using the intelligent tester, perform the Active Test (Click here).
Main Body
Tester Display
|
Test Part
|
Control Range
|
Diagnostic Note
|
Head Light Hi
|
Headlight dimmer relay
|
ON/OFF
|
-
|
- OK:
- Relay operates (high beam headlights illuminate).
|
NG |
 |
|
|
|
| OK |
|
 |
|
| REPLACE MAIN BODY ECU (MULTIPLEX NETWORK BODY ECU) (Click here)
|
|
| 2. INSPECT HEADLIGHT RELAY (H-LP HI) |
|
- Remove the headlight relay from the engine room relay block.
Measure the resistance according to the value(s) in the table below.
- Standard Resistance:
Tester Connection
|
Condition
|
Specified Condition
|
3 - 5
|
Battery voltage not applied between terminals 1 and 2
|
10 kΩ or higher
|
3 - 5
|
Battery voltage applied between terminals 1 and 2
|
Below 1 Ω
|
|
NG |
 |
|
| REPLACE HEADLIGHT RELAY (H-LP HI) |
|
|
| OK |
|
 |
|
| 3. CHECK HARNESS AND CONNECTOR (HEADLIGHT RELAY [H-LP HI] - BATTERY) |
|
- Remove the headlight relay from the engine room relay block.
Measure the voltage according to the value(s) in the table below.
- Standard Voltage:
Tester Connection
|
Condition
|
Specified Condition
|
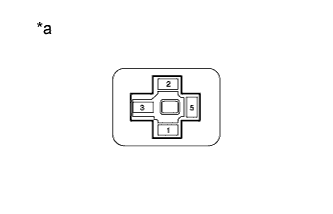
Headlight dimmer relay terminal 1 - Body ground
|
Always
|
11 to 14 V
|
Headlight dimmer relay terminal 5 - Body ground
|
Text in Illustration
*a
|
Front view of wire harness connector
(to Headlight Dimmer Relay)
|
|
NG |
|
|
| REPAIR OR REPLACE HARNESS OR CONNECTOR |
|
|
| OK |
|
|
|
| 4. CHECK HARNESS AND CONNECTOR (HEADLIGHT RELAY [H-LP HI] - MAIN BODY ECU AND BODY GROUND) |
|
Remove the headlight relay from the engine room relay block.
Disconnect the G64 main body ECU connector.
Measure the resistance according to the value(s) in the table below.
- Standard Resistance:
Tester Connection
|
Condition
|
Specified Condition
|
Headlight dimmer relay terminal 2 - G64-15 (DIM)
|
Always
|
Below 1 Ω
|
G64-15 (DIM) - Body ground
|
Always
|
10 kΩ or higher
|
|
NG |
|
|
| REPAIR OR REPLACE HARNESS OR CONNECTOR |
|
|
| OK |
|
|
|
| PROCEED TO NEXT SUSPECTED AREA SHOWN IN PROBLEM SYMPTOMS TABLE (Click here)
|
|