DESCRIPTION
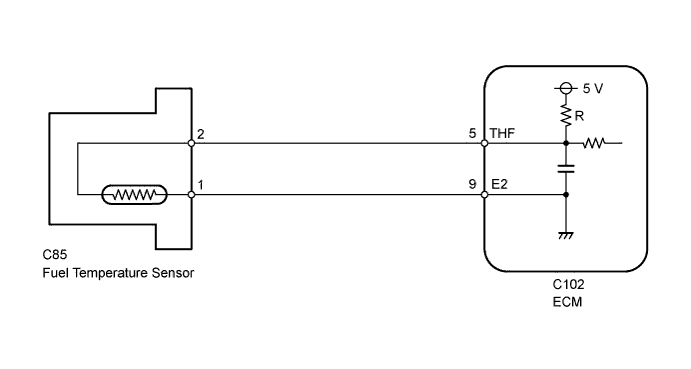
The fuel temperature sensor senses the fuel temperature. A thermistor built into the sensor changes its resistance according to the fuel temperature. The lower the fuel temperature, the higher the thermistor resistance value, and the higher the fuel temperature, the lower the thermistor resistance value (see Fig. 1).The fuel temperature sensor is connected to the ECM. The 5 V power source voltage from the ECM is applied to the fuel temperature sensor from terminal THF via resistor R. That is, resistor R and the fuel temperature sensor are connected in series. When the resistance value of the fuel temperature sensor changes in accordance with changes in the fuel temperature, the voltage at terminal THF also changes. Based on this signal, the ECM increases the fuel injection volume to improve driveability when the engine speed is low and the fuel temperature is high.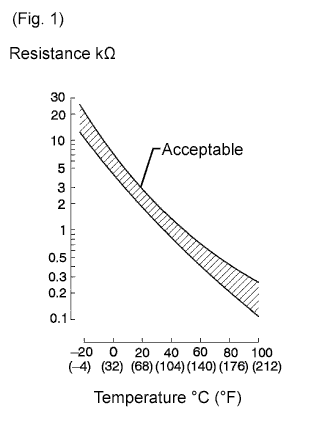

DTC No.
|
DTC Detection Condition
|
Trouble Area
|
39 (5)
|
Open or short in the fuel temperature sensor circuit for 0.5 sec. or more.
|
- Open or short in fuel temperature sensor circuit
- Fuel temperature sensor
- ECM
|
WIRING DIAGRAM
INSPECTION PROCEDURE
- HINT:
- If DTCs related to different systems that have terminal E2 as the ground terminal are stored simultaneously, there may be an open circuit between terminal E2 and body ground.
- Read freeze frame data using the intelligent tester. Freeze frame data records the engine condition when malfunctions are detected. When troubleshooting, freeze frame data can help determine if the vehicle was moving or stationary, if the engine was warmed up or not, and other data from the time the malfunction occurred.
When using intelligent tester:
| 1. READ VALUE USING INTELLIGENT TESTER (FUEL TEMPERATURE) |
 |
Connect the intelligent tester to the DLC3.
Turn the ignition switch to ON.
Enter the following menus: Powertrain / Engine and ECT / Data List / Fuel Temp.
Result
Result
|
Proceed to
|
-40°C (-40°F)
|
A
|
140°C (284°F) or higher
|
B
|
Value is same as actual fuel temperature
|
C
|
- HINT:
- When DTC 39 (5) is stored, the type of malfunction can be determined based on the fuel temperature (see below).
- Result:
Temperature Displayed
|
Malfunction
|
-40°C (-40°F)
|
Open circuit
|
140°C (284°F) or higher
|
Short circuit
|
|
B |
 |
|
|
|
|
C |
 |
|
|
|
| A |
|
 |
|
| 2. READ VALUE USING INTELLIGENT TESTER (CHECK FOR OPEN IN WIRE HARNESS) |
|
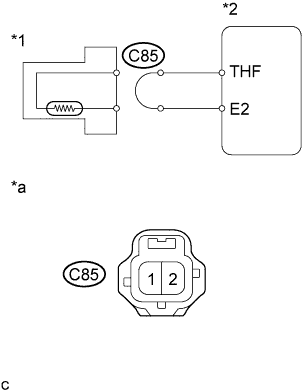
- Disconnect the fuel temperature sensor connector.
Connect terminals 1 and 2 of the fuel temperature sensor harness side connector.
Turn the ignition switch to ON.
Read the temperature value on the intelligent tester.
- OK:
- 140°C (284°F) or higher
Text in Illustration
*1
|
Fuel Temperature Sensor
|
*2
|
ECM
|
*a
|
Front view of wire harness connector
(to fuel temperature sensor)
|
Reconnect the fuel temperature sensor connector.
|
NG |
|
|
|
|
| OK |
|
 |
|
|
| 3. READ VALUE USING INTELLIGENT TESTER (CHECK FOR OPEN IN ECM) |
|
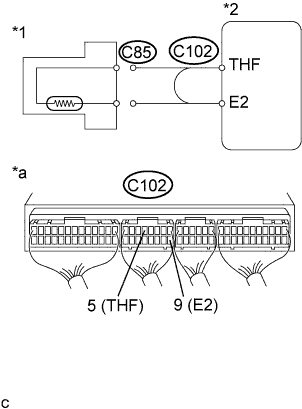
- Connect terminals THF and E2 of the ECM connector.
Turn the ignition switch to ON.
Read the temperature value on the intelligent tester.
- OK:
- 140°C (284°F) or higher
Text in Illustration
*1
|
Fuel Temperature Sensor
|
*2
|
ECM
|
*a
|
Component with harness connected
(ECM)
|
|
NG |
|
|
|
|
| OK |
|
|
|
| REPAIR OR REPLACE HARNESS OR CONNECTOR |
|
| 4. READ VALUE USING INTELLIGENT TESTER (CHECK FOR SHORT IN WIRE HARNESS) |
|
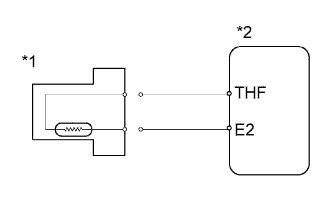
- Disconnect the fuel temperature sensor connector.
Turn the ignition switch to ON.
Read the temperature value on the intelligent tester.
- OK:
- -40°C (-40°F)
Text in Illustration
*1
|
Fuel Temperature Sensor
|
*2
|
ECM
|
Reconnect the fuel temperature sensor connector.
|
NG |
|
|
|
|
| OK |
|
|
|
|
| 5. READ VALUE USING INTELLIGENT TESTER (CHECK FOR SHORT IN ECM) |
|
Disconnect the ECM connector.
Turn the ignition switch to ON.
Read the temperature value on the intelligent tester.
- OK:
- -40°C (-40°F)
Reconnect the ECM connector.
|
NG |
|
|
|
|
| OK |
|
|
|
| REPAIR OR REPLACE HARNESS OR CONNECTOR |
|
When not using intelligent tester:
| 1. CHECK ECM (THF VOLTAGE) |
|
- Turn the ignition switch to ON.
Measure the voltage according to the value(s) in the table below.
- Standard Voltage:
Tester Connection
|
Condition
|
Specified Condition
|
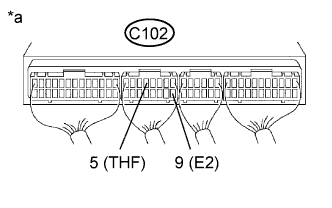
C102-5 (THF) - C102-9 (E2)
|
20°C (68°F)
|
0.2 to 3.8 V
|
C102-5 (THF) - C102-9 (E2)
|
80°C (176°F)
|
0.1 to 1.5 V
|
Text in Illustration
*a
|
Component with harness connected
(ECM)
|
|
NG |
|
|
|
|
| OK |
|
|
|
|
| 2. INSPECT FUEL TEMPERATURE SENSOR |
|
Inspect the fuel temperature sensor (Click here).
|
NG |
|
|
|
|
| OK |
|
|
|
| 3. CHECK HARNESS AND CONNECTOR (ECM - FUEL TEMPERATURE SENSOR) |
|
Disconnect the fuel temperature sensor connector.
Disconnect the ECM connector.
Measure the resistance according to the value(s) in the table below.
- Standard Resistance (Check for Open):
Tester Connection
|
Condition
|
Specified Condition
|
C85-2 - C102-5 (THF)
|
Always
|
Below 1 Ω
|
C85-1 - C102-9 (E2)
|
Always
|
Below 1 Ω
|
- Standard Resistance (Check for Short):
Tester Connection
|
Condition
|
Specified Condition
|
C85-2 or C102-5 (THF) - Body ground
|
Always
|
10 kΩ or higher
|
Reconnect the fuel temperature sensor connector.
Reconnect the ECM connector.
|
NG |
|
|
| REPAIR OR REPLACE HARNESS OR CONNECTOR |
|
|
| OK |
|
|
|
|