INSTALLATION
Removal / installation · Vehicles built Aug 2013 – Jul 2014
Versions by build date: Aug 2013 – Jul 2014 from Aug 2014
| 1. CONNECT NO. 2 STEERING INTERMEDIATE SHAFT SUB-ASSEMBLY |

Align the matchmarks on the No. 2 steering intermediate shaft and power steering gear.
Install the bolt.
- Torque:
- 36 N*m{ 367 kgf*cm , 27 ft.*lbf }
| 2. INSTALL NO. 1 STEERING COLUMN HOLE COVER SUB-ASSEMBLY |
Install the hole cover with the 4 bolts.
- Torque:
- 5.0 N*m{ 51 kgf*cm , 44 in.*lbf }
- NOTICE:
- Do not fold back the boot part of the steering hole cover or extend it excessively. If it is extended excessively, return it to its original position.
| 3. CONNECT STEERING INTERMEDIATE SHAFT ASSEMBLY |
Align the matchmarks on the No. 2 steering intermediate shaft assembly and steering intermediate shaft assembly.
- HINT:
- Install the steering intermediate shaft to the inside of the vehicle.
Install the bolt.
- Torque:
- 36 N*m{ 367 kgf*cm , 27 ft.*lbf }
| 4. INSTALL FRONT NO. 1 FENDER APRON TO FRAME SEAL LH |
w/ KDSS:
Install the apron seal with the 7 clips.
w/o KDSS:
Install the apron seal with the 4 clips.
| 5. INSTALL STEERING COLUMN ASSEMBLY (TILT STEERING GEAR ASSEMBLY WITH MOTOR) |
Align the matchmarks on the steering intermediate shaft, steering shaft stopper and steering column.
Install the steering column with the 4 nuts.
- Torque:
- 26 N*m{ 265 kgf*cm , 19 ft.*lbf }
Install the bolts.
- Torque:
- 36 N*m{ 367 kgf*cm , 27 ft.*lbf }
Attach the claws to install the wire harness protector and wire harness.
| 6. INSTALL NO. 1 INSTRUMENT LOWER PANEL AIRBAG ASSEMBLY |
| 7. INSTALL INSTRUMENT LOWER PANEL FINISH PANEL SUB-ASSEMBLY |
| 8. INSTALL COMBINATION SWITCH ASSEMBLY WITH SPIRAL CABLE SUB-ASSEMBLY |
Using pliers, grip the claws of the clamp and install the combination switch assembly with spiral cable sub-assembly to the steering column assembly with the clamp.
Connect the connectors to the combination switch with spiral cable.
| 9. INSTALL TILT AND TELESCOPIC SWITCH |
Attach the claw to install the switch.
Connect the switch connector.
| 10. INSTALL STEERING COLUMN UPPER COVER |
Attach the claw to install the steering column upper cover.
Attach the 4 clips to install the steering column upper cover to the instrument cluster finish panel.
| 11. INSTALL STEERING COLUMN LOWER COVER |
Attach the 2 claws to install the steering column lower cover.
- NOTICE:
- Do not damage the tilt and telescopic switch.
Install the 3 screws.
| 12. ADJUST SPIRAL CABLE SUB-ASSEMBLY |
Turn the ignition switch off.
Disconnect the cable from the negative (-) battery terminal.
- CAUTION:
- Wait at least 90 seconds after disconnecting the cable from the negative (-) battery terminal to disable the SRS system.
Rotate the spiral cable sub-assembly with steering sensor counterclockwise slowly by hand until it feels firm.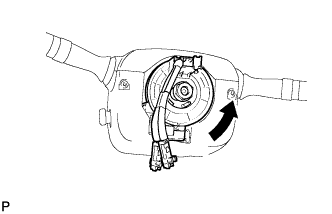

- CAUTION:
- Do not turn the spiral cable sub-assembly with steering sensor by the airbag wire harness.
Rotate the spiral cable sub-assembly with steering sensor clockwise approximately 2.5 turns to align the marks so that the colored part or the flat cable shown in the illustration is visible.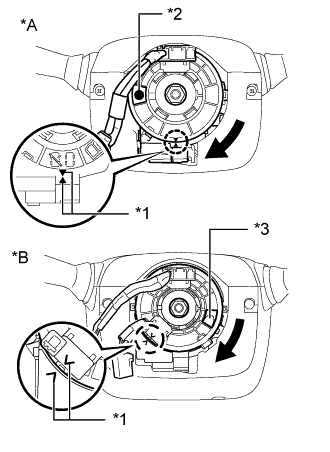
Text in Illustration *A
w/o Steering Heater
*B
w/ Steering Heater
*1
Alignment Mark
*2
Colored Part
*3
Flat Cable
- CAUTION:
- Do not turn the spiral cable sub-assembly with steering sensor by the airbag wire harness.
- HINT:
- The spiral cable sub-assembly with steering sensor can be rotated approximately 2.5 turns to both the left and right from the center position.
| 13. INSTALL STEERING WHEEL ASSEMBLY |
| 14. INSTALL FRONT WHEEL LH |
| 15. CHECK FRONT WHEELS FACING STRAIGHT AHEAD |
| 16. CONNECT CABLE TO NEGATIVE BATTERY TERMINAL |
- NOTICE:
- Reset the auto tilt away function setting to the previous condition by changing the customize parameter (Click here).
- When disconnecting the cable, some systems need to be initialized after the cable is reconnected (Click here).
- Reset the auto tilt away function setting to the previous condition by changing the customize parameter (Click here).
| 17. CHECK SRS WARNING LIGHT |