Home › Vehicle Exterior › LIGHTING (EXT) › LIGHTING SYSTEMStop Light Circuit
Circuit diagnosis · Vehicles built from Aug 2014
Versions by build date: Aug 2013 – Jul 2014 from Aug 2014
DESCRIPTION
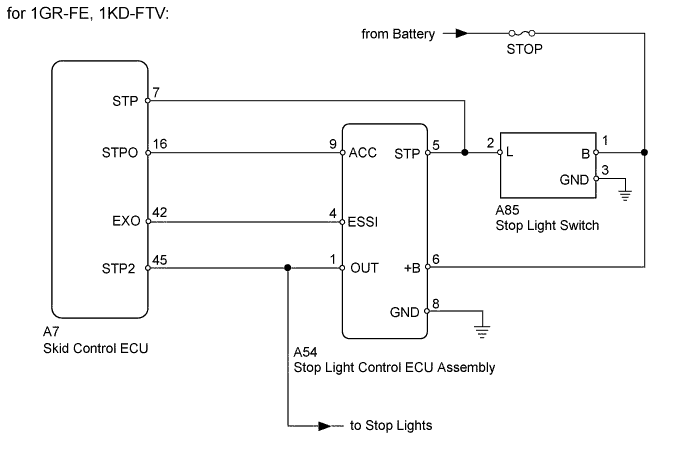
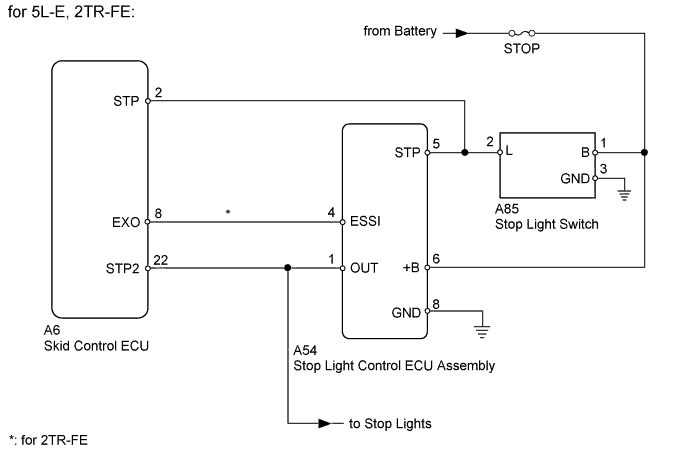
When the stop light switch is turned on, current flows to the stop lights to illuminate them. During emergency braking, the brake control system blinks all stop lights to alert following drivers and reduces the possibility of a rear-end collision. WIRING DIAGRAM
INSPECTION PROCEDURE
1. CHECK FOR DTC (BRAKE CONTROL SYSTEM)
Clear the DTCs (Click here for 5L-E, Click here for 1GR-FE, 1KD-FTV, Click here for 2TR-FE).
Check for DTCs (Click here for 5L-E, Click here for 1GR-FE, 1KD-FTV, Click here for 2TR-FE).
OK:
DTC output does not occur.
Result
Result
Proceed to
OK
A
NG (for 5L-E)
B
NG (for 1GR-FE, 1KD-FTV)
C
NG (for 2TR-FE)
D
B
C
GO TO VEHICLE STABILITY CONTROL SYSTEM (for Hydraulic Brake Booster) (Click here )
D
GO TO VEHICLE STABILITY CONTROL SYSTEM (for Vacuum Brake Booster) (Click here )
A
2. CHECK HARNESS AND CONNECTOR (STOP LIGHT SWITCH ASSEMBLY - BATTERY)
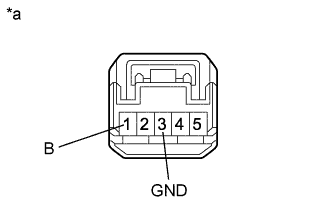
Disconnect the A85 stop light switch connector.
Measure the voltage according to the value(s) in the table below.
Standard Voltage:
Tester Connection
Condition
Specified Condition
A85-1(B) - Body ground
Always
11 to 14 V
Measure the resistance according to the value(s) in the table below.
Standard Resistance:
Tester Connection
Condition
Specified Condition
A85-3(GND) - Body ground
Always
Below 1 Ω
Text in Illustration
*a
Front view of wire harness connector
NG
REPAIR OR REPLACE HARNESS OR CONNECTOR
OK
3. CHECK STOP LIGHT SWITCH ASSEMBLY
Temporarily replace the stop light switch with a new or normally functioning one (Click here ).
Check the stop light operation.
OK:
Stop light operation is normal.
NG
OK
END (STOP LIGHT SWITCH IS DEFECTIVE)
4. CHECK HARNESS AND CONNECTOR (STOP LIGHT CONTROL ECU ASSEMBLY - BATTERY AND BODY GROUND)
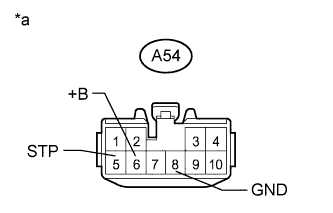
Disconnect the A54 stop light control ECU connector. Measure the voltage according to the value(s) in the table below.
Standard Voltage:
Tester Connection
Condition
Specified Condition
A54-5 (STP) - Body ground
Brake pedal depressed
11 to 14 V
A54-5 (STP) - Body ground
Brake pedal released
Below 1 V
A54-6 (+B) - Body ground
Always
11 to 14 V
Measure the resistance according to the value(s) in the table below.
Standard Resistance:
Tester Connection
Condition
Specified Condition
A54-8 (GND) - Body ground
Always
Below 1 Ω
Text in Illustration
*a
Front view of wire harness connector
Result
Result
Proceed to
OK (Problem is that lights are flashing) (except 5L-E)
A
OK (Problem is that lights do not turn on or stay on)
B
NG
C
B
PROCEED TO NEXT SUSPECTED AREA SHOWN IN PROBLEM SYMPTOMS TABLE (Click here )
C
REPAIR OR REPLACE HARNESS OR CONNECTOR
A
5. CHECK STOP LIGHT
With the skid control ECU connector disconnected, check the illumination of the stop lights when depressing the brake pedal.
OK:
Stop lights operate normally when the brake pedal is depressed.
NG
REPLACE STOP LIGHT CONTROL ECU ASSEMBLY (Click here )
OK