Cruise Control Switch Circuit
Circuit diagnosis · Vehicles built Aug 2013 – Jul 2014
Versions by build date: Aug 2013 – Jul 2014 from Aug 2014
DESCRIPTION
The cruise control switch operates 8 functions: SET, COAST, TAP-DOWN, RESUME, ACCEL, TAP-UP, CANCEL and MODE. The SET, TAP-DOWN and COAST functions and the RESUME, TAP-UP and ACCEL functions are operated with the same switch. The cruise control switch is an automatic return type switch which turns on only while pushing it in each arrow direction and turns off after releasing it. The internal contact point of the cruise control switch is turned on with the switch operation. The driving support ECU then reads the resistance value that has been changed by the switch operation to control MODE, SET, COAST, RESUME, ACCEL and CANCEL operations. The dynamic radar cruise control system has two cruise control modes: constant speed control mode and vehicle-to-vehicle distance control mode.- HINT:
- The vehicle-to-vehicle distance control mode is always selected when starting up the dynamic radar cruise control system.
- The operation of the constant speed control mode is the same as the cruise control system.
- The vehicle-to-vehicle distance control mode is always selected when starting up the dynamic radar cruise control system.
WIRING DIAGRAM
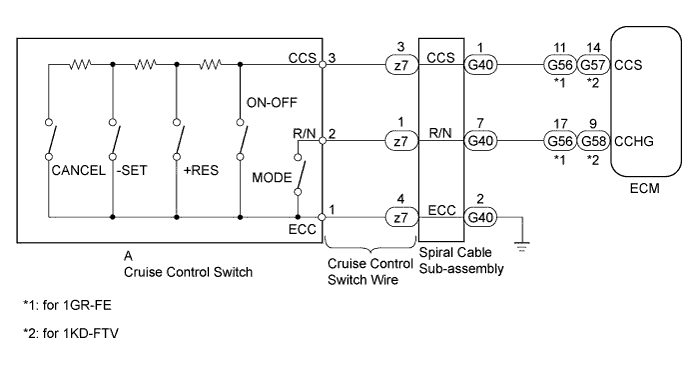

INSPECTION PROCEDURE
- NOTICE:
- When the ECM is replaced with a new one, initialization must be performed (Click here).
| 1. READ VALUE USING INTELLIGENT TESTER |

Use the Data List to check if the cruise control switch is functioning properly (Click here).
Radar Cruise Tester Display
Measurement Item/Range
Normal Condition
Diagnostic Note
Main SW M-CPU
Cruise control switch (Main CPU) signal / ON or OFF
ON: Cruise control switch on
OFF: Cruise control switch off
-
Cancel Switch
Cancel switch signal / ON or OFF
ON: Cancel switch on
OFF: Cancel switch off
-
SET/COAST Switch
-SET switch signal / ON or OFF
ON: -SET switch on
OFF: -SET switch off
-
RES/ACC Switch
+RES switch signal / ON or OFF
ON: +RES switch on
OFF: +RES switch off
-
- OK:
- On screen, each item changes between ON and OFF according to above chart.
|
|
||||

| OK | ||
 |
||
| ||
| 2. INSPECT SPIRAL CABLE SUB-ASSEMBLY |
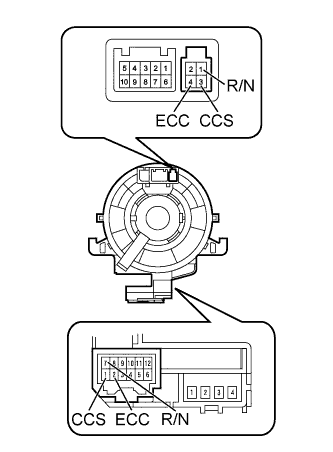 |
Remove the spiral cable sub-assembly (Click here).
If there are any defects as follows, replace the spiral cable with a new one: scratches, cracks, dents or chips in the connector or spiral cable.
Check the spiral cable.
Set the spiral cable to the center position (Click here).
Rotate the spiral cable 2.5 times clockwise and measure the resistance according to the value(s) in the table below. Then rotate the spiral cable 5 times counterclockwise and measure the resistance according to the value(s) in the table below.
- NOTICE:
- As the spiral cable may break, do not rotate the spiral cable more than the specified amount.
- Standard Resistance:
Tester Connection
Condition
Specified Condition
3 (CCS) - 1 (CCS)
Always
Below 1 Ω
4 (ECC) - 2 (ECC)
1 (R/N) - 7 (R/N)
Set the spiral cable to the center position and rotate the spiral cable 2.5 times clockwise. Then, while rotating the spiral cable 5 times counterclockwise, measure the resistance according to the value(s) in the table below.
- Standard Resistance:
Tester Connection
Condition
Specified Condition
3 (CCS) - 1 (CCS)
Always
Below 1 Ω
4 (ECC) - 2 (ECC)
1 (R/N) - 7 (R/N)
|
|
||||

| OK | |
 |
| 3. INSPECT CRUISE CONTROL SWITCH WIRE |
Disconnect the z7 spiral cable connector.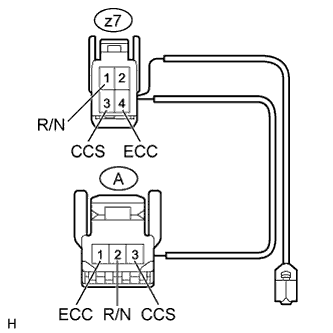
Disconnect the A switch connector.
Measure the resistance according to the value(s) in the table below.
- Standard Resistance:
Tester Connection
Condition
Specified Condition
z7-3 (CCS) - A-3 (CCS)
Always
Below 2.5 Ω
z7-4 (ECC) - A-1 (ECC)
z7-1 (R/N) - A-2 (R/N)
z7-3 (CCS) - Body ground
Always
1 MΩ or higher
z7-4 (ECC) - Body ground
z7-1 (R/N) - Body ground
|
|
||||
| OK | |
|
| 4. INSPECT CRUISE CONTROL SWITCH |
Remove the cruise control switch (Click here).
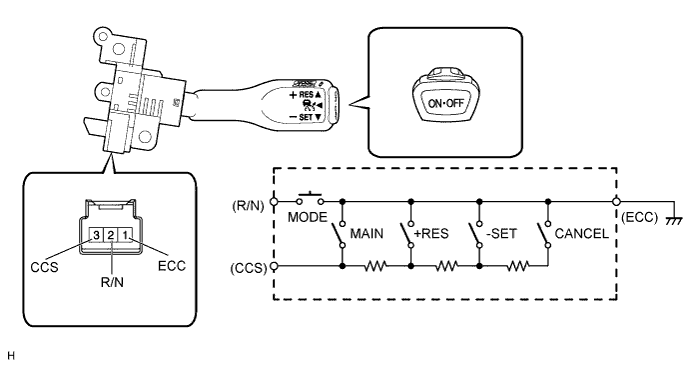
Measure the resistance according to the value(s) in the table below.
- Standard Resistance:
Tester Connection
Switch Condition
Specified Condition
3 (CCS) - 1 (ECC)
Cruise control switch on
Below 2.5 Ω
Cruise control switch off
1 MΩ or higher
+RES switch held on
235 to 245 Ω
-SET switch held on
617 to 643 Ω
CANCEL switch held on
1509 to 1571 Ω
2 (R/N) - 1 (ECC)
MODE switch held on
Below 2.5 Ω
|
|
||||
| OK | |
|
| 5. CHECK HARNESS AND CONNECTOR (SPIRAL CABLE SUB-ASSEMBLY - ECM AND BODY GROUND) |
Disconnect the G40 spiral cable connector.
Disconnect the G56*1 or G57*2 and G58*2 ECM connectors.
- *1: for 1GR-FE
- *2: for 1KD-FTV
- *1: for 1GR-FE
Measure the resistance according to the value(s) in the table below.
- Standard Resistance:
for 1GR-FE Tester Connection
Condition
Specified Condition
G40-1 (CCS) - G56-11 (CCS)
Always
Below 1 Ω
G40-7 (R/N) - G56-17 (CCHG)
G40-2 (ECC) - Body ground
G40-1 (CCS) - Body ground
Always
10 kΩ or higher
G40-7 (R/N) - Body ground
for 1KD-FTV Tester Connection
Condition
Specified Condition
G40-1 (CCS) - G57-14 (CCS)
Always
Below 1 Ω
G40-7 (R/N) - G58-9 (CCHG)
G40-2 (ECC) - Body ground
G40-1 (CCS) - Body ground
Always
10 kΩ or higher
G40-7 (R/N) - Body ground
Result Result
Proceed to
OK (for 1GR-FE)
A
OK (for 1KD-FTV)
B
NG
C
|
|
||||
|
|
||||
| A | ||
|
||
| ||