INSTALLATION
Removal / installation · Vehicles built from Aug 2014
Versions by build date: Aug 2013 – Jul 2014 from Aug 2014
| 1.
INSTALL FUEL TANK TO FILLER PIPE HOSE |
 |
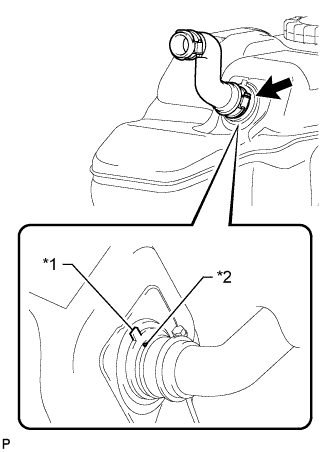
- Align the fuel tank side mark with the hose side mark.
Text in Illustration
*1
|
Fuel Tank Side Mark
|
*2
|
Hose Side Mark
|
Install the fuel tank to filler pipe hose to the fuel tank.
| 2.
INSTALL NO. 3 FUEL TANK PROTECTOR |
|
Install the No. 3 fuel tank protector and attach the 4 clamps.
Install the 2 bolts.
-
Torque:
- 5.0 N*m{
51 kgf*cm
, 44 in.*lbf
}
| 3.
INSTALL FUEL TANK VENT TUBE ASSEMBLY (for Single Tank Type) |
|
Apply a light coat of gasoline or grease to a new gasket and install the gasket to the fuel tank.
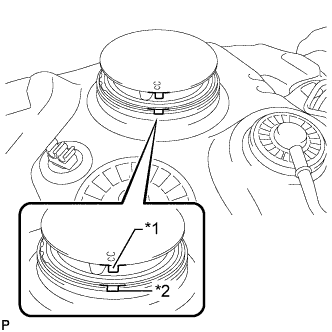
- Align the protrusion of the fuel tank vent tube with the groove of the fuel tank.
Text in Illustration
*1
|
Protrusion
|
*2
|
Groove
|
- NOTICE:
- Be careful not to bend the arm of the fuel sender gauge.
Install the fuel tank vent tube to the fuel tank.
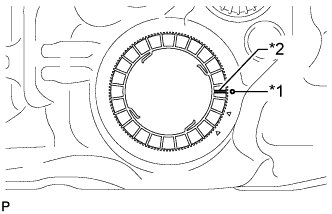
Put a new retainer on the fuel tank. While holding the fuel tank vent tube, tighten the retainer one complete turn by hand.
Text in Illustration
*1
|
Start Mark (Fuel Tank Side)
|
*2
|
Start Mark (Retainer Side)
|
- HINT:
- Make sure the start marks on the retainer and fuel tank are aligned and then tighten the retainer.
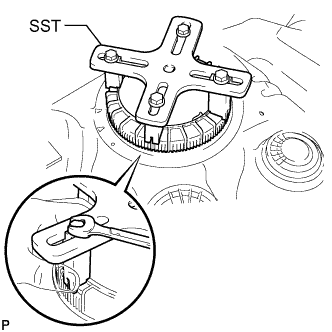
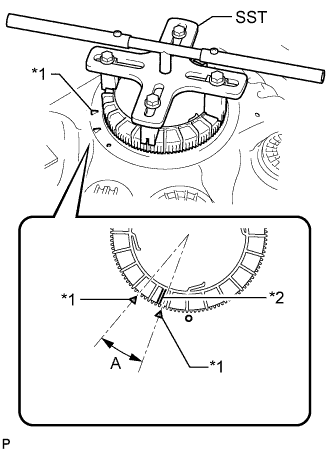
- Set SST on the retainer.
- SST
- 09808-14030
- HINT:
- Hold the fuel tank vent tube assembly upright by hand to ensure that the gasket is not moved out of position.
- Engage the claws of SST securely with the retainer holes to secure SST.
- Install SST while pressing the claws of SST against the retainer (toward the center of SST).
- Using SST, tighten the retainer until the mark on the retainer is within range A on the fuel tank as shown in the illustration.
- SST
- 09808-14030
Text in Illustration
*1
|
Fuel Tank Side Mark
|
*2
|
Retainer Side Mark
|
- HINT:
- Fit the tips of SST onto the ribs of the retainer.
| 4.
INSTALL FUEL SUCTION WITH PUMP AND GAUGE TUBE ASSEMBLY (for Double Tank Type)
|
|
Apply a light coat of gasoline or grease to a new gasket and install the gasket to the fuel tank.
- Align the protrusion of the fuel suction with pump and gauge tube with the groove of the fuel tank.
Text in Illustration
*1
|
Protrusion
|
*2
|
Groove
|
- NOTICE:
- Be careful not to bend the arm of the fuel sender gauge.
Install the fuel suction with pump and gauge tube to the fuel tank.
Put a new retainer on the fuel tank. While holding the fuel suction with pump and gauge tube, tighten the retainer one complete turn by hand.
Text in Illustration
*1
|
Start Mark (Fuel Tank Side)
|
*2
|
Start Mark (Retainer Side)
|
- HINT:
- Make sure the start marks on the retainer and fuel tank are aligned and then tighten the retainer.
- Set SST on the retainer.
- SST
- 09808-14030
- HINT:
- Hold the fuel suction with pump and gauge tube assembly upright by hand to ensure that the gasket is not moved out of position.
- Engage the claws of SST securely with the retainer holes to secure SST.
- Install SST while pressing the claws of SST against the retainer (toward the center of SST).
- Using SST, tighten the retainer until the mark on the retainer is within range A on the fuel tank as shown in the illustration.
- SST
- 09808-14030
Text in Illustration
*1
|
Fuel Tank Side Mark
|
*2
|
Retainer Side Mark
|
- HINT:
- Fit the tips of SST onto the ribs of the retainer.
| 5.
INSTALL FUEL RETURN TUBE SUB-ASSEMBLY AND FUEL TANK MAIN TUBE SUB-ASSEMBLY (for Single Tank Type) |
|
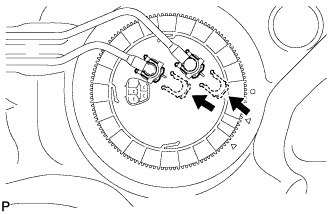
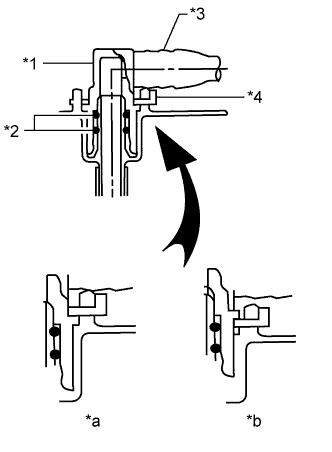
- Install the fuel return tube and fuel tank main tube with the 2 fuel tube joint clips.
- NOTICE:
-
Check that there are no scratches or foreign objects on the connecting parts.
- Check that the fuel tube joints are inserted securely.
- Check that the fuel tube joint clips are on the collars of the fuel tube joints.
- After installing the fuel tube joint clips, check that the fuel tube joints cannot be pulled off.
Text in Illustration
*1
|
Fuel Tube Joint
|
*2
|
O-Ring
|
*3
|
Fuel Tube
|
*4
|
Fuel Tube Joint Clip
|
*a
|
CORRECT
|
*b
|
INCORRECT
|
Install the fuel return tube and fuel tank main tube to the fuel tank.
| 6.
INSTALL FUEL TANK MAIN TUBE SUB-ASSEMBLY, FUEL RETURN TUBE SUB-ASSEMBLY AND NO. 2 FUEL MAIN TUBE SUB-ASSEMBLY (for Double Tank Type) |
|
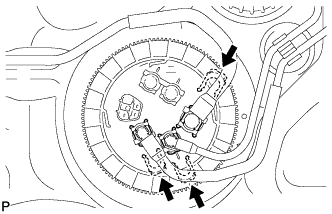
- Install the fuel tank main tube, fuel return tube and No. 2 fuel main tube with the 3 fuel tube joint clips.
- NOTICE:
-
Check that there are no scratches or foreign objects on the connecting parts.
- Check that the fuel tube joints are inserted securely.
- Check that the fuel tube joint clips are on the collars of the fuel tube joints.
- After installing the fuel tube joint clips, check that the fuel tube joints cannot be pulled off.
Text in Illustration
*1
|
Fuel Tube Joint
|
*2
|
O-Ring
|
*3
|
Fuel Tube
|
*4
|
Fuel Tube Joint Clip
|
*a
|
CORRECT
|
*b
|
INCORRECT
|
Install the fuel tank main tube to the fuel tank.
Install the fuel return tube to the fuel tank and attach the clamp.
Install the No. 2 fuel main tube to the fuel tank and attach the clamp.
| 7.
INSTALL NO. 4 FUEL MAIN TUBE SUB-ASSEMBLY AND FUEL SUCTION TUBE SUB-ASSEMBLY (for Double Tank Type) |
|
- Install the No. 4 fuel main tube and fuel suction tube with the 2 fuel tube joint clips.
- NOTICE:
-
Check that there are no scratches or foreign objects on the connecting parts.
- Check that the fuel tube joints are inserted securely.
- Check that the fuel tube joint clips are on the collars of the fuel tube joints.
- After installing the fuel tube joint clips, check that the fuel tube joints cannot be pulled off.
Text in Illustration
*1
|
Fuel Tube Joint
|
*2
|
O-Ring
|
*3
|
Fuel Tube
|
*4
|
Fuel Tube Joint Clip
|
*a
|
CORRECT
|
*b
|
INCORRECT
|
Install the fuel suction tube to the fuel tank and attach the clamp.
Install the No. 4 fuel main tube to the fuel tank and attach the clamp.
| 8.
INSTALL FUEL TANK CUSHION |
|
Install 3 new fuel tank cushions to the fuel tank.
| 9.
INSTALL FUEL TANK SUB-ASSEMBLY |
|
Set the fuel tank on a transmission jack and lift up the transmission jack.
- NOTICE:
- Do not allow the fuel tank to contact the vehicle, especially the differential.
Install the 2 fuel tank bands with the 2 pins and 2 clips.
Connect the 2 fuel tank bands with the 2 bolts.
-
Torque:
- 40 N*m{
408 kgf*cm
, 30 ft.*lbf
}
| 10.
CONNECT FUEL TANK TO FILLER PIPE HOSE |
|
Connect the fuel tank to filler pipe hose to the filler pipe.
| 11.
CONNECT FUEL TANK BREATHER TUBE SUB-ASSEMBLY (for Single Tank Type) |
|
Connect the fuel tank breather tube (Click here).
| 12.
CONNECT FUEL CUT OFF TUBE (for Single Tank Type) |
|
| 13.
CONNECT FUEL TANK BREATHER TUBE SUB-ASSEMBLY (for Double Tank Type) |
|
Connect the fuel tank breather tube (Click here).
| 14.
CONNECT FUEL RETURN TUBE SUB-ASSEMBLY AND NO. 2 FUEL MAIN TUBE SUB-ASSEMBLY (for Double Tank Type) |
|
Connect the fuel return tube and No. 2 fuel main tube (Click here).
| 15.
CONNECT FUEL CUT OFF TUBE (for Double Tank Type) |
|
Connect the fuel cut off tube (Click here).
| 16.
CONNECT NO. 4 FUEL MAIN TUBE SUB-ASSEMBLY AND FUEL SUCTION TUBE SUB-ASSEMBLY (for Double Tank Type) |
|
Connect the No. 4 fuel main tube and fuel suction tube (Click here).
| 17.
CONNECT FUEL RETURN TUBE SUB-ASSEMBLY (for Single Tank Type) |
|
| 18.
CONNECT FUEL TANK MAIN TUBE SUB-ASSEMBLY (for Single Tank Type) |
|
| 19.
CONNECT FUEL TANK MAIN TUBE SUB-ASSEMBLY (for Double Tank Type) |
|
| 20.
INSTALL NO. 1 FUEL TANK PROTECTOR SUB-ASSEMBLY |
|
Install the No. 1 fuel tank protector with the 6 bolts.
-
Torque:
- 20 N*m{
204 kgf*cm
, 15 ft.*lbf
}
for Half Cover Type:
Install the No. 1 fuel tank protector with the 4 bolts.
-
Torque:
- 20 N*m{
204 kgf*cm
, 15 ft.*lbf
}
| 21.
INSTALL REAR FLOOR SERVICE HOLE COVER |
|
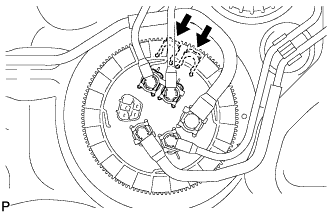
Connect the fuel pump and fuel sender gauge connector.
Install the rear floor service hole cover with the 3 screws.
| 22.
INSTALL REAR SEAT ASSEMBLY LH |
|
for 60/40 Split Double-folding Seat Type LH Side:
Install the rear seat assembly LH (Click here).
for 60/40 Split Slide Walk-in Seat Type LH Side:
Install the rear seat assembly LH (Click here).
| 23.
CONNECT CABLE TO NEGATIVE BATTERY TERMINAL |
|
- NOTICE:
- When disconnecting the cable, some systems need to be initialized after the cable is reconnected (Click here).
| 24.
BLEED AIR FROM FUEL SYSTEM |
|
- w/ DPF (Click here)
- w/o DPF (Click here)
| 25.
INSPECT FOR FUEL LEAK |
|
- w/ DPF (Click here)
- w/o DPF (Click here)