1GD-FTV ENGINE CONTROL ECD SYSTEM(w/ Urea SCR System) Lack of Power (Turbocharger System)
CAUTION / NOTICE / HINT
- HINT:
- ·
The diagnosis flowchart is for lack of power due to turbocharger factors.
·If symptom-specific diagnosis indicates a turbocharger related problem, check using this flowchart.
PROCEDURE
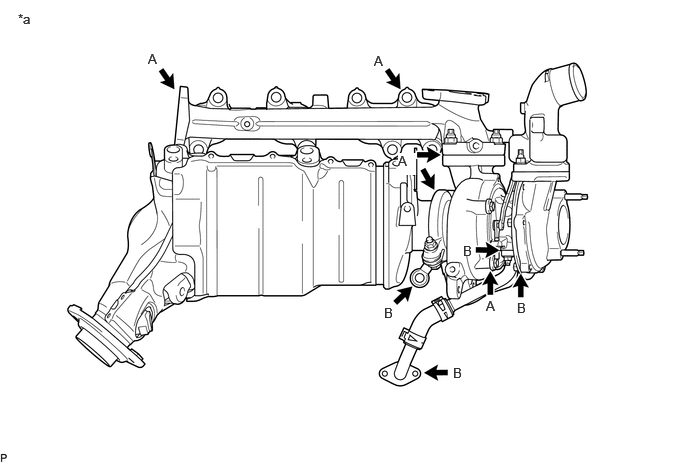
Check that no soot or oil adheres to the turbocharger sub-assembly connectors.
| *a | Example | - | - |
- HINT:
-
If adhering soot or an oil leak exists, air leaking at that position may be the cause of the lack of boost pressure.
| Result | Proceed to |
|---|---|
| No adhering soot or an oil | A |
| Soot adhering around the turbine housing, flange, or V band (A in the illustration) | B |
| Oil leak from the contact surface between the compressor housing and bearing housing (B in the illustration) | C |
A
B
C
(See pageEngine / Hybrid System>1GD-FTV (INTAKE / EXHAUST)>EXHAUST MANIFOLD W/ TURBOCHARGER>REMOVAL)
Remove the turbocharger sub-assembly.
Check that the turbine shaft rotates smoothly, without catching.
Click hereEngine / Hybrid System>1GD-FTV (INTAKE / EXHAUST)>EXHAUST MANIFOLD W/ TURBOCHARGER>INSPECTION
Check for loose turbine mounting nuts and for axial play in the turbine shaft.
Click hereEngine / Hybrid System>1GD-FTV (INTAKE / EXHAUST)>EXHAUST MANIFOLD W/ TURBOCHARGER>INSPECTION
- HINT:
-
If the turbine shaft catches or if there is no play or excessive play, it could indicate improper sealing due to seizing or poor sliding because of a deposit build-up.
| Result | Proceed to |
|---|---|
| No turbine shaft malfunction | A |
| Turbine shaft malfunction | B |
A
B
(See pageEngine / Hybrid System>1GD-FTV (INTAKE / EXHAUST)>EXHAUST MANIFOLD W/ TURBOCHARGER>REMOVAL)
Check for interference between the turbine wheel and the turbine housing.
- HINT:
-
When there is interference between the turbine wheel and turbine housing and the turbine wheel is damaged, check for fragments of the turbine wheel in the exhaust manifold converter subassembly.
| Result | Proceed to |
|---|---|
| No damage or interference | A |
| Damage or interference exists | B |
A
B
(See pageEngine / Hybrid System>1GD-FTV (INTAKE / EXHAUST)>EXHAUST MANIFOLD W/ TURBOCHARGER>REMOVAL)
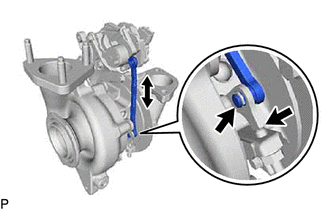
Inspect the turbocharger nozzle vane plate.
Remove the e-washer from the turbocharger nozzle vane control actuator.
Move the turbocharger vane control rod subassembly and check that the turbocharger nozzle vane plate moves.
| Result | Proceed to |
|---|---|
| Catches, but operates* | A |
| Gets stuck and does not operate | B |
- HINT:
-
*: Check several times.
OK
(See pageEngine / Hybrid System>1GD-FTV (INTAKE / EXHAUST)>EXHAUST MANIFOLD W/ TURBOCHARGER>DISASSEMBLY)
NG
(See pageEngine / Hybrid System>1GD-FTV (INTAKE / EXHAUST)>EXHAUST MANIFOLD W/ TURBOCHARGER>REMOVAL)
Check for deformation or cracks in the mounting surfaces on the exhaust manifold converter subassembly and the turbocharger sub-assembly.
- HINT:
-
Deformation or cracks on a mounting surface may allow exhaust gas to leak from the damaged position.
- Standard:
No deformation or cracks on a mounting surface
| Result | Proceed to |
|---|---|
| No problem with the mounting surface | A |
| Deformation or cracks on the exhaust manifold converter sub-assembly mounting surface | B |
| Deformation or cracks on the turbocharger subassembly mounting surface | C |
A
B
C
(See pageEngine / Hybrid System>1GD-FTV (INTAKE / EXHAUST)>EXHAUST MANIFOLD W/ TURBOCHARGER>REMOVAL)
Replace the exhaust pipe clamp and the gasket.
NEXT
Check that the abnormal state has disappeared.
NEXT