1GD-FTV COOLING RADIATOR INSTALLATION
PROCEDURE

 16547
1.INSTALL NO. 1 RADIATOR SUPPORT BUSH
Install the 6 No. 1 radiator support bushes to the radiator assembly.
16548
2.INSTALL NO. 2 RADIATOR SUPPORT BUSH
Install the 2 No. 2 radiator support bushes to the radiator assembly.
16400S
3.INSTALL RADIATOR COLLAR
Install the 4 radiator collars to the radiator assembly.
12209F
4.INSTALL OIL RETURN PIPE SUB-ASSEMBLY
Attach the 2 clamps to install the oil return pipe sub-assembly to the radiator assembly.
17940D
5.INSTALL INTERCOOLER ASSEMBLY
16562
6.INSTALL NO. 2 RADIATOR TO SUPPORT SEAL
16593
7.INSTALL NO. 1 RADIATOR AIR GUIDE
Install the No. 1 radiator air guide with the 2 bolts.
- Torque:
- 11 N*m (112 kgf*cm, 8 ft.*lbf)
16563
8.INSTALL NO. 3 RADIATOR TO SUPPORT SEAL
Install a new No. 3 radiator to support seal to the No. 1 radiator guide.
16400
9.INSTALL RADIATOR ASSEMBLY
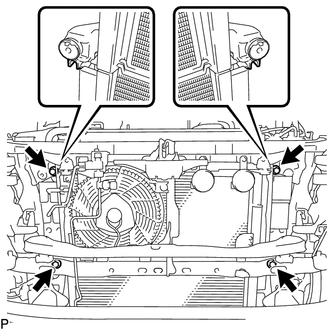
Insert the tabs of the radiator collar into the radiator service holes.
Install the radiator assembly the 4 bolts.
- Torque:
- 18 N*m (184 kgf*cm, 13 ft.*lbf)
53294C
10.INSTALL RADIATOR SIDE DEFLECTOR LH
Attach the 3 claws to install the radiator side deflector LH, and install the clip.
53293C
11.INSTALL RADIATOR SIDE DEFLECTOR RH
Attach the 3 claws to install the radiator side deflector RH, and install the clip.
52521
12.INSTALL FRONT BUMPER UPPER RETAINER
Install the front bumper upper retainer with the 3 bolts.
- Torque:
- 8.0 N*m (82 kgf*cm, 71 in.*lbf)
52119A
13.INSTALL FRONT BUMPER COVER
52129B
14.INSTALL FRONT BUMPER LOWER COVER
16711
15.INSTALL FAN SHROUD
Install the fan pulley.
Place the fan shroud together with the fan with fluid coupling assembly between the engine and radiator assembly.
- NOTICE:
-
Be careful not to damage the radiator core.
Attach the 2 guides and install the fan shroud with the 2 bolts.
- Torque:
- 5.0 N*m (51 kgf*cm, 44 in.*lbf)
Temporarily install the fan with fluid coupling assembly to the engine water pump assembly with the 4 nuts.
- NOTICE:
- ·
Make sure to match the paint mark colors on the fan with fluid coupling assembly with the stud bolts of the same color on the engine water pump assembly.
·When installing the fan and generator V belt, make sure to securely tighten the nuts of the fan with fluid coupling assembly so that the fan pulley is properly aligned.
Install the fan and generator V belt (See page Engine / Hybrid System>1GD-FTV (ENGINE MECHANICAL)>DRIVE BELT>INSTALLATION).
Tighten the 4 nuts holding the fan with fluid coupling assembly.
- Torque:
- 23 N*m (235 kgf*cm, 17 ft.*lbf)
88359
16.INSTALL VISCOUS HEATER V BELT (w/ Viscous Heater)
17.CONNECT OIL COOLER HOSE (for Automatic Transmission)
Connect the oil cooler hose to the radiator assembly and slide the 2 hose clamps to secure the hose.
Attach the 2 clamps and connect the oil cooler hose to the fan shroud with the bolt.
- Torque:
- 5.5 N*m (56 kgf*cm, 49 ft.*lbf)
16470
18.INSTALL RADIATOR RESERVOIR ASSEMBLY
Install the radiator reservoir assembly with the 3 bolts.
- Torque:
- 5.0 N*m (51 kgf*cm, 44 in.*lbf)
Attach the 2 clamps to connect the No. 1 water by-pass hose to the fan shroud.
Connect the No. 1 water by-pass hose to the radiator assembly and slide the hose clamp to secure the hose.
Connect the No. 2 water by-pass hose to the water inlet and slide the hose clamp to secure the hose.
Attach the 2 clamps to connect the No. 2 water by-pass hose to the fan shroud.
17341K
19.INSTALL INTERCOOLER AIR HOSE
Install the intercooler air hose and tighten the 2 hose bands to secure the hose.
- Torque:
- 5.0 N*m (51 kgf*cm, 44 in.*lbf)
16572D
20.INSTALL NO. 2 RADIATOR HOSE
Install the No. 2 radiator hose and slide the 2 hose clamps to secure the hose.
17342F
21.INSTALL NO. 2 INTERCOOLER AIR HOSE
16571C
22.INSTALL NO. 1 RADIATOR HOSE
Install the No. 1 radiator hose and slide the 2 hose clamps to secure the hose.
82123
23.INSTALL NO. 3 ENGINE WIRE (for Cold Area Specification Vehicles)
Attach the 3 wire harness clamps to connect the No. 3 engine wire to the fan shroud.
Connect the 2 cables to the positive battery terminals.
24.CONNECT CABLE TO NEGATIVE BATTERY TERMINAL (for Cold Area Specification Vehicles)
- NOTICE:
-
When disconnecting the cable, some systems need to be initialized after the cable is reconnected (See page General>INTRODUCTION>REPAIR INSTRUCTION>INITIALIZATION).
25.ADD ENGINE COOLANT
26.INSPECT FOR COOLANT LEAK
51405A
27.INSTALL NO. 1 ENGINE UNDER COVER SUB-ASSEMBLY
53292A
28.INSTALL UPPER RADIATOR SUPPORT SEAL
Install the upper radiator support seal with the 13 clips.