AC60F AUTOMATIC TRANSMISSION / TRANSAXLE OIL COOLER(for 2TR-FE) INSTALLATION
PROCEDURE

 32907C
1.INSTALL OIL COOLER TUBE SUB-ASSEMBLY
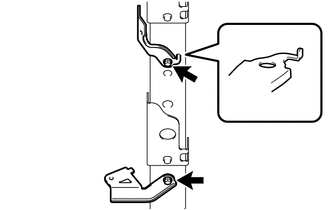
Install the 2 oil cooler tube clamps with the 2 bolts.
- Torque:
- 14 N*m (143 kgf*cm, 10 ft.*lbf)
- NOTICE:
-
Make contact with the terminal stopper.
Install the 2 flexible hose clamps, No. 2 oil cooler inlet tube and No. 2 oil cooler outlet tube with the 2 bolt.
- Torque:
- 5.5 N*m (56 kgf*cm, 49 in.*lbf)
2.INSTALL OIL COOLER HOSE
- NOTICE:
- ·
When disconnecting the hoses from the tube, support the tube by hand and be careful to prevent the tube from being deformed.
·Make sure to install the clips so that the spool fitting is not overlapped.
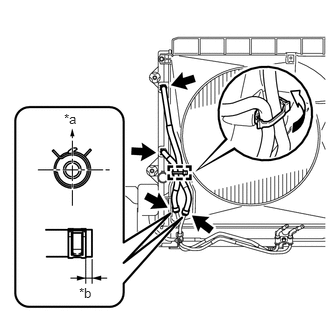
Install the No. 1 transmission oil cooler hose and No. 2 transmission oil cooler hose to the radiator, and slide the 2 clips to secure them.
| *a | Front Side |
| *b | 2 to 7 mm (0.0788 to 0.2755 in.) |
- HINT:
-
Position the claws of the clips so that they do not interfere with other parts unless otherwise specified.
Connect the No. 1 transmission oil cooler hose and No. 2 transmission oil cooler hose to the oil cooler tube sub-assembly, and slide the 2 clips to secure them.
Then pass the No. 1 transmission oil cooler hose and No. 2 transmission oil cooler hose through the No. 1 flexible hose clamp and close the No. 1 flexible hose clamp.
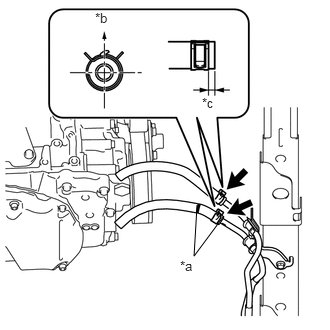
Install the No. 1 oil cooler inlet hose and No. 1 oil cooler outlet hose to the oil cooler tube sub-assembly, and slide the 2 clips to secure them.
| *a | Paint Mark |
| *b | Upper Side |
| *c | 2 to 7 mm (0.0788 to 0.2755 in.) |
32921
3.INSTALL NO. 1 OIL COOLER INLET TUBE AND NO. 1 OIL COOLER OUTLET TUBE
- NOTICE:
- ·
When disconnecting the hoses from the tube, support the tube by hand and be careful to prevent the tube from being deformed.
·Make sure to install the clips so that the spool fitting is not overlapped.
Install the 2 oil cooler tube clamps to the engine assembly with the 2 bolts.
- Torque:
- for Bolt A : 14 N*m (143 kgf*cm, 10 ft.*lbf)
- for Bolt B : 28 N*m (286 kgf*cm, 21 ft.*lbf)
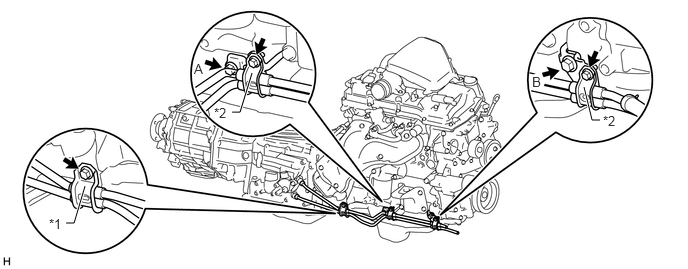
| *1 | Flexible Hose Clamp | *2 | Oil Cooler Tube Clamp |
Connect the ends of the No. 1 oil cooler inlet tube and No. 1 oil cooler outlet tube to the automatic transmission assembly by hand.
Close the 2 oil cooler tube clamps and install the 2 bolts.
- Torque:
- 5.5 N*m (56 kgf*cm, 49 in.*lbf)
Install the flexible hose clamp to the automatic transmission assembly with the bolt.
- Torque:
- 14 N*m (143 kgf*cm, 10 ft.*lbf)
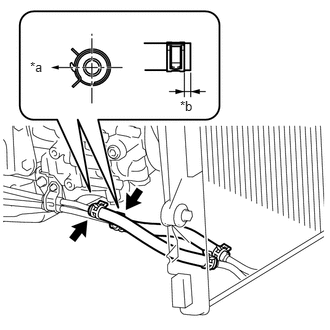
Connect the No. 1 oil cooler inlet hose and No. 1 oil cooler outlet hose to the No. 1 oil cooler inlet tube and No. 1 oil cooler outlet tube, and slide the 2 clips to secure them.
| *a | LH Side |
| *b | 2 to 7 mm (0.0788 to 0.2755 in.) |
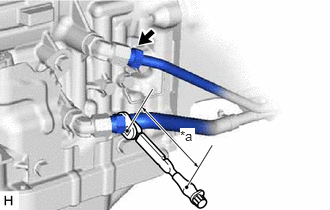
Using a 17 mm union nut wrench, tighten the No. 1 oil cooler inlet tube and No. 1 oil cooler outlet tube.
- Torque:
- Specified tightening torque : 34 N*m (350 kgf*cm, 25 ft.*lbf)
| *a | Torque Wrench Fulcrum Length |
- HINT:
- ·
Calculate the torque wrench reading when changing the fulcrum length of the torque wrench.
(See page General>INTRODUCTION>REPAIR INSTRUCTION>PRECAUTION)
·When using a union nut wrench (fulcrum length of 30 mm (1.181 in.)) + torque wrench (fulcrum length of 180 mm (7.087 in.)): 29 N*m (300 kgf*cm, 22 ft.*lbf)
4.ADJUST AUTOMATIC TRANSMISSION FLUID LEVEL
Adjust the automatic transmission fluid level (See page Drivetrain>AC60F (AUTOMATIC TRANSMISSION / TRANSAXLE)>AUTOMATIC TRANSMISSION FLUID>ADJUSTMENT).
17410
5.INSTALL FRONT EXHAUST PIPE ASSEMBLY
51450
6.INSTALL REAR ENGINE UNDER COVER ASSEMBLY
51405A
7.INSTALL NO. 1 ENGINE UNDER COVER SUB-ASSEMBLY