RA61F MANUAL TRANSMISSION / TRANSAXLE MANUAL TRANSMISSION ASSEMBLY(for 1GD-FTV) INSTALLATION
PROCEDURE

 36100
1.INSTALL TRANSFER ASSEMBLY
33107
2.INSTALL TRANSMISSION UPPER COVER SUB-ASSEMBLY
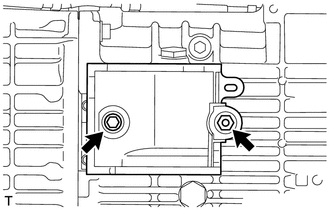
Install the transmission upper cover sub-assembly with the 2 bolts.
- Torque:
- 12 N*m (117 kgf*cm, 8 ft.*lbf)
3.INSTALL MANUAL TRANSMISSION WITH TRANSFER
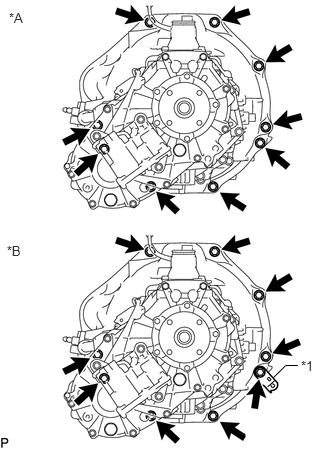
w/o Urea SCR System:
Install the manual transmission with transfer with the 9 bolts.
- Torque:
- 72 N*m (729 kgf*cm, 53 ft.*lbf)
| *A | w/o Urea SCR System |
| *B | w/ Urea SCR System |
| *1 | Wire Harness Bracket |
w/ Urea SCR System:
Install the manual transmission with transfer with the 9 bolts and wire harness bracket.
- Torque:
- 72 N*m (729 kgf*cm, 53 ft.*lbf)
36407
4.CONNECT TRANSFER AND MANUAL TRANSMISSION BREATHER HOSE SUB-ASSEMBLY
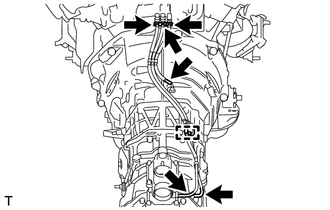
Connect the 3 breather hoses.
Attach the breather hose clamp.
5.CONNECT WIRE HARNESS
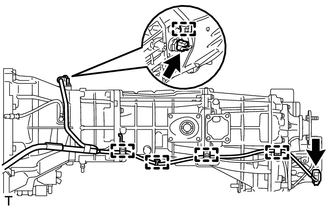
Attach the 5 wire harness clamps.
Connect the 2 connectors and wire harness.
12371
6.INSTALL REAR NO. 1 ENGINE MOUNTING INSULATOR
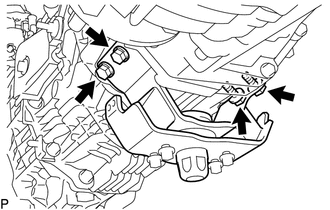
Install the rear No. 1 engine mounting insulator with the 4 bolts.
- Torque:
- 73 N*m (739 kgf*cm, 54 ft.*lbf)
12391
7.INSTALL FRONT ENGINE MOUNTING INSULATOR RH
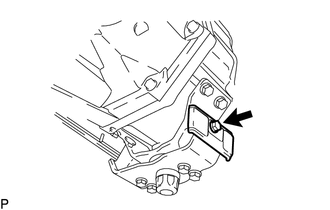
Install the front engine mounting insulator RH with the bolt.
- Torque:
- 12 N*m (122 kgf*cm, 9 ft.*lbf)
51204
8.INSTALL NO. 3 FRAME CROSSMEMBER SUB-ASSEMBLY
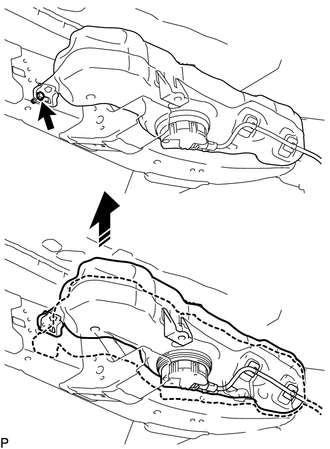
w/ Urea SCR System:
Remove the bolt as shown in the illustration, raise the urea tank sub-assembly and hold it in position.
- HINT:
-
Only raise the urea tank enough to install the fixing bolt to the No. 3 frame crossmember sub-assembly. Do not raise it any higher.
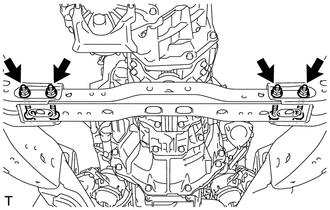
Install the No. 3 frame crossmember sub-assembly with the 4 bolts and 4 nuts.
- Torque:
- 72 N*m (734 kgf*cm, 53 ft.*lbf)
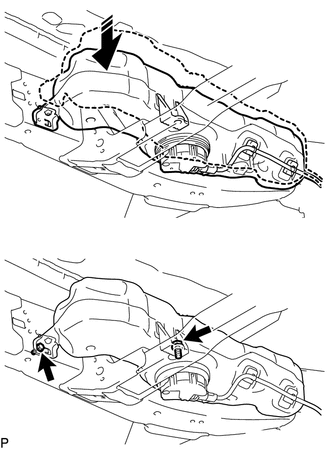
w/ Urea SCR System:
Connect the urea tank sub-assembly to the No. 3 frame crossmember sub-assembly with the 2 bolts.
- Torque:
- 14 N*m (146 kgf*cm, 11 ft.*lbf)
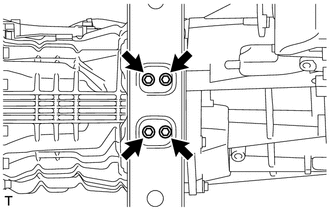
Install the 4 bolts to the No. 3 frame crossmember sub-assembly.
- Torque:
- 30 N*m (306 kgf*cm, 22 ft.*lbf)
51226A
9.INSTALL FRONT SUSPENSION MEMBER BRACKET LH (w/o Urea SCR System)
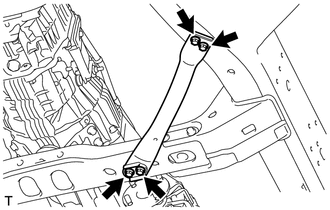
Install the front suspension member bracket LH with the 4 bolts.
- Torque:
- 33 N*m (337 kgf*cm, 24 ft.*lbf)
51226A
10.INSTALL FRONT SUSPENSION MEMBER BRACKET LH (w/ Urea SCR System)
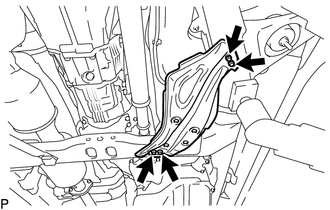
Install the front suspension member bracket LH with the 4 bolts.
- Torque:
- 33 N*m (337 kgf*cm, 24 ft.*lbf)
51225B
11.INSTALL FRONT SUSPENSION MEMBER BRACKET RH
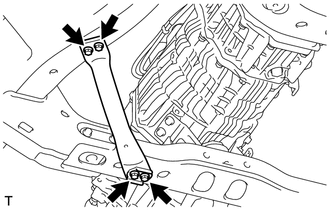
Install the front suspension member bracket RH with the 4 bolts.
- Torque:
- 33 N*m (337 kgf*cm, 24 ft.*lbf)
28100
12.INSTALL STARTER ASSEMBLY (w/o Urea SCR System)
for 2.0 kW Type: (See page Engine / Hybrid System>1GD-FTV (STARTING)>STARTER (for 2.0 kW Type)>INSTALLATION)
for 2.7 kW Type: (See page Engine / Hybrid System>1GD-FTV (STARTING)>STARTER (for 2.7 kW Type)>INSTALLATION)
28100
13.CONNECT STARTER ASSEMBLY (w/ Urea SCR System)
for 2.0 kW Type:
Connect the starter assembly.
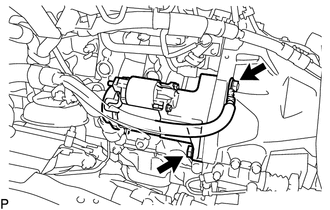
Connect the starter assembly with the 2 bolts.
- Torque:
- 68 N*m (693 kgf*cm, 50 ft.*lbf)
Connect the starter wire with the nut.
- Torque:
- 9.8 N*m (100 kgf*cm, 87 in.*lbf)
Connect the starter connector.
Close the terminal cap.
for 2.7 kW Type:
Connect the starter assembly.
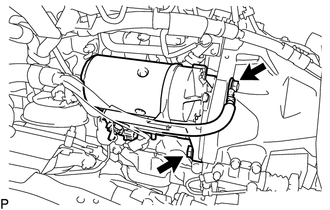
Connect the starter assembly with the 2 bolts.
- Torque:
- 68 N*m (693 kgf*cm, 50 ft.*lbf)
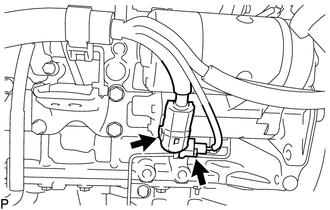
Connect the starter wire with the nut.
- Torque:
- 21 N*m (215 kgf*cm, 16 ft.*lbf)
Connect the starter connector.
Close the terminal cap.
53737A
14.INSTALL FRONT NO. 1 FENDER APRON TO FRAME SEAL LH
31470
15.INSTALL CLUTCH RELEASE CYLINDER ASSEMBLY
31482
16.INSTALL CLUTCH RELEASE CYLINDER TO FLEXIBLE HOSE TUBE
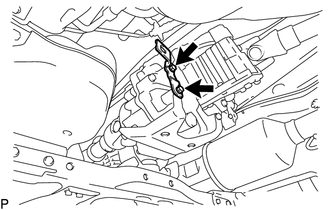
Install the clutch flexible hose bracket with the 2 bolts.
- Torque:
- 19 N*m (194 kgf*cm, 14 ft.*lbf)
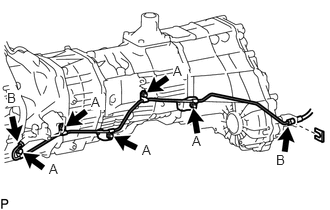
Temporarily install the clutch release cylinder to flexible hose tube with the 2 bolts, 3 nuts and a new clip.
Tighten the labeled A.
- Torque:
- 19 N*m (194 kgf*cm, 14 ft.*lbf)
Tighten the labeled B.
- Torque:
- 15 N*m (155 kgf*cm, 11 ft.*lbf)
37110
17.INSTALL PROPELLER SHAFT ASSEMBLY
37140
18.INSTALL FRONT PROPELLER SHAFT ASSEMBLY
12156
19.INSTALL OIL PAN INSULATOR
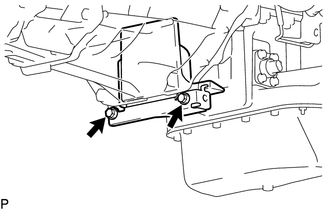
Install oil pan insulator with the 2 bolts.
- Torque:
- 18 N*m (184 kgf*cm, 13 ft.*lbf)
20.CONNECT WIRE HARNESS
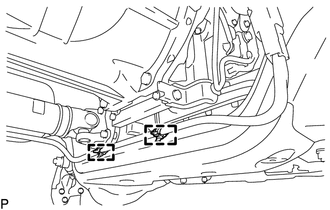
Attach the 2 wire harness clamps and connect the wire harness.
21.INSTALL WIRE HARNESS CLAMP BRACKET (w/ Urea SCR System)
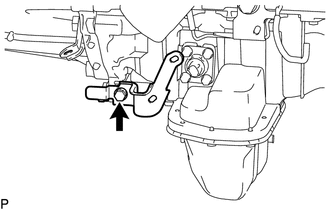
Install the wire harness clamp bracket with the bolt.
- Torque:
- 13 N*m (131 kgf*cm, 9 ft.*lbf)
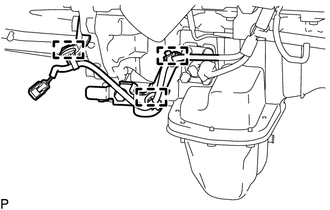
Attach the 3 wire harness clamps and connect the wire harness.
36179
22.INSTALL TRANSFER CASE LOWER PROTECTOR
Install the transfer case lower protector with the 4 bolts.
- Torque:
- 18 N*m (184 kgf*cm, 13 ft.*lbf)
17410
23.INSTALL FRONT EXHAUST PIPE ASSEMBLY
24.ADD MANUAL TRANSMISSION OIL
25.INSPECT MANUAL TRANSMISSION OIL
33530F
26.INSTALL SHIFT LEVER ASSEMBLY
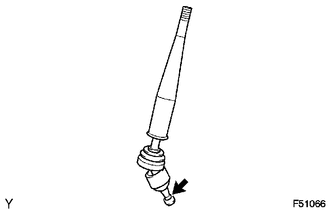
Apply MP grease to the tip of the shift lever assembly.

|
MP Grease |
Cover the shift lever cap with a cloth.
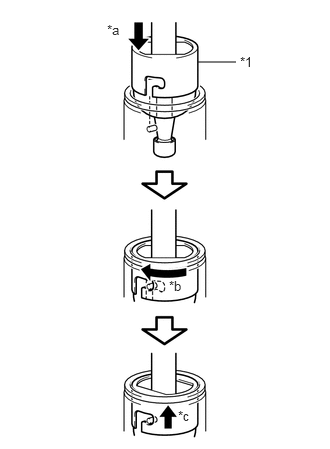
While pressing down on the shift lever cap, turn it clockwise to install the shift lever assembly.
| *1 | Shift Lever Cap |
| *a | Press down |
| *b | Clockwise |
| *c | Lock |
Attach the shift lever cap boot.
58286
27.INSTALL NO. 1 SHIFT AND SELECT LEVER BOOT
Install the No. 1 shift and select lever boot with the 4 screws.
28.INSTALL CONSOLE BOX ASSEMBLY
for manual transmission: (See page Vehicle Interior>INTERIOR PANELS / TRIM>FRONT CONSOLE BOX(for Manual Transmission)>INSTALLATION)
w/ Refrigerated Cool Box: (See page Vehicle Interior>INTERIOR PANELS / TRIM>FRONT CONSOLE BOX (w/ Refrigerated Cool Box)>INSTALLATION)
29.FILL RESERVOIR WITH BRAKE FLUID
30.BLEED CLUTCH LINE
31.INSPECT FLUID LEVEL IN RESERVOIR
32.INSPECT FOR BRAKE FLUID LEAK FROM CLUTCH LINE
28800
33.CONNECT CABLE TO NEGATIVE BATTERY TERMINAL
- NOTICE:
-
When disconnecting the cable, some systems need to be initialized after the cable is reconnected (See page General>INTRODUCTION>REPAIR INSTRUCTION>INITIALIZATION).