PARK ASSIST / MONITORING CLEARANCE WARNING ECU(for RHD) INSTALLATION
PROCEDURE

 89340A
1.INSTALL CLEARANCE WARNING ECU ASSEMBLY (for 4 Sensor Type)
Install the clearance warning ECU assembly with the bolt.
Connect the connector.
82730A
2.INSTALL DRIVER SIDE JUNCTION BLOCK ASSEMBLY (for 4 Sensor Type)
73900
3.INSTALL LOWER NO. 1 INSTRUMENT PANEL AIRBAG ASSEMBLY (for 4 Sensor Type)
Install the lower No. 1 instrument panel airbag assembly with the 4 bolts.
Connect the connector.
- NOTICE:
-
When handling the airbag connector, take care not to damage the airbag wire harness.
- Torque:
- 10 N*m (102 kgf*cm, 7 ft.*lbf)
55045
4.INSTALL LOWER INSTRUMENT PANEL FINISH PANEL SUB-ASSEMBLY (for 4 Sensor Type)
Connect each connector and each cable.
Attach the 14 clips to install the lower instrument panel finish panel sub-assembly.
Install the 2 bolts.
Attach the 2 claws to close the cover.
55607
5.INSTALL NO. 2 INSTRUMENT PANEL UNDER COVER SUB-ASSEMBLY (for 4 Sensor Type)
55476C
6.INSTALL INSTRUMENT PANEL FINISH PLATE GARNISH (for 4 Sensor Type)
55480D
7.INSTALL LOWER INSTRUMENT PANEL FINISH PANEL ASSEMBLY (for 4 Sensor Type)
Connect each connector.
Attach the 4 clips to install the lower instrument panel finish panel assembly.
55317A
8.INSTALL INSTRUMENT SIDE PANEL RH (for 4 Sensor Type)
Attach the 5 clips, claw and 3 guides to install the instrument side panel RH.
62111C
9.INSTALL COWL SIDE TRIM BOARD RH (for 4 Sensor Type)
Attach the clip and claw to install the cowl side trim board RH.
Install the clip.
67910
10.INSTALL DOOR SCUFF PLATE ASSEMBLY RH (for 4 Sensor Type)
Attach the 4 clips, 10 claws and 2 guides to install the door scuff plate assembly RH.
89340A
11.INSTALL CLEARANCE WARNING ECU ASSEMBLY (for 8 Sensor Type)
Install the clearance warning ECU assembly with the 2 nuts.
Connect the connector.
55550
12.INSTALL GLOVE COMPARTMENT DOOR ASSEMBLY (for 8 Sensor Type)
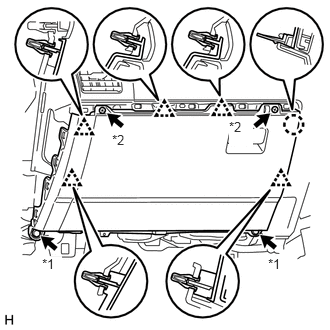
Connect each connector.
Attach the 5 clips and claw to install the glove compartment door assembly.
Install the 2 bolts and 2 screws.
| *1 | Bolt |
| *2 | Screw |
55607
13.INSTALL NO. 2 INSTRUMENT PANEL UNDER COVER SUB-ASSEMBLY (for 8 Sensor Type)
55461A
14.INSTALL INSTRUMENT PANEL ORNAMENT (for 8 Sensor Type)
Attach the 5 clips to install the instrument panel ornament.
55318C
15.INSTALL INSTRUMENT SIDE PANEL LH (for 8 Sensor Type)
Attach the 5 clips, claw and 3 guides to install the instrument side panel LH.
62112
16.INSTALL COWL SIDE TRIM BOARD LH (for 8 Sensor Type)
Attach the clip and claw to install the cowl side trim board LH.
Install the clip.
67920
17.INSTALL DOOR SCUFF PLATE ASSEMBLY LH (for 8 Sensor Type)
Attach the 4 clips, 10 claws and 2 guides to install the door scuff plate assembly LH.
18.CONNECT CABLE TO NEGATIVE BATTERY TERMINAL (for 4 Sensor Type)
- NOTICE:
-
When disconnecting the cable, some systems need to be initialized after the cable is reconnected (See page General>INTRODUCTION>REPAIR INSTRUCTION>INITIALIZATION).
19.CHECK SRS WARNING LIGHT (for 4 Sensor Type)