WINDOW / GLASS POWER WINDOW REGULATOR MOTOR(for Front Door) INSTALLATION
CAUTION / NOTICE / HINT
- HINT:
- ·
Use the same procedure for the RH and LH sides.
·The procedure listed below is for the LH side.
·A bolt without a torque specification is shown in the standard bolt chart (See page General>SPECIFICATIONS>STANDARD BOLT>SPECIFIED TORQUE FOR STANDARD BOLTS).
PROCEDURE

 85720C
1.INSTALL FRONT POWER WINDOW REGULATOR MOTOR ASSEMBLY LH
- NOTICE:
-
The regulator arm must be below the intermediate position when installing the power window regulator motor.
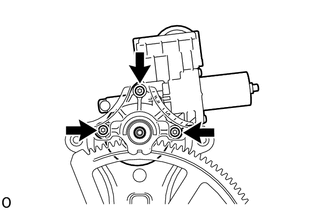
Apply MP grease to the sliding and rotating areas of the regulator motor.
Using a T25 "TORX" socket wrench, install the power window regulator motor with the 3 screws.
- Torque:
- 5.4 N*m (55 kgf*cm, 48 in.*lbf)
- HINT:
-
A new front window regulator uses self-tapping screws to thread new installation holes when the self-tapping screws are inserted.
69802
2.INSTALL FRONT DOOR WINDOW REGULATOR SUB-ASSEMBLY LH
68102
3.INSTALL FRONT DOOR GLASS SUB-ASSEMBLY LH
67832
4.INSTALL FRONT DOOR SERVICE HOLE COVER LH
86160
5.INSTALL FRONT NO. 1 SPEAKER ASSEMBLY
68172A
6.INSTALL FRONT DOOR INNER GLASS WEATHERSTRIP LH
67602
7.INSTALL FRONT DOOR TRIM BOARD SUB-ASSEMBLY LH
74611C
8.INSTALL ASSIST GRIP COVER LH
67492A
9.INSTALL FRONT DOOR LOWER FRAME BRACKET GARNISH LH
69298A
10.INSTALL NO. 2 DOOR INSIDE HANDLE BEZEL LH
11.CONNECT CABLE TO NEGATIVE BATTERY TERMINAL
- NOTICE:
-
When disconnecting the cable, some systems need to be initialized after the cable is reconnected (See page General>INTRODUCTION>REPAIR INSTRUCTION>INITIALIZATION).
12.INITIALIZE POWER WINDOW CONTROL SYSTEM
Initialize the power window control system (See page Vehicle Exterior>WINDOW / GLASS>POWER WINDOW CONTROL SYSTEM>INITIALIZATION).