DOOR LOCK POWER DOOR LOCK CONTROL SYSTEM All Doors LOCK/UNLOCK Functions do not Operate Via Master Switch, Driver Side Door Key Cylinder
DESCRIPTION
The main body ECU (multiplex network body ECU) receives switch signals from the multiplex network master switch assembly and driver door key cylinder lock or unlock switch signals from the front door lock assembly LH*1 or front door lock assembly RH*2. The main body ECU (multiplex network body ECU) activates the door lock motor on each door according to these signals.
*1: for LHD
*2: for RHD
WIRING DIAGRAM
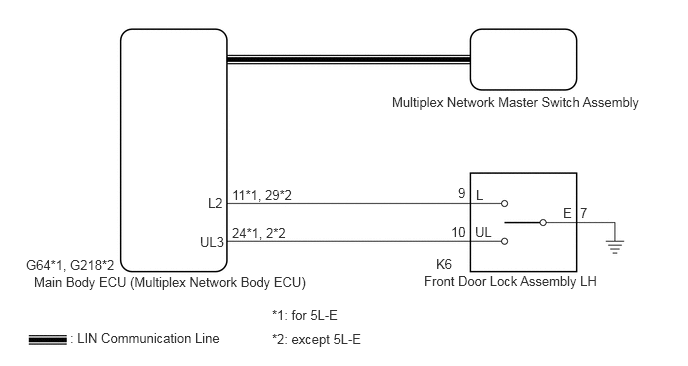
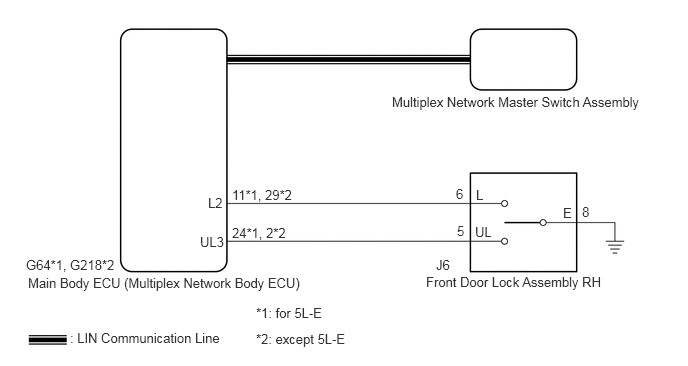
CAUTION / NOTICE / HINT
- NOTICE:
- ·
The power door lock control system uses the LIN communication system. Inspect the communication function by following How to Proceed with Troubleshooting. Troubleshoot the power door lock control system after confirming that the communication systems are functioning properly.
Click hereVehicle Interior>DOOR LOCK>POWER DOOR LOCK CONTROL SYSTEM>HOW TO PROCEED WITH TROUBLESHOOTING
·w/ Door Control Battery:
As the door control battery is installed between the vehicle battery and main body ECU (multiplex network body ECU), first perform the inspections in On-Vehicle Inspection to confirm that there are no malfunctions in the power source circuit for the main body ECU (multiplex network body ECU) before performing this troubleshooting procedure.
Click hereVehicle Interior>DOOR LOCK>POWER DOOR LOCK CONTROL SYSTEM>ON-VEHICLE INSPECTION
·w/ Entry and Start System:
If the main body ECU (multiplex network body ECU) is replaced, refer to the Service Bulletin.
PROCEDURE
Check door lock operation.
Click hereVehicle Interior>DOOR LOCK>POWER DOOR LOCK CONTROL SYSTEM>OPERATION CHECK
- Result:
Result Proceed to All doors cannot be locked by multiplex network master switch assembly A All doors cannot be locked by driver door key cylinder B
A
B
Connect the GTS to the DLC3.
Turn the ignition switch to ON.
Turn the GTS on.
Enter the following menus: Body Electrical / Master Switch / Data List.
Read the Data List according to the display on the GTS.
| Tester Display | Measurement Item/Range | Normal Condition | Diagnostic Note |
|---|---|---|---|
| Door Lock Switch Status | Driver side door control switch lock signal / ON or OFF | ON: Lock side of driver side door control switch pushed
OFF: Lock side of driver side door control switch not pushed |
- |
| Door Unlock Switch Status | Driver side door control switch unlock signal / ON or OFF | ON: Unlock side of driver side door control switch pushed
OFF: Unlock side of driver side door control switch not pushed |
- |
- OK:
On the GTS screen, ON or OFF is displayed for each item according to the table above.
- Result:
Proceed to OK NG
OK
NG
Connect the GTS to the DLC3.
Turn the ignition switch to ON.
Turn the GTS on.
Enter the following menus: Body Electrical / Main Body / Data List.
Read the Data List according to the display on the GTS.
| Tester Display | Measurement Item/Range | Normal Condition | Diagnostic Note |
|---|---|---|---|
| Door Key SW-Lock | Driver side door key-linked switch lock signal / ON or OFF | OFF: Driver door key cylinder not turned to lock position
ON: Driver door key cylinder turned to lock position |
- |
| D Door Key SW-UL | Driver side door key-linked switch unlock signal / ON or OFF | OFF: Driver door key cylinder not turned to unlock position
ON: Driver door key cylinder turned to unlock position |
- |
- OK:
On the GTS screen, ON or OFF is displayed for each item according to the table above.
- Result:
Proceed to OK NG
OK
NG
for LHD:
Remove the front door lock assembly LH.
Click hereVehicle Interior>DOOR LOCK>FRONT DOOR LOCK>REMOVAL
Inspect the front door lock assembly LH.
Click hereVehicle Interior>DOOR LOCK>FRONT DOOR LOCK>INSPECTION
for RHD:
Remove the front door lock assembly RH.
Click hereVehicle Interior>DOOR LOCK>FRONT DOOR LOCK>REMOVAL
Inspect the front door lock assembly RH.
Click hereVehicle Interior>DOOR LOCK>FRONT DOOR LOCK>INSPECTION
- Result:
Proceed to OK NG
OK
NG
for LHD:
Disconnect the K6 front door lock assembly LH connector.
Disconnect the G64*1 or G218*2 main body ECU (multiplex network body ECU) connector.
*1: for 5L-E
*2: except 5L-E
Measure the resistance according to the value(s) in the table below.
- Standard Resistance:
for 5L-E: Tester Connection Condition Specified Condition K6-9 (L) - G64-11 (L2) Always Below 1 Ω K6-10 (UL) - G64-24 (UL3) Always Below 1 Ω K6-7 (E) - Body ground Always Below 1 Ω K6-9 (L) or G64-11 (L2) - Other terminals and body ground Always 10 kΩ or higher K6-10 (UL) or G64-24 (UL3) - Other terminals and body ground Always 10 kΩ or higher
except 5L-E: Tester Connection Condition Specified Condition K6-9 (L) - G218-29 (L2) Always Below 1 Ω K6-1 (UL) - G218-2 (UL3) Always Below 1 Ω K6-7 (E) - Body ground Always Below 1 Ω K6-9 (L) or G218-29 (L2) - Other terminals and body ground Always 10 kΩ or higher K6-1 (UL) or G218-2 (UL3) - Other terminals and body ground Always 10 kΩ or higher
for RHD:
Disconnect the J6 front door lock assembly RH connector.
Disconnect the G64*1 or G218*2 main body ECU (multiplex network body ECU) connector.
Measure the resistance according to the value(s) in the table below.
- Standard Resistance:
for 5L-E: Tester Connection Condition Specified Condition J6-6 (L) - G64-11 (L2) Always Below 1 Ω J6-5 (UL) - G64-24 (UL3) Always Below 1 Ω J6-8 (E) - Body ground Always Below 1 Ω J6-6 (L) or G64-11 (L2) - Other terminals and body ground Always 10 kΩ or higher J6-5 (UL) or G64-24 (UL3) - Other terminals and body ground Always 10 kΩ or higher
except 5L-E: Tester Connection Condition Specified Condition J6-6 (L) - G218-29 (L2) Always Below 1 Ω J6-5 (UL) - G218-2 (UL3) Always Below 1 Ω J6-8 (E) - Body ground Always Below 1 Ω J6-6 (L) or G218-29 (L2) - Other terminals and body ground Always 10 kΩ or higher J6-5 (UL) or G218-2 (UL3) - Other terminals and body ground Always 10 kΩ or higher
- Result:
Proceed to OK NG
OK
NG