DOOR LOCK KEY REMINDER WARNING SYSTEM Key Reminder Buzzer does not Sound
DESCRIPTION
The key reminder warning buzzer sounds when the driver door is opened while the ignition switch is off or ACC. The key reminder warning buzzer is activated when the main body ECU (multiplex network body ECU) sends an unlock warning switch signal and driver door courtesy light switch signal to the combination meter assembly via CAN communication.
WIRING DIAGRAM
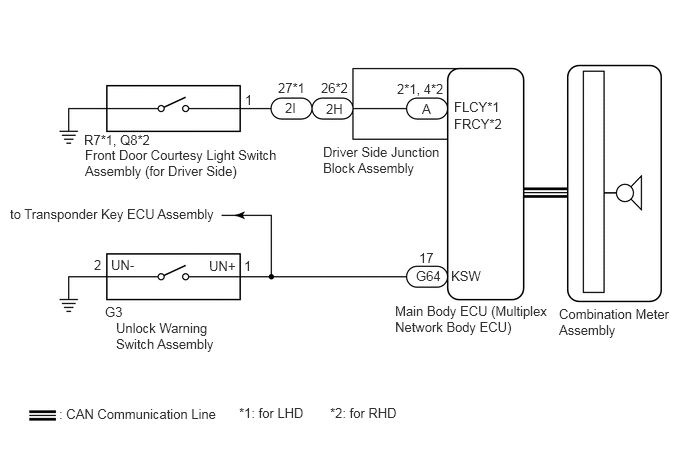
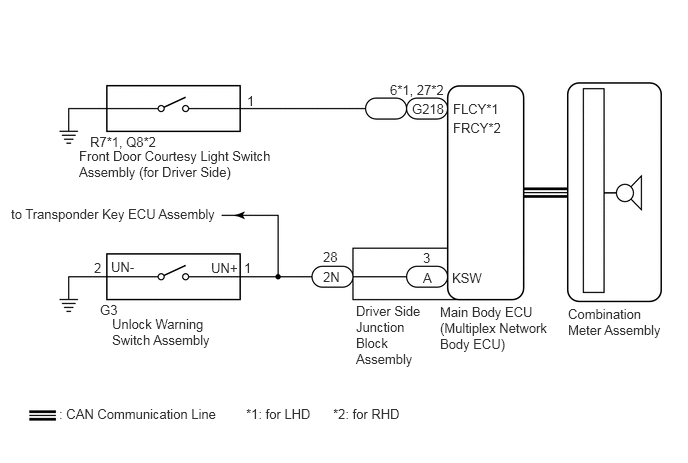
CAUTION / NOTICE / HINT
- NOTICE:
- ·
When replacing the combination meter assembly, make sure to replace it with a new one.
·The key reminder warning system uses the CAN communication system. Inspect the communication function by following How to Proceed with Troubleshooting. Troubleshoot the key reminder warning system after confirming that the communication systems are functioning properly.
Click hereVehicle Interior>DOOR LOCK>KEY REMINDER WARNING SYSTEM>HOW TO PROCEED WITH TROUBLESHOOTING
PROCEDURE
Check that the seat belt warning buzzer.
Click hereVehicle Interior>SEAT BELT>SEAT BELT WARNING SYSTEM>OPERATION CHECK
- Result:
Proceed to OK NG
OK
NG
Connect the GTS to the DLC3.
Turn the ignition switch to ON.
Turn the GTS on.
Enter the following menus: Body Electrical / Main Body / Data List.
Read the Data List according to the display on the GTS.
| Tester Display | Measurement Item | Range | Normal Condition | Diagnostic Note |
|---|---|---|---|---|
| FL Door Courtesy SW*1 | Front door courtesy light switch assembly LH signal | OFF or ON | OFF: Front door LH closed
ON: Front door LH open |
- |
| FR Door Courtesy SW*2 | Front door courtesy light switch assembly RH signal | OFF or ON | OFF: Front door RH closed
ON: Front door RH open |
- |
*1: for LHD
*2: for RHD
- OK:
The GTS indicates ON or OFF according to the driver door conditions shown in the table.
- Result:
Proceed to OK NG
OK
NG
Connect the GTS to the DLC3.
Turn the ignition switch to ON.
Turn the GTS on.
Enter the following menus: Body Electrical / Main Body / Data List.
Read the Data List according to the display on the GTS.
| Tester Display | Measurement Item | Range | Normal Condition | Diagnostic Note |
|---|---|---|---|---|
| Key Unlock Warning SW | Unlock warning switch signal | OFF or ON | OFF: No key in ignition key cylinder
ON: Key in ignition key cylinder |
- |
- OK:
The GTS indicates ON or OFF according to whether the key is in the ignition key cylinder.
- Result:
Proceed to OK NG
OK
NG
Remove the unlock warning switch assembly.
Click hereVehicle Interior>DOOR LOCK>UNLOCK WARNING SWITCH>REMOVAL
Inspect the unlock warning switch assembly.
Click hereVehicle Interior>DOOR LOCK>UNLOCK WARNING SWITCH>INSPECTION
- Result:
Proceed to OK (for 5L-E) OK (except 5L-E) NG
OK (for 5L-E)
OK (except 5L-E)
NG
Disconnect the G3 unlock warning switch assembly connector.
Disconnect the G64 main body ECU (multiplex network body ECU) connector.
Measure the resistance according to the value(s) in the table below.
- Standard Resistance:
Tester Connection Condition Specified Condition G3-1 (UN+) - G64-17 (KSW) Always Below 1 Ω G3-2 (UN-) - Body ground Always Below 1 Ω
- Result:
Proceed to OK NG
OK
NG
Disconnect the G3 unlock warning switch assembly connector.
Remove the main body ECU (multiplex network body ECU) from the driver side junction block assembly.
Click herePower Source / Network>POWER DISTRIBUTION>MAIN BODY ECU>REMOVAL
Connect the driver side junction block assembly connectors.
Measure the resistance according to the value(s) in the table below.
- Standard Resistance:
Tester Connection Condition Specified Condition G3-1 (UN+) - A-3 (KSW) Always Below 1 Ω G3-2 (UN-) - Body ground Always Below 1 Ω
- Result:
Proceed to OK NG
OK
NG
Disconnect the G3 unlock warning switch assembly connector.
Disconnect the 2N driver side junction block assembly connector.
Measure the resistance according to the value(s) in the table below.
- Standard Resistance:
Tester Connection Condition Specified Condition G3-1 (UN+) - 2N-28 Always Below 1 Ω G3-2 (UN-) - Body ground Always Below 1 Ω
- Result:
Proceed to OK NG
OK
NG
Remove the front door courtesy light switch assembly (for RH).
Click hereVehicle Interior>LIGHTING (INT)>FRONT DOOR COURTESY SWITCH>REMOVAL
Inspect the front door courtesy light switch assembly (for RH).
Click hereVehicle Interior>LIGHTING (INT)>FRONT DOOR COURTESY SWITCH>INSPECTION
- Result:
Proceed to OK (for 5L-E) OK (except 5L-E) NG
OK (for 5L-E)
OK (except 5L-E)
NG
Disconnect the R7*1 or Q8*2 front door courtesy light switch assembly (for Driver Side) connector.
*1: for LHD
*2: for RHD
Remove the main body ECU (multiplex network body ECU) from the driver side junction block assembly.
Click herePower Source / Network>POWER DISTRIBUTION>MAIN BODY ECU>REMOVAL
Connect the driver side junction block assembly connectors.
Measure the resistance according to the value(s) in the table below.
- Standard Resistance:
for LHD: Tester Connection Condition Specified Condition R7-1 - A-2 (FLCY) Always Below 1 Ω
for RHD: Tester Connection Condition Specified Condition Q8-1 - A-4 (FRCY) Always Below 1 Ω
- Result:
Proceed to OK NG
OK
NG
*1: for LHD
*2: for RHD
Disconnect the R7*1 or Q8*2 front door courtesy light switch assembly (for Driver Side) connector.
Disconnect the 2I*1 or 2H*2 driver side junction block assembly connector.
Measure the resistance according to the value(s) in the table below.
- Standard Resistance:
for LHD: Tester Connection Condition Specified Condition R7-1 - 2I-27 Always Below 1 Ω
for RHD: Tester Connection Condition Specified Condition Q8-1 - 2H-26 Always Below 1 Ω
- Result:
Proceed to OK NG
OK
NG
Disconnect the R7*1 or Q8*2 front door courtesy light switch assembly (for Driver Side) connector.
*1: for LHD
*2: for RHD
Disconnect the G218 main body ECU (multiplex network body ECU) connector.
Measure the resistance according to the value(s) in the table below.
- Standard Resistance:
for LHD: Tester Connection Condition Specified Condition R7-1 - G218-6 (FLCY) Always Below 1 Ω
for RHD: Tester Connection Condition Specified Condition Q8-1 - G218-27 (FRCY) Always Below 1 Ω
- Result:
Proceed to OK NG
OK
NG