1GD-FTV INTAKE / EXHAUST EXHAUST MANIFOLD W/ TURBOCHARGER REMOVAL
PROCEDURE

 1.DISCONNECT CABLE FROM NEGATIVE BATTERY TERMINAL
- NOTICE:
-
When disconnecting the cable, some systems need to be initialized after the cable is reconnected.
-
Click hereGeneral>INTRODUCTION>REPAIR INSTRUCTION>INITIALIZATION
25051
2.REMOVE EXHAUST MANIFOLD CONVERTER SUB-ASSEMBLY
3.DRAIN ENGINE COOLANT
4.DRAIN ENGINE COOLANT (w/ Urea SCR System)
5.DRAIN ENGINE OIL
17940D
6.REMOVE INTERCOOLER ASSEMBLY (w/ Urea SCR System)
17341K
7.REMOVE INTERCOOLER AIR HOSE (w/o Urea SCR System)
17342F
8.REMOVE NO. 2 INTERCOOLER AIR HOSE (w/o Urea SCR System)
44306
9.DISCONNECT VANE PUMP OIL RESERVOIR SUB-ASSEMBLY
16571C
10.REMOVE NO. 1 RADIATOR HOSE
16552B
11.REMOVE NO. 2 SUB-RADIATOR HOSE (w/ Urea SCR System)
16551B
12.REMOVE NO. 1 SUB-RADIATOR HOSE (w/ Urea SCR System)
161B0
13.REMOVE ELECTRIC WATER PUMP ASSEMBLY (w/ Urea SCR System)
16553B
14.REMOVE NO. 3 SUB-RADIATOR HOSE (w/ Urea SCR System)
16554B
15.REMOVE NO. 4 SUB-RADIATOR HOSE (w/ Urea SCR System)
16640
16.REMOVE INTERCOOLER RESERVOIR ASSEMBLY
16470
17.REMOVE RADIATOR RESERVOIR ASSEMBLY
82123
18.DISCONNECT NO. 3 ENGINE WIRE (for Cold Area Specification Vehicles)
16711
19.REMOVE FAN SHROUD
17705
20.REMOVE AIR CLEANER CAP SUB-ASSEMBLY WITH AIR CLEANER HOSE
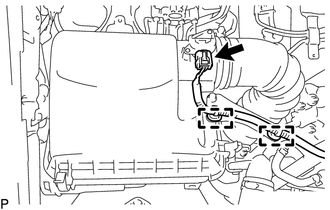
Disconnect the mass air flow meter sub-assembly connector and detach the 2 harness clamps.
Detach the 4 clips.
Loosen the hose clamp and remove the air cleaner cap sub-assembly with air cleaner hose.
17801
21.REMOVE AIR CLEANER FILTER ELEMENT SUB-ASSEMBLY
Remove the air cleaner element sub-assembly from the air cleaner case.
22.REMOVE AIR CLEANER CASE SUB-ASSEMBLY
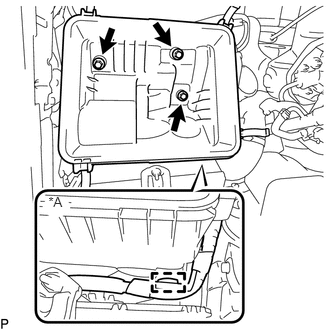
| *A | for Cold Area Specification Vehicles |
Remove the 3 bolts and air cleaner case sub-assembly.
87120G
23.DISCONNECT VISCOUS HEATER WITH MAGNET CLUTCH ASSEMBLY (for Cold Area Specification Vehicles)
87209D
24.REMOVE WATER HOSE SUB-ASSEMBLY (w/ Viscous Heater)
16279
25.REMOVE NO. 3 WATER BY-PASS PIPE
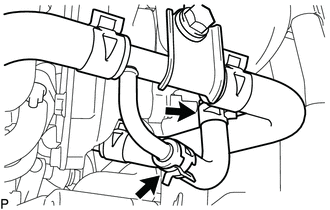
for Cold Area Specification Vehicles:
Slide the 2 clips and remove the water hose from the compressor inlet elbow and No. 3 water by-pass pipe.
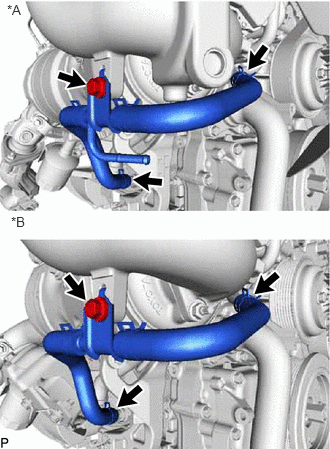
| *A | for Cold Area Specification Vehicles |
| *B | except Cold Area Specification Vehicles |
Slide the 2 clips and disconnect the 2 water hoses from the oil cooler assembly and No. 2 water by-pass pipe.
Remove the bolt and No. 3 water by-pass pipe.
12229
26.REMOVE PCV PIPE (for Cold Area Specification Vehicles)
w/o Urea SCR System:
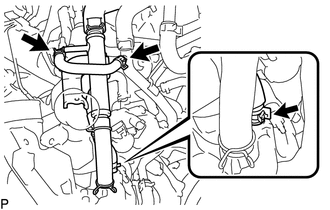
Slide the 2 clips and disconnect the No. 20 water by-pass hose from the PCV pipe and No. 1 water by-pass pipe.
Slide the clip and disconnect the No. 19 water by-pass hose from the compressor inlet elbow.
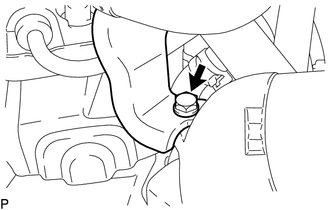
Remove the bolt and disconnect the PCV pipe from the compressor outlet elbow.
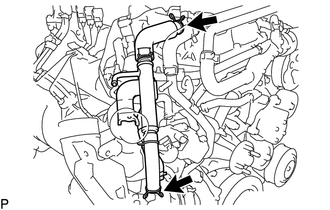
Slide the 2 clips and remove the PCV pipe.
w/ Urea SCR System:
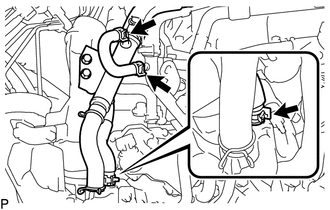
Slide the 2 clips and disconnect the No. 20 water by-pass hose from the PCV pipe and No. 1 water by-pass pipe.
Slide the clip and disconnect the No. 19 water by-pass hose from the compressor inlet elbow.
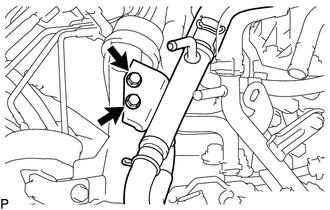
Remove the 2 bolts and disconnect the PCV pipe from the compression outlet elbow.
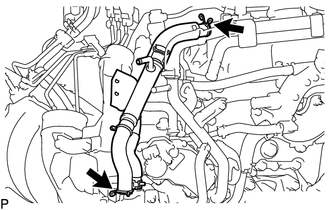
Slide the 2 clips and remove the PCV pipe.
12261
27.REMOVE PCV HOSE (except Cold Area Specification Vehicles)
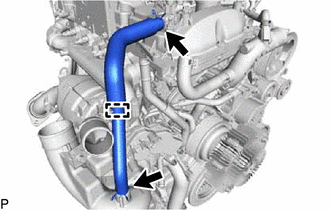
Slide the 2 clips.
Slide the 2 clips, detach the clamp and remove the PCV hose.
28.REMOVE WATER BY-PASS HOSE (w/ Urea SCR System)
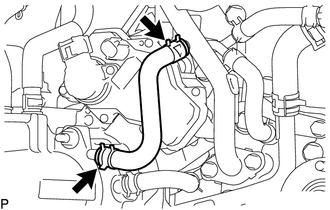
Slide the 2 clips and disconnect the No. 21 water by-pass hose from the turbocharger sub-assembly and No. 1 water by-pass pipe.
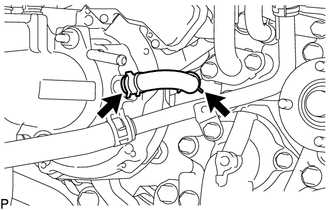
Slide the 2 clips and disconnect the No. 4 turbo water hose from the turbocharger sub-assembly and No. 1 turbo water pipe sub-assembly.
16268
29.REMOVE NO. 1 WATER BY-PASS PIPE
16284
30.DISCONNECT TURBO WATER HOSE
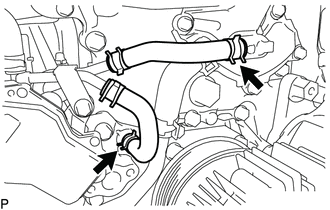
Slide the 2 clips and disconnect the No. 1 turbo water hose and No. 2 turbo water hose from the water outlet sub-assembly and water pump assembly.
31.REMOVE OIL COOLER TUBE BRACKET AND WIREHARNESS CLAMP BRACKET
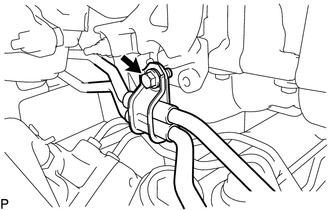
for Automatic Transmission:
Remove the bolt and disconnect the oil cooler tube bracket.
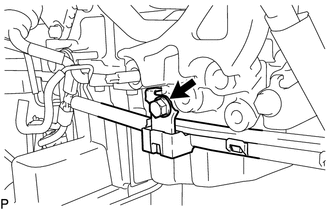
Remove the bolt and disconnect the wire harness.
87101
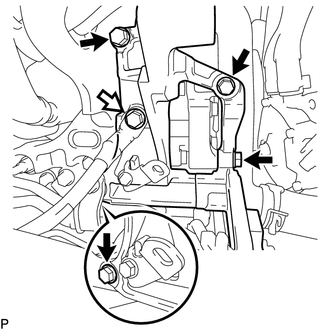
32.DISCONNECT NO. 1 VISCOUS HEATER BRACKET SUB-ASSEMBLY (for Cold Area Specification Vehicles)
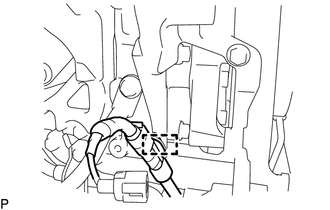
Remove the detach the clamp and disconnect the wire harness.

|
No. 1 Viscous Heater Bracket Sub-assembly Bolt |

|
No. 4 Engine Harness Bolt |
Remove the bolt and disconnect the No. 4 engine harness.
Remove the 4 bolts and No. 1 viscous heater bracket sub-assembly.
17293
33.REMOVE TURBOCHARGER STAY
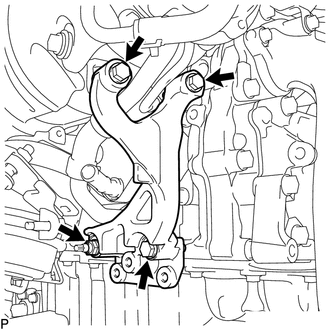
Remove the 3 bolts, nut and the turbocharger stay.
15474
34.REMOVE TURBO OIL OUTLET PIPE
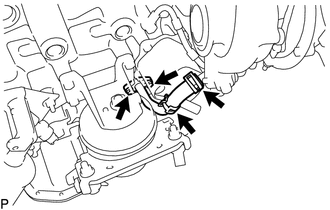
Slide the 2 clips and disconnect the turbo oil outlet hose from the turbo oil outlet pipe.
w/ Cover:
Remove the cover from the turbo oil outlet pipe.
Remove the 2 bolts and turbo oil outlet pipe and gasket.
15407
35.REMOVE TURBO OIL INLET PIPE SUB-ASSEMBLY
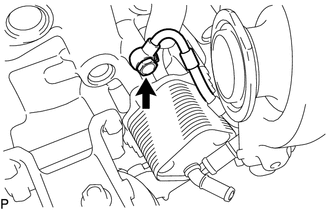
Remove the union bolt and gasket.
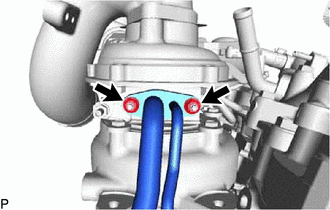
Remove the 2 nuts and the turbo oil inlet pipe subassembly.
- NOTICE:
-
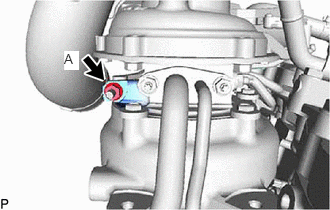 0.667,0.531 0.823,0.729 0.156,0.198 10 true A
-
Do not loosen the nut labeled A.
Remove the gasket.
17201
36.REMOVE TURBOCHARGER SUB-ASSEMBLY
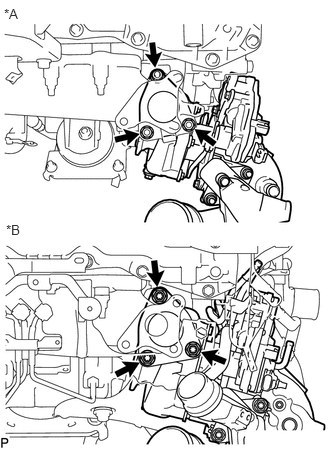
| *A | w/o Urea SCR System |
| *B | w/ Urea SCR System |
Remove the 3 nuts and turbocharger sub-assembly.
Remove the gasket from the exhaust manifold.
25601
37.REMOVE NO. 1 EGR PIPE SUB-ASSEMBLY
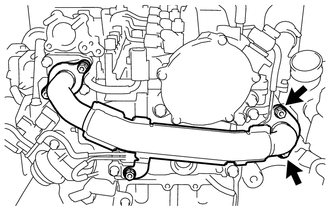
Remove the 2 nuts and disconnect the No. 1 EGR pipe sub-assembly.
17141
38.REMOVE EXHAUST MANIFOLD
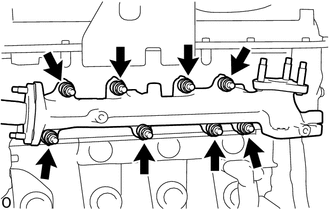
Remove the 8 nuts, 8 plate washers, 8 collars and exhaust manifold.
Remove the 2 gaskets (cylinder head side and No. 1 EGR pipe sub-assembly side).
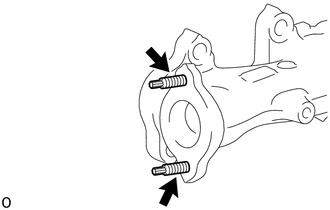
Using an E8 "TORX" socket wrench, remove the 2 stud bolts from the exhaust manifold.
16027
39.REMOVE NO. 1 TURBO WATER PIPE SUB-ASSEMBLY
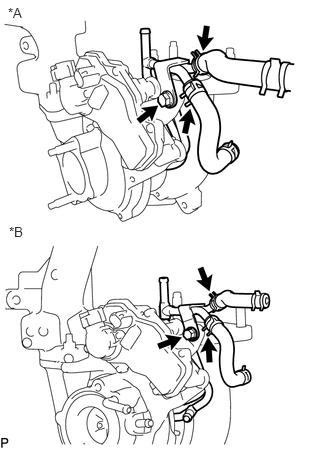
| *A | w/o Urea SCR System |
| *B | w/ Urea SCR System |
Slide the 2 hose clips and disconnect the No. 1 turbo water hose and No. 2 turbo water hose from the No. 1 turbo water pipe sub-assembly.
Remove the bolt.
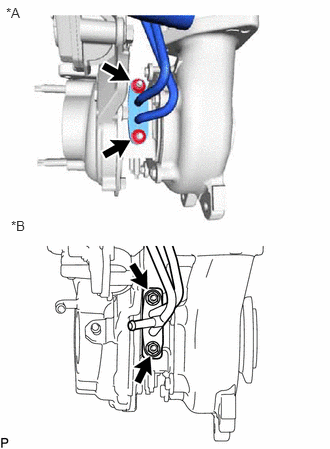
| *A | w/o Urea SCR System |
| *B | w/ Urea SCR System |
Remove the 2 nuts, turbo water pipe sub-assembly and gasket.
17274
40.REMOVE COMPRESSOR INLET ELBOW
w/o Urea SCR System:
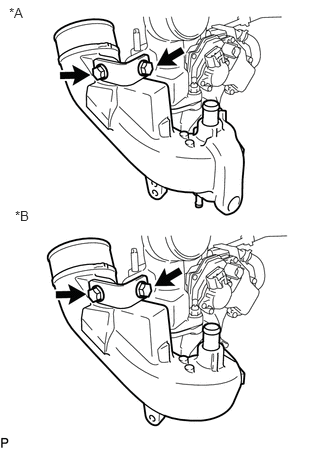
| *A | for Cold Area Specification Vehicles |
| *B | except Cold Area Specification Vehicles |
Remove the 2 bolts and compressor elbow stay.
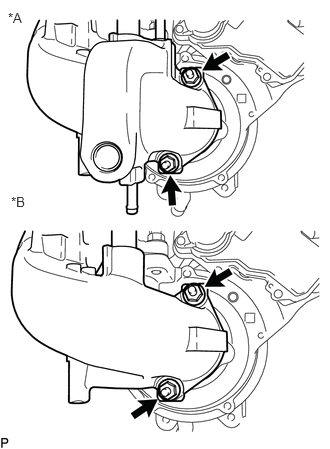
| *A | for Cold Area Specification Vehicles |
| *B | except Cold Area Specification Vehicles |
Remove the 2 nuts and compressor inlet elbow from turbocharger sub-assembly.
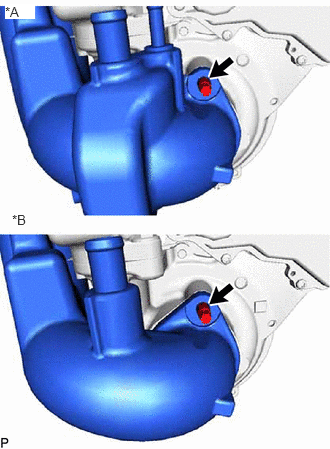
| *A | for Cold Area Specification Vehicles |
| *B | except Cold Area Specification Vehicles |
Using an E8 "TORX" socket wrench, remove the stud bolt shown in the illustration together with the compressor inlet elbow and gasket.
w/ Urea SCR System:
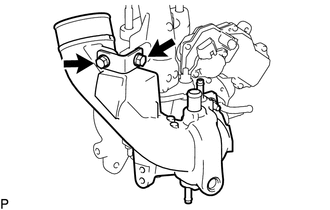
Remove the 2 bolts and compressor elbow stay.
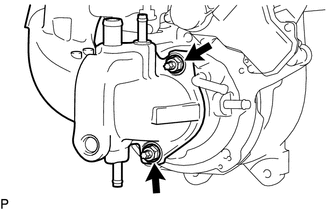
Remove the 2 nuts and compressor inlet elbow from turbocharger sub-assembly.
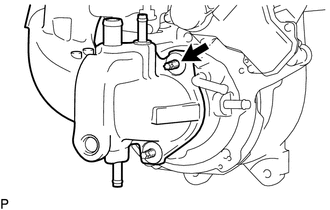
Using an E8 "TORX" socket wrench, remove the stud bolt shown in the illustration together with the compressor inlet elbow.
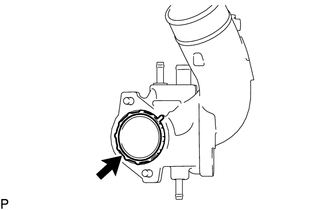
Remove the gasket from compressor inlet elbow.
17275
41.REMOVE COMPRESSOR OUTLET ELBOW
w/o Urea SCR System:
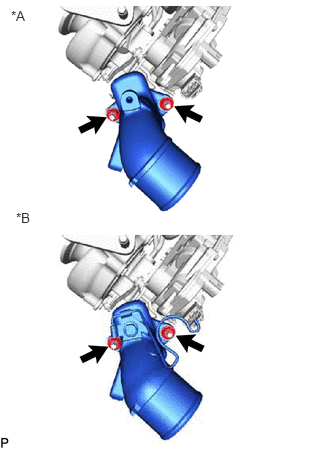
| *A | for Cold Area Specification Vehicles |
| *B | except Cold Area Specification Vehicles |
Remove the 2 nuts and compressor outlet elbow.
Remove the gasket.
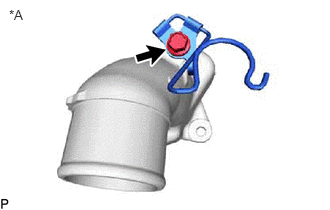
| *A | except Cold Area Specification Vehicles |
Remove the bolt and hose clamp.
w/ Urea SCR System:
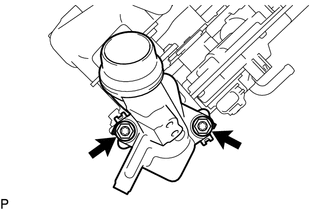
Remove the 2 nuts and compressor outlet elbow.
Remove the gasket.
42.DISCONNECT STUD BOLT
Using an E5 "TORX" socket wrench, remove the 4 stud bolts shown in the illustration.
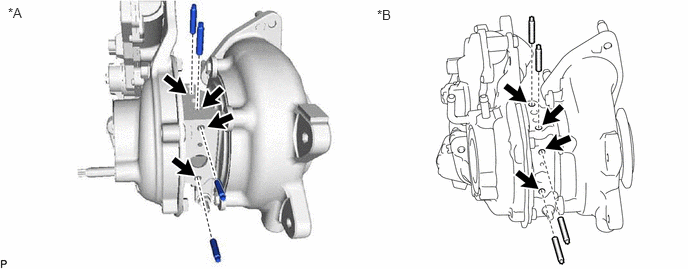
| *A | w/o Urea SCR System | *B | w/ Urea SCR System |
- NOTICE:
-
If a stud bolt is deformed or its threads are damaged, replace it.
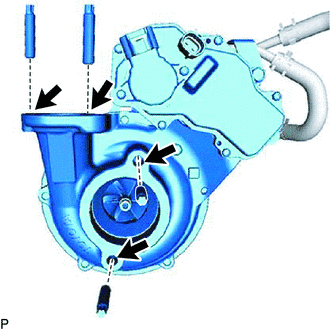
Using an E8 "TORX" socket wrench, remove the 4 stud bolts shown in the illustration.
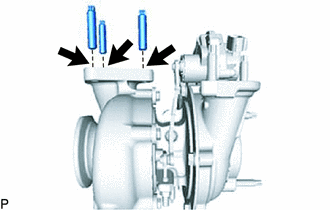
Using an E10 "TORX" socket wrench, remove the 3 stud bolts shown in the illustration.