HEATING / AIR CONDITIONING CONDENSER REMOVAL
PROCEDURE

 1. DRAIN ENGINE COOLANT
for 1GR-FE:
Click hereEngine / Hybrid System>1GR-FE (COOLING)>COOLANT>REPLACEMENT
for 2TR-FE:
Click hereEngine / Hybrid System>2TR-FE (COOLING)>COOLANT>REPLACEMENT
for 5L-E:
Click hereEngine / Hybrid System>5L-E (COOLING)>COOLANT>REPLACEMENT
for 1GD-FTV:
Click hereEngine / Hybrid System>1GD-FTV (COOLING)>COOLANT>REPLACEMENT
16400
2.REMOVE RADIATOR ASSEMBLY
for 1GR-FE:
Click hereEngine / Hybrid System>1GR-FE (COOLING)>RADIATOR>REMOVAL
for 2TR-FE:
Click hereEngine / Hybrid System>2TR-FE (COOLING)>RADIATOR>REMOVAL
for 5L-E:
Click hereEngine / Hybrid System>5L-E (COOLING)>RADIATOR>REMOVAL
for 1GD-FTV:
Click hereEngine / Hybrid System>1GD-FTV (COOLING)>RADIATOR>REMOVAL
3.RECOVER REFRIGERANT FROM REFRIGERATION SYSTEM
for HFC-134a (R134a):
Click hereVehicle Interior>HEATING / AIR CONDITIONING>REFRIGERANT (for HFC-134a(R134a))>REPLACEMENT
for HFO-1234yf (R1234yf):
Click hereVehicle Interior>HEATING / AIR CONDITIONING>REFRIGERANT(for HFO-1234yf(R1234yf))>REPLACEMENT
88703
4.DISCONNECT DISCHARGE HOSE SUB-ASSEMBLY
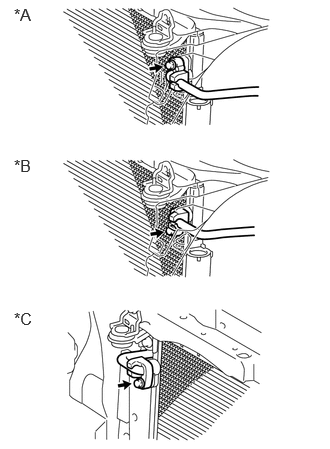
| *A | for 1GR-FE |
| *B | for 2TR-FE, 1GD-FTV |
| *C | for 5L-E |
Remove the bolt and disconnect the discharge hose sub-assembly from the cooler condenser assembly.
- NOTICE:
- ·
When removing the bolt, do not allow any tools to contact the pipe.
·When removing the bolt, hold a part of the pipe near the connector.
Remove the O-ring from the discharge hose sub-assembly.
- NOTICE:
-
Seal the openings of the disconnected parts using vinyl tape to prevent moisture and foreign matter from entering them.
88710
5.DISCONNECT AIR CONDITIONING TUBE ASSEMBLY
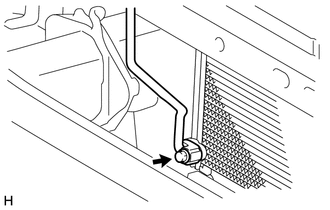
Remove the bolt and disconnect the air conditioning tube assembly from the cooler condenser assembly.
- NOTICE:
- ·
When removing the bolt, do not allow any tools to contact the pipe.
·When removing the bolt, hold a part of the pipe near the connector.
Remove the O-ring from the air conditioning tube assembly.
- NOTICE:
-
Seal the openings of the disconnected parts using vinyl tape to prevent moisture and foreign matter from entering them.
88463
6.DISCONNECT NO. 1 COOLER CONDENSER BRACKET
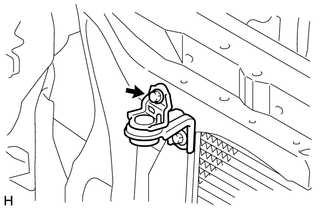
Remove the bolt and disconnect the No. 1 cooler condenser bracket.
88463A
7.DISCONNECT NO. 2 COOLER CONDENSER BRACKET
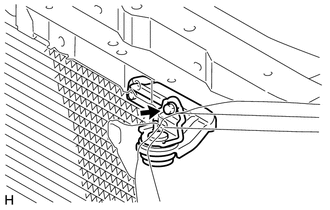
Remove the bolt and disconnect the No. 2 cooler condenser bracket.
88460
8.REMOVE COOLER CONDENSER ASSEMBLY
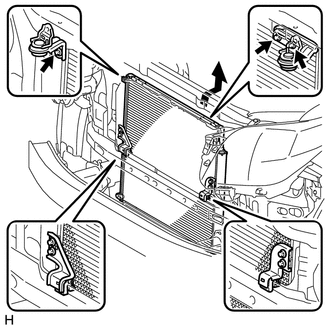
Remove the 3 bolts and cooler condenser assembly as shown in the illustration.
9.REMOVE COOLER DRYER
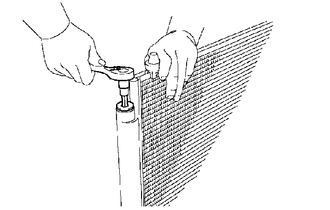
Using a 14 mm socket hexagon wrench, remove the cap from the modulator.
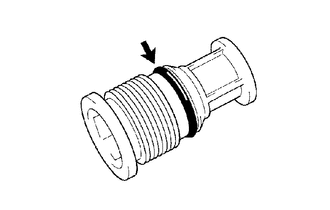
Remove the O-ring from the cap.
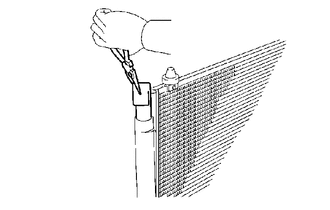
Using pliers, remove the cooler dryer.