VF4BM TRANSFER / 4WD / AWD 4WD CONTROL ECU REMOVAL
CAUTION / NOTICE / HINT
The necessary procedures (adjustment, calibration, initialization, or registration) that must be performed after parts are removed, installed, or replaced during the 4 wheel drive control ECU removal/installation are shown below.
| Replacement Part or Procedure | Necessary Procedures | Effects/Inoperative when not Performed | Link |
|---|---|---|---|
| Battery terminal is disconnected/reconnected | Correction of steering angle neutral point | Multi-terrain monitor system | ( ) |
- HINT:
- ·
When the cable is disconnected / reconnected to the auxiliary battery terminal, systems temporarily stop operating. However, each system has a function that completes learning the first time the system is used.
Learning completes when vehicle is driven
Effect/Inoperative Function When Necessary Procedures are not Performed Necessary Procedures Link Lane departure alert system Drive the vehicle straight ahead at 40 km/h (25 mph) or more for 10 seconds or more. ( )
Pre-collision system Lighting system (EXT) (for LED Headlight) Stop and start system Drive the vehicle until stop and start control is permitted (approximately 5 to 60 minutes) ( )
Vehicle stability control system (for Hydraulic brake booster) Drive the vehicle straight ahead at 40 km/h (25 mph) or more for at least 10 seconds. ( )
·Use the same procedure for RHD and LHD vehicles.
·The procedure listed below is for LHD vehicles.
PROCEDURE

 1. PRECAUTION
- NOTICE:
-
After turning the ignition switch is turned off, there may be a waiting time before disconnecting the negative (-) battery terminal.
-
Click hereGeneral>INTRODUCTION>REPAIR INSTRUCTION>PRECAUTION
2.DISCONNECT CABLE FROM NEGATIVE BATTERY TERMINAL
67910
3.REMOVE DOOR SCUFF PLATE ASSEMBLY RH
62111C
4.REMOVE COWL SIDE TRIM BOARD RH
55317A
5.REMOVE INSTRUMENT SIDE PANEL RH
55461A
6.REMOVE INSTRUMENT PANEL ORNAMENT
55607
7.REMOVE NO. 2 INSTRUMENT PANEL UNDER COVER SUB-ASSEMBLY
55550
8.REMOVE GLOVE COMPARTMENT DOOR ASSEMBLY
89533
9.REMOVE 4 WHEEL DRIVE CONTROL ECU
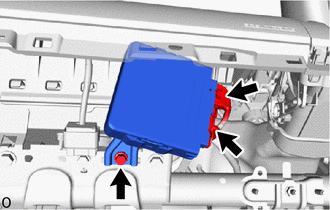
Disconnect the 2 connectors.
Remove the bolt and 4 wheel drive control ECU.