NAVIGATION / MULTI INFO DISPLAY NAVIGATION ANTENNA(w/o Heated Windshield Defroster System) INSTALLATION
CAUTION / NOTICE / HINT
- HINT:
- ·
Use the same procedure for RHD and LHD vehicles.
·The procedure listed below is for LHD vehicles.
PROCEDURE

 86860
1.INSTALL NAVIGATION ANTENNA ASSEMBLY
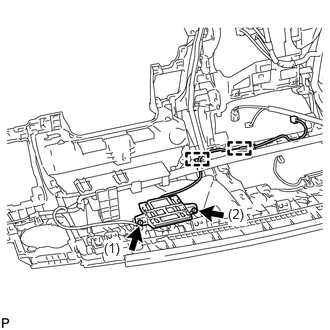
w/o Telematics Transceiver:
Install the navigation antenna assembly with the 2 screws in the order shown in the illustration.
Attach the clamp.
w/ Telematics Transceiver:
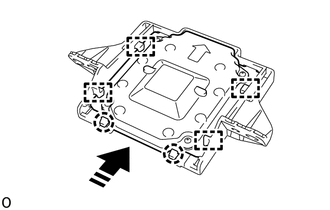

|
Install in this Direction |
Attach the guide and claw to install the navigation antenna assembly as shown in the illustration.
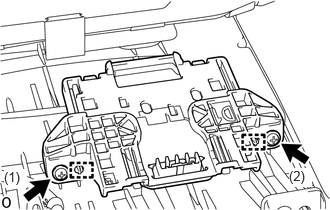
Attach the guide to temporarily install the navigation antenna assembly with bracket.
Install the navigation antenna assembly with bracket with the 2 screws in the order shown in the illustration.
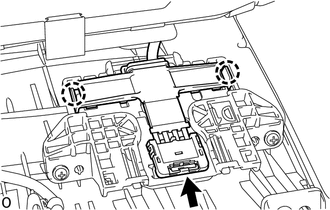
Attach the claw.
Connect the connector.
55950G
2.INSTALL DEFROSTER NOZZLE ASSEMBLY
55972C
3.INSTALL NO. 2 SIDE DEFROSTER NOZZLE DUCT
55971C
4.INSTALL NO. 1 SIDE DEFROSTER NOZZLE DUCT
55844
5.INSTALL NO. 2 HEATER TO REGISTER DUCT
55843A
6.INSTALL NO. 1 HEATER TO REGISTER DUCT
55401E
7.INSTALL INSTRUMENT PANEL SAFETY PAD SUB-ASSEMBLY
8.CONNECT CABLE TO NEGATIVE BATTERY TERMINAL
9. INITIALIZATION AFTER RECONNECTING BATTERY TERMINAL
Click hereGeneral>SETUP>WHEN DISCONNECTING OR RECONNECTING BATTERY TERMINAL>WORK PROCEDURE
- HINT:
-
When disconnecting and reconnecting the auxiliary battery, there is an automatic learning function that completes learning when the respective system is used.
-
Click hereGeneral>SETUP>WHEN DISCONNECTING OR RECONNECTING BATTERY TERMINAL>AUTOMATIC LEARNING CHART
10.CHECK SRS WARNING LIGHT