INTERIOR PANELS / TRIM INSTRUMENT PANEL SAFETY PAD INSTALLATION
CAUTION / NOTICE / HINT
- HINT:
- ·
Use the same procedure for RHD and LHD vehicles.
·The procedure listed below is for LHD vehicles.
·A bolt without a torque specification is shown in the standard bolt chart.
Click hereGeneral>SPECIFICATIONS>STANDARD BOLT>SPECIFIED TORQUE FOR STANDARD BOLTS
PROCEDURE

 55401E
1.INSTALL INSTRUMENT PANEL SAFETY PAD SUB-ASSEMBLY
for LHD:
Attach the 2 guides to install the instrument panel safety pad sub-assembly.
Install the 2 brackets with the 4 bolts and 2 nuts.
Connect the connectors and attach the clamps and claws.
Install the 2 passenger airbag bolts <G>.
- Torque:
- 20 N*m (204 kgf*cm, 15 ft.*lbf)
Install the 6 bolts <E> and nut <F>.
Install the front floor carpet.
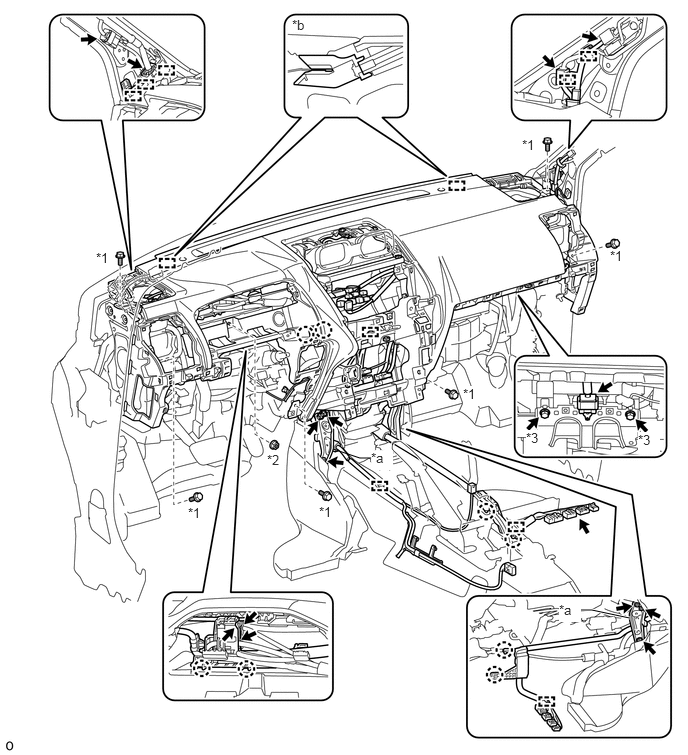
| *1 | Bolt <E> | *2 | Nut <F> |
| *3 | Bolt <G> | - | - |
| *a | Bracket | *b | Guide |
for RHD:
Attach the 2 guides to install the instrument panel safety pad sub-assembly.
Install the 2 brackets with the 4 bolts and 2 nuts.
Connect the connectors and attach the clamps and claws.
Install the 2 passenger airbag bolts <G>.
- Torque:
- 20 N*m (204 kgf*cm, 15 ft.*lbf)
Install the 6 bolts <E> and nut <F>.
Install the front floor carpet.
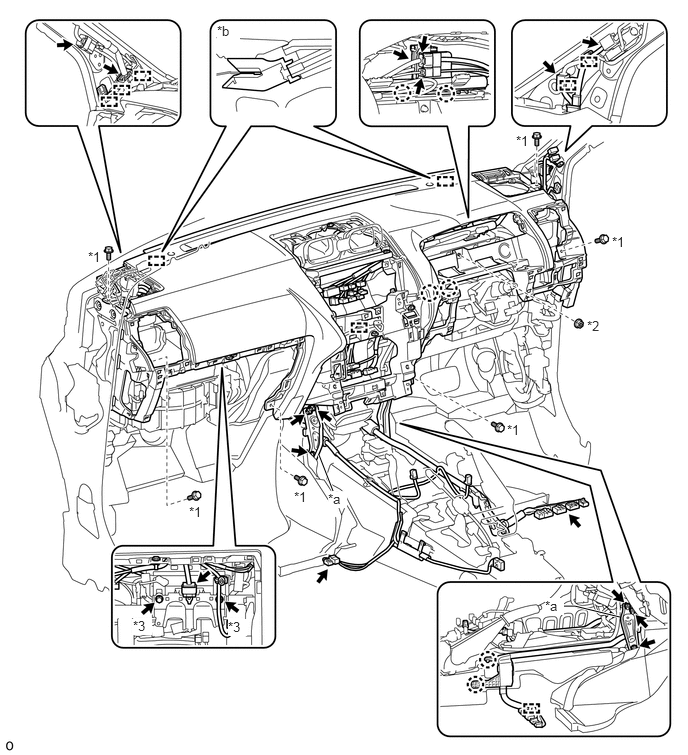
| *1 | Bolt <E> | *2 | Nut <F> |
| *3 | Bolt <G> | - | - |
| *a | Bracket | *b | Guide |
86160P
2.INSTALL FRONT NO. 2 SPEAKER ASSEMBLY
55408F
3.INSTALL NO. 1 INSTRUMENT PANEL SPEAKER PANEL SUB-ASSEMBLY
Attach the 2 clips, claw and 2 guides to install the No. 1 instrument panel speaker panel sub-assembly.
55409F
4.INSTALL NO. 2 INSTRUMENT PANEL SPEAKER PANEL SUB-ASSEMBLY
- HINT:
-
Use the same procedure described for the No. 1 instrument panel speaker panel sub-assembly.
55650
5.INSTALL NO. 1 INSTRUMENT PANEL REGISTER ASSEMBLY
Attach the 4 clips to install the No. 1 instrument panel register assembly.
55660
6.INSTALL NO. 2 INSTRUMENT PANEL REGISTER ASSEMBLY
- HINT:
-
Use the same procedure described for the No. 1 instrument panel register assembly.
86160L
7.INSTALL FRONT NO. 4 SPEAKER ASSEMBLY
55421B
8.INSTALL UPPER INSTRUMENT CLUSTER FINISH PANEL
Attach the 8 clips and 2 guides to install the upper instrument cluster finish panel.
55406B
9.INSTALL LOWER CENTER INSTRUMENT CLUSTER FINISH PANEL SUB-ASSEMBLY (w/o Module Switch)
Attach the 3 clips and guide to install the lower center instrument cluster finish panel sub-assembly.
Install the 2 bolts <E>.
84970
10.INSTALL COMBINATION SWITCH ASSEMBLY (w/ Module Switch)
55522B
11.INSTALL RADIO TUNER OPENING COVER (w/o Audio)
Install the radio tuner opening cover with the 4 bolts.
86120
12.INSTALL RADIO RECEIVER ASSEMBLY (for Radio Receiver Type)
13.INSTALL RADIO AND DISPLAY RECEIVER ASSEMBLY WITH BRACKET (for Radio and Display Type)
55420A
14.INSTALL CENTER INSTRUMENT CLUSTER FINISH PANEL ASSEMBLY (w/o Audio)
Connect each connector.
Attach the 10 clips to install the center instrument cluster finish panel assembly.
55420A
15.INSTALL CENTER INSTRUMENT CLUSTER FINISH PANEL ASSEMBLY (for Radio Receiver Type)
- HINT:
-
Use the same procedure described for the center instrument cluster finish panel assembly (w/o Audio).
89533
16.INSTALL 4 WHEEL DRIVE CONTROL ECU
17.INSTALL TELEPHONE TRANSCEIVER ASSEMBLY WITH BRACKET (w/ Telematics Transceiver)
85970A
18.INSTALL DOUBLE LOCK DOOR CONTROL RELAY ASSEMBLY (w/ Telematics Transceiver, Double Door Lock)
85940
19.INSTALL WINDSHIELD WIPER RELAY ASSEMBLY (w/ Wiper ECU)
86681C
20.INSTALL ANTENNA DIVIDER (w/ Antenna Divider)
55550
21.INSTALL GLOVE COMPARTMENT DOOR ASSEMBLY
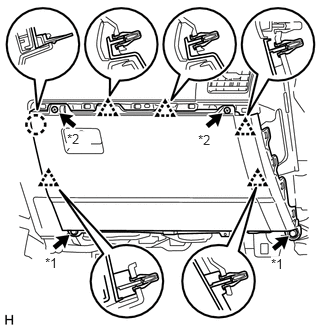
| *1 | Bolt |
| *2 | Screw |
Connect each connector.
Attach the 5 clips and claw to install the glove compartment door assembly.
Install the 2 bolts <C> and 2 screws <A> or <B>.
55461A
22.INSTALL INSTRUMENT PANEL ORNAMENT
Attach the 5 clips to install the instrument panel ornament.
55317A
23.INSTALL INSTRUMENT SIDE PANEL RH
Connect the connector.
Attach the 5 clips, claw and 3 guides to install the instrument side panel RH.
83100
24.INSTALL COMBINATION METER ASSEMBLY
55404D
25.INSTALL INSTRUMENT CLUSTER FINISH PANEL SUB-ASSEMBLY
except 5L-E:
Connect the connector.
Attach the 4 claws, 2 clips and 2 guides to install the instrument cluster finish panel sub-assembly.
for 5L-E:
Connect the connector.
Attach the 4 claws, 2 clips and 2 guides to install the instrument cluster finish panel sub-assembly.
73900
26.INSTALL LOWER NO. 1 INSTRUMENT PANEL AIRBAG ASSEMBLY (w/ Knee Airbag)
55045
27.INSTALL LOWER INSTRUMENT PANEL FINISH PANEL SUB-ASSEMBLY
Connect each connector and each cable.
w/o Knee Airbag:
Attach the 7 clips to install the lower instrument panel finish panel sub-assembly.
w/ Knee Airbag:
Attach the 14 clips to install the lower instrument panel finish panel sub-assembly.
Install the 2 bolts <C>.
Attach the 2 claws to close the cover.
55480D
28.INSTALL LOWER INSTRUMENT PANEL FINISH PANEL ASSEMBLY
Connect each connector.
Attach the 4 clips to install the lower instrument panel finish panel assembly.
55476C
29.INSTALL INSTRUMENT PANEL FINISH PLATE GARNISH (for RHD)
Connect each connector.
Attach the 4 clips to install the instrument panel finish plate garnish.
55471A
30.INSTALL INSTRUMENT CLUSTER FINISH PANEL ORNAMENT (for LHD)
Attach the 3 clips to install the instrument cluster finish panel ornament.
55318C
31.INSTALL INSTRUMENT SIDE PANEL LH
Attach the 5 clips, claw and 3 guides to install the instrument side panel LH.
86160J
32.INSTALL FRONT NO. 3 SPEAKER ASSEMBLY
62212
33.INSTALL FRONT PILLAR GARNISH LH
62211
34.INSTALL FRONT PILLAR GARNISH RH
- HINT:
-
Use the same procedure described for the LH side.
74611F
35.INSTALL NO. 1 ASSIST GRIP
74616C
36.INSTALL FRONT NO. 1 ASSIST GRIP PLUG LH
74615E
37.INSTALL FRONT NO. 1 ASSIST GRIP PLUG RH
- HINT:
-
Use the same procedure described for the LH side.
62312B
38.INSTALL FRONT DOOR OPENING TRIM WEATHERSTRIP LH
62311B
39.INSTALL FRONT DOOR OPENING TRIM WEATHERSTRIP RH
- HINT:
-
Use the same procedure described for the LH side.
62112
40.INSTALL COWL SIDE TRIM BOARD LH
62111C
41.INSTALL COWL SIDE TRIM BOARD RH
- HINT:
-
Use the same procedure described for the LH side.
67920
42.INSTALL DOOR SCUFF PLATE ASSEMBLY LH
67910
43.INSTALL DOOR SCUFF PLATE ASSEMBLY RH
- HINT:
-
Use the same procedure described for the LH side.
58910C
44.INSTALL REAR CONSOLE BOX ASSEMBLY
for Automatic Transmission:
Click hereVehicle Interior>INTERIOR PANELS / TRIM>FRONT CONSOLE BOX(for Automatic Transmission)>INSTALLATION
for Manual Transmission:
Click hereVehicle Interior>INTERIOR PANELS / TRIM>FRONT CONSOLE BOX(for Manual Transmission)>INSTALLATION
w/ Refrigerated Cool Box:
Click hereVehicle Interior>INTERIOR PANELS / TRIM>FRONT CONSOLE BOX (w/ Refrigerated Cool Box)>INSTALLATION
for Bench Seat Type:
Click hereVehicle Interior>INTERIOR PANELS / TRIM>FRONT CONSOLE BOX(for Bench Seat Type)>INSTALLATION
58191
45.INSTALL FRONT FLOOR FOOTREST
for LHD:
Click hereVehicle Interior>INTERIOR PANELS / TRIM>FRONT FLOOR FOOTREST>INSTALLATION
for RHD:
Click hereVehicle Interior>INTERIOR PANELS / TRIM>FRONT FLOOR FOOTREST>INSTALLATION
46.INSTALL FRONT SEAT ASSEMBLY LH
for Manual Seat:
Click hereVehicle Interior>SEAT>FRONT SEAT ASSEMBLY (for Manual Seat)>INSTALLATION
for Power Seat:
Click hereVehicle Interior>SEAT>FRONT SEAT ASSEMBLY (for Power Seat)>INSTALLATION
47.INSTALL FRONT SEAT ASSEMBLY RH
for Manual Seat:
- HINT:
-
Use the same procedure described for the LH side.
for Power Seat:
- HINT:
-
Use the same procedure described for the LH side.
for Walk in Seat Type:
Click hereVehicle Interior>SEAT>FRONT SEAT ASSEMBLY (for Walk in Seat Type)>INSTALLATION
84140
48.INSTALL HEADLIGHT DIMMER SWITCH ASSEMBLY
49.CONNECT CABLE TO NEGATIVE BATTERY TERMINAL
50. CUSTOMIZE POWER TILT AND POWER TELESCOPIC STEERING COLUMN SYSTEM
Reset the auto tilt away function setting to the previous condition by changing the customize parameter.
Click hereSteering>STEERING COLUMN>POWER TILT AND POWER TELESCOPIC STEERING COLUMN SYSTEM>CUSTOMIZE PARAMETERS
51. INITIALIZATION AFTER RECONNECTING BATTERY TERMINAL
Click hereGeneral>SETUP>WHEN DISCONNECTING OR RECONNECTING BATTERY TERMINAL>WORK PROCEDURE
- HINT:
-
When disconnecting and reconnecting the battery, there is an automatic learning function that completes learning when the respective system is used.
-
Click hereGeneral>SETUP>WHEN DISCONNECTING OR RECONNECTING BATTERY TERMINAL>AUTOMATIC LEARNING CHART
52.CHECK SRS WARNING LIGHT