Security Indicator Light Does not Blink
Circuit diagnosis · Vehicles built Sep 2011 – Dec 2011
Versions by build date: Sep 2011 – Dec 2011 from Jan 2012
DESCRIPTION
- When the engine immobiliser system is set, the security indicator light blinks continuously, but does not illuminate if the engine immobiliser system is not set.
WIRING DIAGRAM
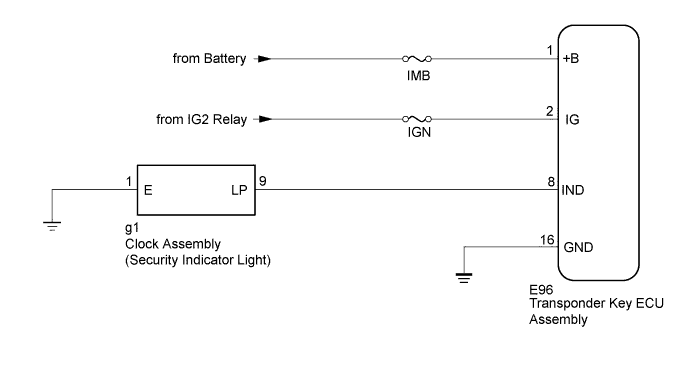

INSPECTION PROCEDURE
- NOTICE:
- Inspect the fuses for circuits related to this system before performing the following inspection procedure.
- When replacing the transponder key ECU assembly, refer to Registration.
- Inspect the fuses for circuits related to this system before performing the following inspection procedure.
| 1. CHECK FOR DTC |

Check for DTCs (Click here).
- OK:
- DTC is not output.
|
|
||||

| OK | |
 |
| 2. PERFORM ACTIVE TEST USING INTELLIGENT TESTER (SECURITY INDICATOR) |
Connect the intelligent tester to the DLC3.
Turn the ignition switch to ON.
Turn the intelligent tester on.
Enter the following menus: Body / Immobiliser / Active Test.
According to the display on the intelligent tester, perform the Active Test.
Immobiliser Tester Display
Test Part
Control Range
Diagnostic Note
Security Indicator
Security indicator light
ON/OFF
-
- OK:
- Security indicator light can be turned on and off using the intelligent tester.
|
|
||||

| OK | |
|
| 3. READ VALUE USING INTELLIGENT TESTER (ENGINE IMMOBILISER SYSTEM STATUS) |
Turn the ignition switch off.
- HINT:
- When using the intelligent tester with the ignition switch off to troubleshoot: Connect the intelligent tester to the DLC3 and turn a courtesy light switch on and off at intervals of 1.5 seconds until communication between the intelligent tester and vehicle begins.
Using the intelligent tester, read the Data List (Click here).
Immobiliser Tester Display
Measurement Item/Range
Normal Condition
Diagnostic Note
Immobiliser
Engine immobiliser system status determined by transponder key ECU assembly / Set or Unset
Set: Engine immobiliser set (engine start prohibited [no key in ignition key cylinder])
Unset: Engine immobiliser unset (engine start permitted [key inserted in ignition key cylinder])
When the engine immobiliser system does not change to the unset state, this item can be used to determine if the cause is the transponder key ECU assembly.
|
|
||||
| OK | ||
 |
||
| ||
| 4. CHECK HARNESS AND CONNECTOR (TRANSPONDER KEY ECU - SECURITY INDICATOR LIGHT) |
Disconnect the E96 transponder key ECU assembly connector.
Disconnect the g1 clock assembly connector.
Measure the resistance according to the value(s) in the table below.
- Standard Resistance:
Tester Connection
Condition
Specified Condition
E96-8 (IND) - g1-9 (LP)
Always
Below 1 Ω
g1-1 (E) - Body ground
Always
Below 1 Ω
g1-9 (LP) - Body ground
Always
10 kΩ or higher
|
|
||||
| OK | |
|
| 5. REPLACE CLOCK ASSEMBLY (SECURITY INDICATOR LIGHT) |
Temporarily replace the clock assembly (security indicator light) with a new or normally functioning one (Click here).
When the immobiliser is set or the theft deterrent system is in the arming preparation state, check that the security indicator light blinks.
- OK:
- Security indicator light blinks.
|
|
||||
| OK | ||
|
||
| ||
| 6. CHECK HARNESS AND CONNECTOR (TRANSPONDER KEY ECU - BATTERY AND BODY GROUND) |
Disconnect the E96 transponder key ECU assembly connector.
Measure the resistance according to the value(s) in the table below.
- Standard Resistance:
Tester Connection
Condition
Specified Condition
E96-16 (GND) - Body ground
Always
Below 1 Ω
Measure the voltage according to the value(s) in the table below.
- Standard Voltage:
Tester Connection
Condition
Specified Condition
E96-1 (+B) - Body ground
Always
11 to 14 V
E96-2 (IG) - Body ground
Ignition switch off
Below 1 V
Ignition switch ON
11 to 14 V
|
|
||||
| OK | ||
|
||
| ||