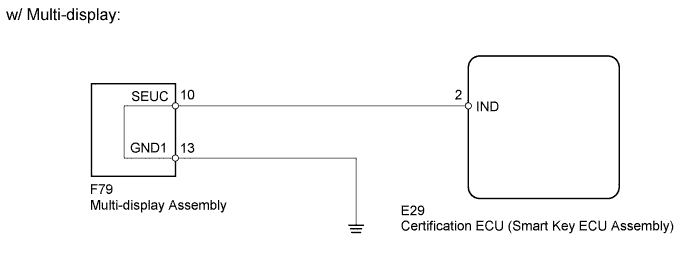
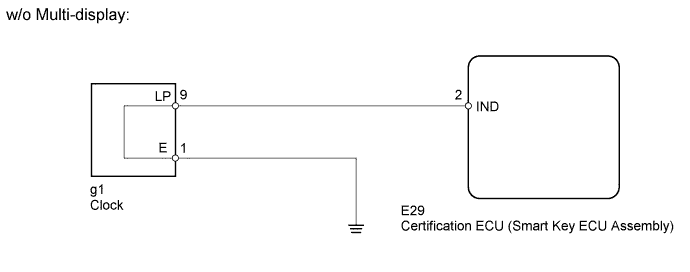
When the theft deterrent system is in the disarmed state, the security indicator will flash continuously if the immobiliser system is set, or not illuminate if the immobiliser system is not set. When the theft deterrent system is in the armed state, the immobiliser system is automatically set and the security indicator will flash continuously. When the theft deterrent system is in the arming preparation state and alarm sounding state, the certification ECU (smart key ECU assembly) causes the security indicator to be illuminated.
WIRING DIAGRAM
INSPECTION PROCEDURE
1. PERFORM ACTIVE TEST USING INTELLIGENT TESTER (SECURITY INDICATOR)
Connect the intelligent tester to the DLC3.
Turn the engine switch on (IG).
Turn the intelligent tester on.
Enter the following menus: Body / Entry&Start / Active Test.
According to the display on the intelligent tester, perform the Active Test.
3. CHECK HARNESS AND CONNECTOR (MULTI-DISPLAY - CERTIFICATION ECU [SMART KEY ECU ASSEMBLY] AND BODY GROUND)
Disconnect the F79 multi-display assembly connector.
Disconnect the E29 certification ECU (smart key ECU assembly) connector.
Measure the resistance according to the value(s) in the table below.
Standard Resistance:
Tester Connection
Condition
Specified Condition
F79-10 (SEUC) - E29-2 (IND)
Always
Below 1 Ω
F79-13 (GND1) - Body ground
Always
Below 1 Ω
F79-10 (SEUC) - Body ground
Always
10 kΩ or higher
NG
REPAIR OR REPLACE HARNESS OR CONNECTOR
OK
4. PERFORM ACTIVE TEST USING INTELLIGENT TESTER (SECURITY INDICATOR)
Disconnect the F79 multi-display assembly connector.
Connect the intelligent tester to the DLC3.
Turn the engine switch on (IG).
Turn the intelligent tester on.
Enter the following menus: Body / Entry & Start / Active Test.
Operate the certification ECU (smart key ECU assembly) using the active test function and measure the voltage according to the value(s) in the table below.
Standard voltage:
Tester Connection
Tester Operation
Specified Condition
E29-2 (IND) - Body ground
Security Indicator ON
11 to 14 V
E29-2 (IND) - Body ground
Security Indicator OFF
Below 1 V
HINT:
Before performing this inspection, check that the battery voltage is between 11 and 14 V (not depleted).
5. CHECK HARNESS AND CONNECTOR (CLOCK - CERTIFICATION ECU [SMART KEY ECU ASSEMBLY] AND BODY GROUND)
Disconnect the g1 clock connector.
Disconnect the E29 certification ECU (smart key ECU assembly) connector.
Measure the resistance according to the value(s) in the table below.
Standard Resistance:
Tester Connection
Condition
Specified Condition
g1-9 (LP) - E29-2 (IND)
Always
Below 1 Ω
g1-1 (E) - Body ground
Always
Below 1 Ω
g1-9 (LP) - Body ground
Always
10 kΩ or higher
NG
REPAIR OR REPLACE HARNESS OR CONNECTOR
OK
6. PERFORM ACTIVE TEST USING INTELLIGENT TESTER (SECURITY INDICATOR)
Disconnect the g1 clock connector.
Connect the intelligent tester to the DLC3.
Turn the engine switch on (IG).
Turn the intelligent tester on.
Enter the following menus: Body / Entry & Start / Active Test.
Operate the certification ECU (smart key ECU assembly) using the active test function and measure the voltage according to the value(s) in the table below.
Standard voltage:
Tester Connection
Tester Operation
Specified Condition
g1-9 (LP) - Body ground
Security Indicator ON
11 to 14 V
g1-9 (LP) - Body ground
Security Indicator OFF
Below 1 V
HINT:
Before performing this inspection, check that the battery voltage is between 11 and 14 V (not depleted).