Illumination Circuit
Circuit diagnosis · Vehicles built Sep 2011 – Dec 2011
Versions by build date: Sep 2011 – Dec 2011 from Jan 2012
CAUTION / NOTICE / HINT
DESCRIPTION
Power is supplied to the radio receiver and steering pad switch illumination when the light control switch is in the tail or head position.WIRING DIAGRAM
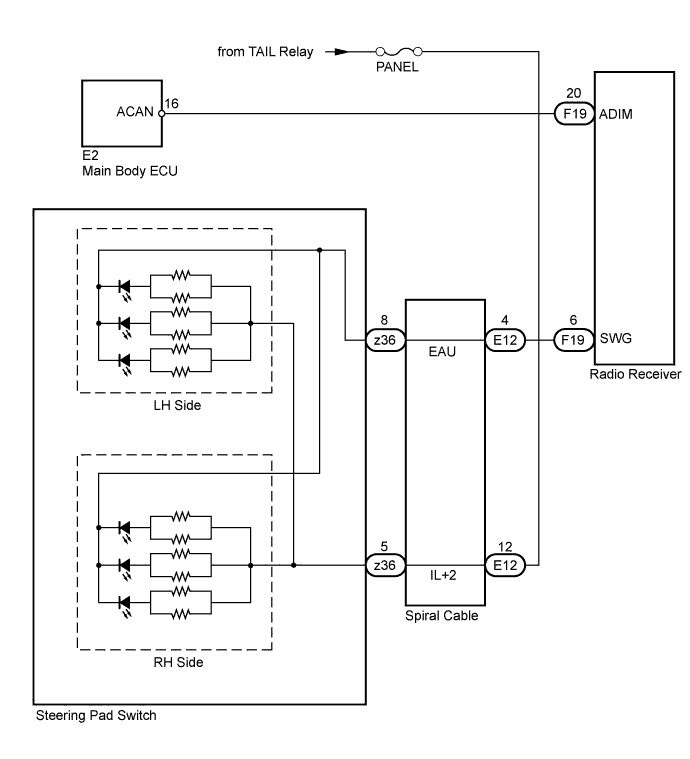

INSPECTION PROCEDURE
- CAUTION:
- The vehicle is equipped with an SRS (Supplemental Restraint System) which includes components such as airbags. Before servicing (including removal or installation of parts), be sure to read the Precaution for the SRS (Click here).
- Inspect the fuses for circuits related to this system before performing the following inspection procedure.
- The vehicle is equipped with an SRS (Supplemental Restraint System) which includes components such as airbags. Before servicing (including removal or installation of parts), be sure to read the Precaution for the SRS (Click here).
| 1. CHECK ILLUMINATION |

Check if the illumination for the multi-display, steering pad switch, glove box light, cigarette lighter, or others (seat heater switch, front seat memory switch, etc.) comes on when the light control switch is turned to the head or tail position.
Result Result
Proceed to
Illumination comes on for all components except steering pad switch.
A
Illumination comes on for all components except radio receiver.
B
No illumination comes on for radio receiver, multi-display, glove box light, front seat memory switch, cigarette lighter, etc.
C
|
|
||||
|
|
||||


| A | |
 |
| 2. CHECK HARNESS AND CONNECTOR (BATTERY - SPIRAL CABLE) |
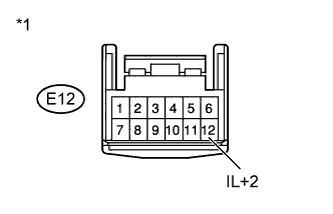 |
Disconnect the E12 cable connector.
Measure the voltage according to the value(s) in the table below.
- Standard Voltage:
Tester Connection
Condition
Specified Condition
E12-12 (IL+2) - Body ground
Always
11 to 14 V
Text in Illustration *1
Front view of wire harness connector
(to Spiral Cable)
|
|
||||
| OK | |
|
| 3. INSPECT STEERING PAD SWITCH ASSEMBLY (STEERING PAD SIDE) |
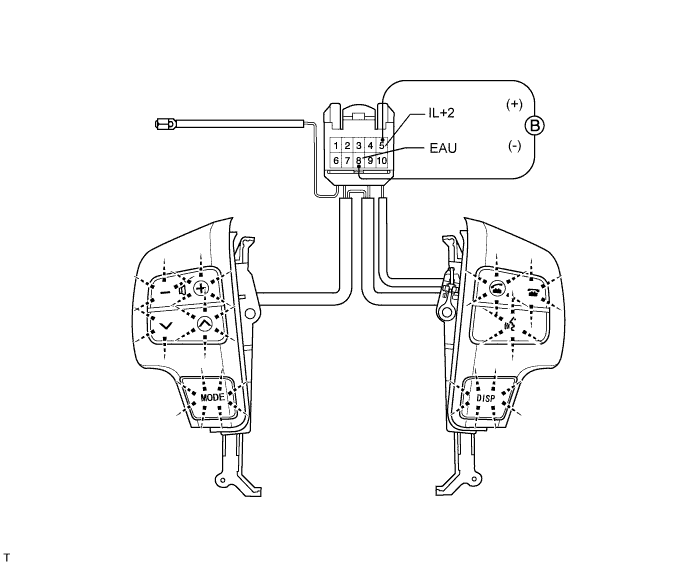
Disconnect the z36 switch connector.
Apply battery voltage to the terminals of the connector, and check the LED illumination condition.
OK Measurement Condition
Specified Condition
Battery positive (+) → Terminal 5 (IL+2)
Battery negative (-) → Terminal 8 (EAU)
Light illuminates
|
|
||||
| OK | |
|
| 4. INSPECT SPIRAL CABLE SUB-ASSEMBLE |
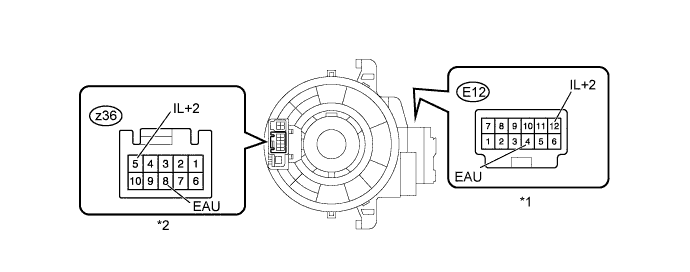
| *1 |
Vehicle Side |
*2 |
Steering Pad Switch Side |
Remove the spiral cable (Click here).
Measure the resistance according to the value(s) in the table below.
- Standard Resistance:
Tester Connection
Condition
Specified Condition
E12-12 (IL+2) - z36-5 (IL+2)
Spiral cable is turned 2.5 rotations counterclockwise
Below 1 Ω
Spiral cable is centered
Spiral cable is turned 2.5 rotations clockwise
E12-4 (EAU) - z36-8 (EAU)
Spiral cable is turned 2.5 rotations counterclockwise
Below 1 Ω
Spiral cable is centered
Spiral cable is turned 2.5 rotations clockwise
- CAUTION:
- The spiral cable is an important part of the SRS airbag system. Incorrect removal or installation of the spiral cable may prevent the airbag from deploying. Be sure to read the Precaution for the SRS (Click here).
|
|
||||
| OK | |
|
| 5. CHECK HARNESS AND CONNECTOR (SPIRAL CABLE - RADIO RECEIVER) |
Disconnect the F19 radio receiver connector.
Measure the resistance according to the value(s) in the table below.
- Standard Resistance:
Tester Connection
Condition
Specified Condition
F19-6 (SWG) - E12-4 (EAU)
Always
Below 1 Ω
F19-6 (SWG) - Body ground
Always
10 kΩ or higher
|
|
||||
| OK | ||
 |
||
| ||
| 6. CHECK HARNESS AND CONNECTOR (RADIO RECEIVER - MAIN BODY ECU) |
Disconnect the F19 receiver connector.
Disconnect the E2 main body ECU connector.
Measure the resistance according to the value(s) in the table below.
- Standard Resistance:
Tester Connection
Condition
Specified Condition
F19-20 (ADIM) - E2-16 (ACAN)
Always
Below 1 Ω
F19-20 (ADIM) - Body ground
Always
10 kΩ or higher
|
|
||||
| OK | ||
|
||
| ||