Headlight Leveling ECU Power Source Circuit
Circuit diagnosis · Vehicles built from Jan 2012
DESCRIPTION
This circuit detects the state of the ignition switch, and sends it to the headlight leveling ECU*1 or headlight swivel ECU*2.- *1: w/ Static Headlight Auto Leveling
- *2: w/ Dynamic Headlight Auto Leveling
WIRING DIAGRAM
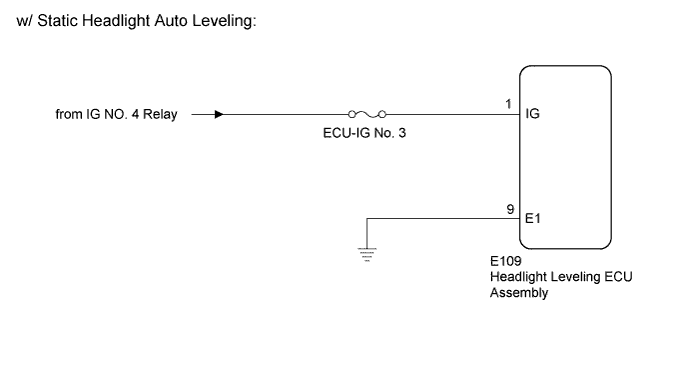

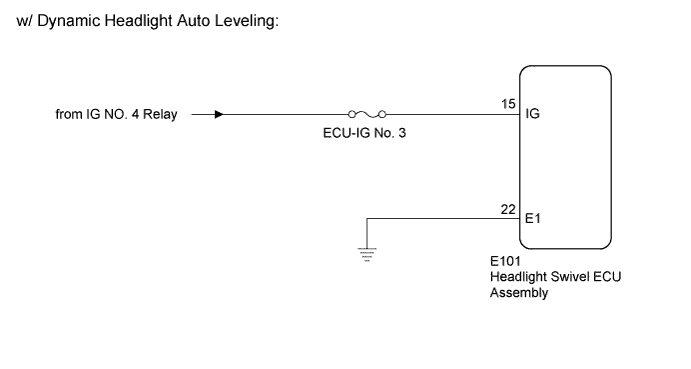
INSPECTION PROCEDURE
- NOTICE:
- Inspect the fuses for circuits related to this system before performing the following inspection procedure.
- After replacing the headlight leveling ECU*1 or headlight swivel ECU*2, initialization of the ECU is necessary (except w/ Dynamic Headlight Auto Leveling) (Click here).
- Inspect the fuses for circuits related to this system before performing the following inspection procedure.
- *1: w/ Static Headlight Auto Leveling
- *2: w/ Dynamic Headlight Auto Leveling
- *1: w/ Static Headlight Auto Leveling
| 1. CHECK VEHICLE TYPE |

Check the vehicle type.
Result Result
Proceed to
w/ Static Headlight Auto Leveling
A
w/ Dynamic Headlight Auto Leveling
B
|
|
||||

| A | |
 |
| 2. READ VALUE USING INTELLIGENT TESTER (IGNITION POWER SUPPLY) |
Using the intelligent tester, read the Data List (Click here).
HL Auto Leveling Tester Display
Measurement Item/Range
Normal Condition
Diagnostic Note
+B
Ignition power supply voltage value / 0 to 19.75 V
11 to 14 V
-
- OK:
- The display is as specified in the normal condition column.
|
|
||||
| OK | ||
 |
||
| ||
| 3. CHECK HARNESS AND CONNECTOR (HEADLIGHT LEVELING ECU ASSEMBLY - BATTERY AND BODY GROUND) |
Disconnect the headlight leveling ECU connector.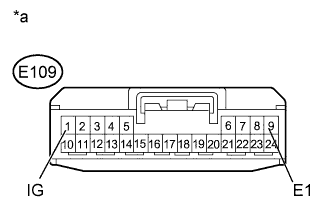
Measure the voltage according to the value(s) in the table below.
- Standard Voltage:
Tester Connection
Switch Condition
Specified Condition
E109-1 (IG) - Body ground
Ignition switch ON
11 to 14 V
Ignition switch off
Below 1 V
Measure the resistance according to the value(s) in the table below.
- Standard Resistance:
Tester Connection
Condition
Specified Condition
E109-9 (E1) - Body ground
Always
Below 1 Ω
| *a |
Front view of wire harness connector (to Headlight Leveling ECU Assembly) |
|
|
||||

| OK | ||
|
||
| ||
| 4. READ VALUE USING INTELLIGENT TESTER (IGNITION POWER SUPPLY) |
Using the intelligent tester, read the Data List (Click here).
AFS Tester Display
Measurement Item/Range
Normal Condition
Diagnostic Note
+B
Ignition power supply voltage value / 0 to 19.75 V
11 to 14 V
-
- OK:
- The display is as specified in the normal condition column.
|
|
||||
| OK | ||
|
||
| ||
| 5. CHECK HARNESS AND CONNECTOR (HEADLIGHT SWIVEL ECU ASSEMBLY - BATTERY AND BODY GROUND) |
Disconnect the headlight leveling ECU connector.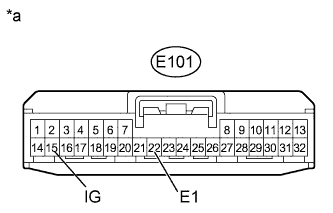
Measure the voltage according to the value(s) in the table below.
- Standard Voltage:
Tester Connection
Switch Condition
Specified Condition
E101-15 (IG) - Body ground
Ignition switch ON
11 to 14 V
Ignition switch off
Below 1 V
Measure the resistance according to the value(s) in the table below.
- Standard Resistance:
Tester Connection
Condition
Specified Condition
E101-22 (E1) - Body ground
Always
Below 1 Ω
| *a |
Front view of wire harness connector (to Headlight Swivel ECU Assembly) |
| Result |
Proceed to |
| OK (for LHD) |
A |
| OK (for RHD) |
B |
| NG |
C |
|
|
||||
|
|
||||
| A | ||
|
||
| ||