Headlight Beam Level Control Actuator Circuit
Circuit diagnosis · Vehicles built from Jan 2012
DESCRIPTION
The headlight leveling ECU actuates the headlight leveling motors according to the vehicle conditions.WIRING DIAGRAM
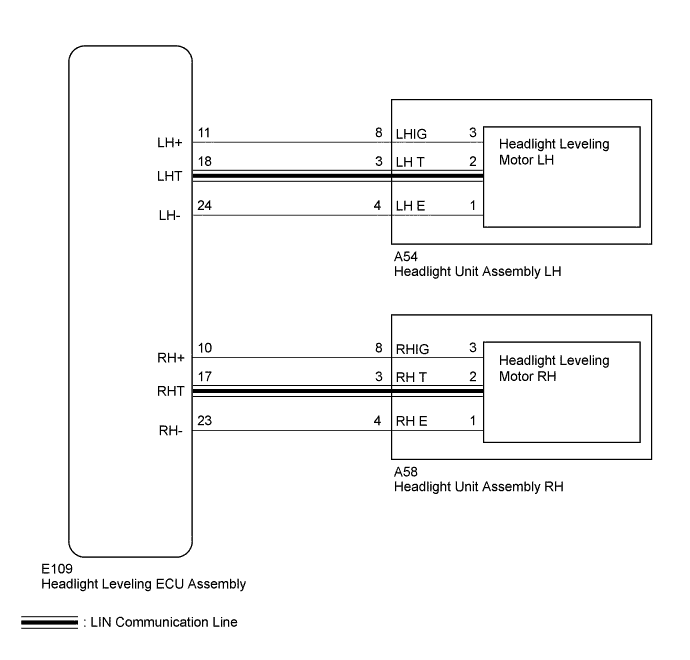

INSPECTION PROCEDURE
- NOTICE:
- After replacing the headlight leveling ECU, initialization of the ECU is necessary (Click here).
| 1. PERFORM ACTIVE TEST USING INTELLIGENT TESTER (HEADLIGHT LEVELING MOTOR) |

Using the intelligent tester, perform the Active Test (Click here).
HL Auto Leveling Tester Display
Test Part
Control Range
Diagnostic Note
Drive The Leveling Motor UP*
Headlight leveling motor upward operation
ON/OFF
ON: Move up
OFF: Stop
Drive The Leveling Motor DOWN*
Headlight leveling motor downward operation
ON/OFF
ON: Move down
OFF: Stop
- *: Perform the Active Test with the engine running and vehicle stopped.
- OK:
- Headlight leveling motors operate normally.
- *: Perform the Active Test with the engine running and vehicle stopped.
|
|
||||

| OK | ||
 |
||
| ||
| 2. CHECK HARNESS AND CONNECTOR (HEADLIGHT UNIT ASSEMBLY - HEADLIGHT LEVELING ECU ASSEMBLY) |
Disconnect the E109 headlight leveling ECU connector.
Disconnect the A54*1 or A58*2 headlight leveling motor connector.
- *1: for LH
- *2: for RH
- *1: for LH
Measure the resistance according to the value(s) in the table below.
- Standard Resistance:
for LH Tester Connection
Condition
Specified Condition
E109-11 (LH+) - A54-8 (LHIG)
Always
Below 1 Ω
E109-18 (LHT) - A54-3 (LH T)
Always
Below 1 Ω
E109-24 (LH-) - A54-4 (LH E)
Always
Below 1 Ω
E109-11 (LH+) - Body ground
Always
10 kΩ or higher
E109-18 (LHT) - Body ground
Always
10 kΩ or higher
E109-24 (LH-) - Body ground
Always
10 kΩ or higher
for RH Tester Connection
Condition
Specified Condition
E109-10 (RH+) - A58-8 (RHIG)
Always
Below 1 Ω
E109-17 (RHT) - A58-3 (RH T)
Always
Below 1 Ω
E109-23 (RH-) - A58-4 (RH E)
Always
Below 1 Ω
E109-10 (RH+) - Body ground
Always
10 kΩ or higher
E109-17 (RHT) - Body ground
Always
10 kΩ or higher
E109-23 (RH-) - Body ground
Always
10 kΩ or higher
|
|
||||

| OK | |
 |
| 3. INSPECT HEADLIGHT UNIT ASSEMBLY |
Remove the headlight unit (Click here).
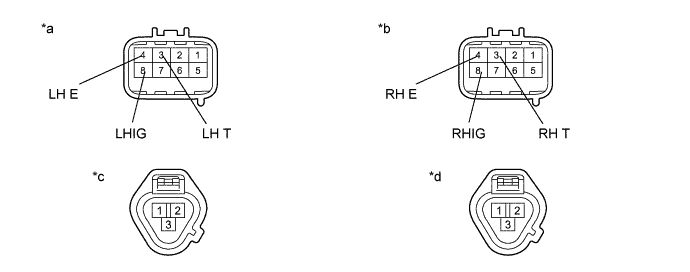
Text in Illustration *a
Component without harness connected
(Headlight Unit Assembly LH)
*b
Component without harness connected
(Headlight Unit Assembly RH)
*c
Front view of wire harness connector
(to Headlight Leveling Motor LH)
*d
Front view of wire harness connector
(to Headlight Leveling Motor RH)
Disconnect the headlight leveling motor connector.
Measure the resistance according to the value(s) in the table below.
- Standard Resistance:
- for LH:
Tester Connection
Condition
Specified Condition
8 (LHIG) - 3
Always
Below 1 Ω
3 (LH T) - 2
4 (LH E) - 1
- for RH:
Tester Connection
Condition
Specified Condition
8 (RHIG) - 3
Always
Below 1 Ω
3 (RH T) - 2
4 (RH E) - 1
|
|
||||
| OK | |
|
| 4. CHECK HEADLIGHT LEVELING MOTOR |
Temporarily replace the headlight leveling motor with a new or normally functioning one (Click here).
Perform the Active Test of the leveling motors (Click here).
- OK:
- Headlight leveling motors operate normally.
|
|
||||
| OK | ||
|
||
| ||