C1241/41 Low Battery Positive Voltage
Diagnostic trouble codes · Vehicles built Sep 2011 – Dec 2011
DESCRIPTION
If the voltage supplied to the IG1 terminal is within the DTC detection range due to malfunctions in components such as the battery and alternator circuit, this DTC is stored.| DTC Code |
DTC Detection Condition |
Trouble Area |
| C1241/41 |
When either of the following conditions is detected: 1. Both of the following conditions continue for at least 10 seconds.
|
|
WIRING DIAGRAM
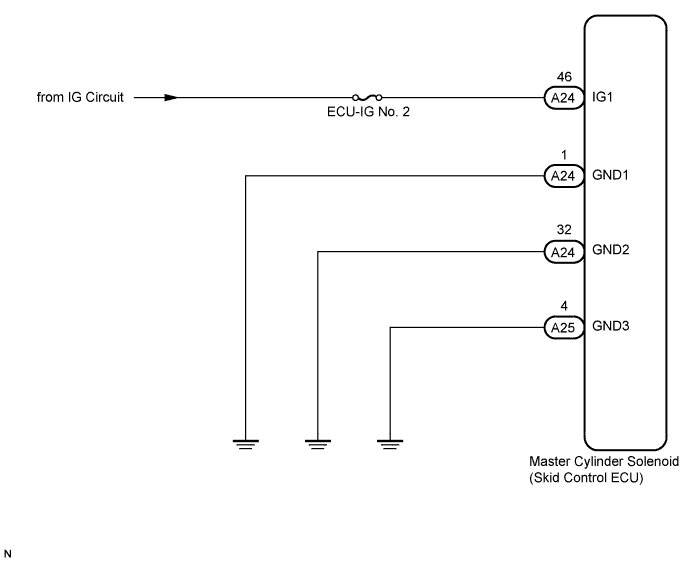

INSPECTION PROCEDURE
- NOTICE:
- When replacing the master cylinder solenoid, perform zero point calibration (Click here).
| 1. INSPECT BATTERY |

Check the battery voltage.
- Standard voltage:
- 11 to 14 V
Result Result
Proceed to
OK
A
NG
1GR-FE
B
2UZ-FE
C
1VD-FTV
D
|
|
||||
|
|
||||
|
|
||||

| A | |
 |
| 2. INSPECT ECU-IG NO. 2 FUSE |
Remove the ECU-IG No. 2 fuse from the main body ECU (cowl side junction block LH).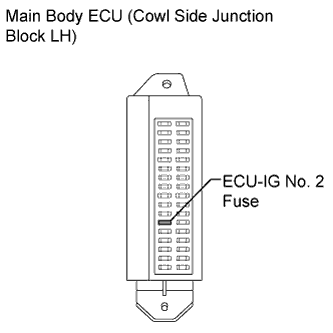
Measure the resistance according to the value(s) in the table below.
- Standard Resistance:
Tester Connection
Condition
Specified Condition
ECU-IG No. 2 fuse
Always
Below 1 Ω
|
|
||||
| OK | |
|
| 3. READ VALUE USING INTELLIGENT TESTER (IG1 VOLTAGE VALUE) |
Install the ECU-IG No. 2 fuse.
Connect the intelligent tester to the DLC3.
Turn the ignition switch to ON and turn the intelligent tester on.
Start the engine.
Enter the following menus: Chassis / ABS/VSC/TRC / Data List.
ABS/VSC/TRC Tester Display
Measurement Item/Range
Normal Condition
Diagnostic Note
IG1 Voltage Value
IG1 voltage value/min.: 0 V, max.: 255 V
9.5 to 14.0 V
-
Measure the voltage output from the skid control ECU displayed on the intelligent tester.
- OK:
- The output voltage displayed on the intelligent tester is within 9.5 to 14.0 V.
|
|
||||

| OK | |
|
| 4. RECONFIRM DTC |
Clear the DTCs (Click here).
Check if the same DTCs are output (Click here).
- HINT:
- Reinstall the sensors, connectors, etc. and restore the previous vehicle conditions before rechecking for DTCs.
Result Result
Proceed to
DTC is output
LHD
A
RHD
B
DTC is not output (When troubleshooting in accordance with the Diagnostic Trouble Code Chart)
C
DTC is not output (When troubleshooting in accordance with the Problem Symptoms Table)
D
|
|
||||
|
|
||||
|
|
||||
| A | ||
 |
||
| ||
| 5. INSPECT SKID CONTROL ECU (IG1 TERMINAL) |
Disconnect the A24 skid control ECU connector.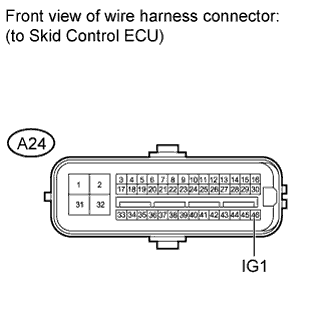
Measure the voltage according to the value(s) in the table below.
- Standard Voltage:
Tester Connection
Switch Condition
Specified Condition
A24-46 (IG1) - Body ground
Ignition switch ON
11 to 14 V
|
|
||||
| OK | |
|
| 6. INSPECT SKID CONTROL ECU (GND TERMINAL) |
Disconnect the A24 and A25 skid control ECU connectors.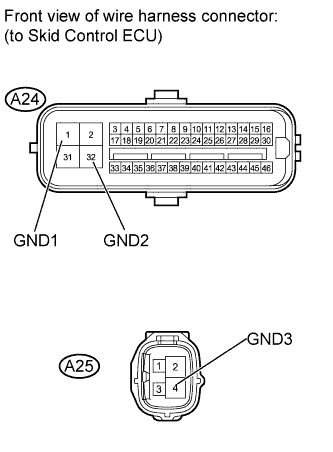
Measure the resistance according to the value(s) in the table below.
- Standard Resistance:
Tester Connection
Condition
Specified Condition
A24-1 (GND1) - Body ground
Always
Below 1 Ω
A24-32 (GND2) - Body ground
Always
Below 1 Ω
A25-4 (GND3) - Body ground
Always
Below 1 Ω
|
|
||||
| OK | |
|
| 7. RECONFIRM DTC |
Clear the DTCs (Click here).
Check if the same DTCs are output (Click here).
- HINT:
- Reinstall the sensors, connectors, etc. and restore the previous vehicle conditions before rechecking for DTCs.
Result Result
Proceed to
DTC is output
LHD
A
RHD
B
DTC is not output (When troubleshooting in accordance with the Diagnostic Trouble Code Chart)
C
DTC is not output (When troubleshooting in accordance with the Problem Symptoms Table)
D
|
|
||||
|
|
||||
|
|
||||
| A | ||
|
||
| ||