INSTALLATION
Removal / installation · Vehicles built Sep 2011 – Dec 2011
Versions by build date: Sep 2011 – Dec 2011 from Jan 2012
| 1.
INSTALL REAR CRANKSHAFT OIL SEAL |
 |
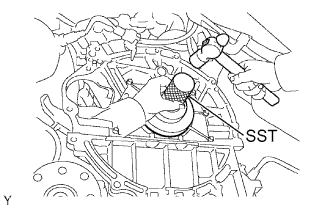
- Apply MP grease to the lip of a new oil seal.
Using SST and a hammer, tap in the oil seal until its surface is flush with the rear oil seal retainer edge.
- SST
- 09223-78010
| 2.
INSTALL DRIVE PLATE AND RING GEAR SUB-ASSEMBLY (for Automatic Transmission)
|
|
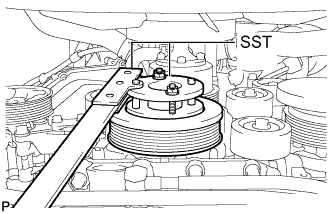
- Using SST, hold the crankshaft.
- SST
- 09213-54015
(91651-60855)
09330-00021
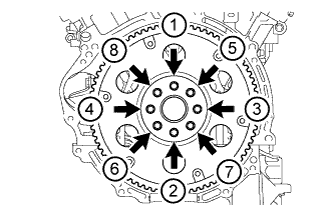
Temporarily install the front spacer, drive plate and rear spacer with the 8 bolts.
- Tighten the 8 bolts uniformly in several steps in the order shown in the illustration.
-
Torque:
- 83 N*m{
846 kgf*cm
, 61 ft.*lbf
}
- NOTICE:
- Do not start the engine for at least 1 hour after installing.
| 3.
INSTALL FLYWHEEL SUB-ASSEMBLY (for Manual Transmission)
|
|
- Using SST, hold the crankshaft.
- SST
- 09213-54015
(91651-60855)
09330-00021
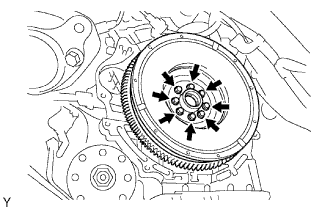
Temporarily install the flywheel with 8 new bolts.
- Install and tighten the 8 bolts uniformly in several steps.
-
Torque:
- 30 N*m{
306 kgf*cm
, 22 ft.*lbf
}
Mark the top of the bolts with paint.
Tighten the 8 bolts 90° in the same sequence.
Check that the paint marks are now at a 90° angle to the top.
| 4.
INSTALL CLUTCH DISC ASSEMBLY (for Manual Transmission)
|
|
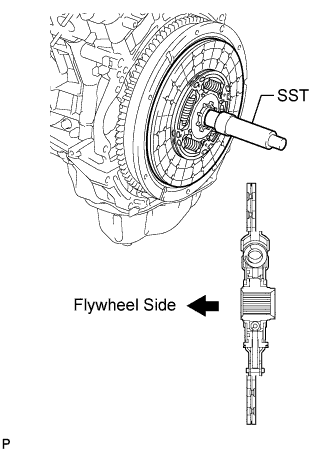
Insert SST into the clutch disc, then insert the clutch disc into the flywheel.
- SST
- 09301-00110
- NOTICE:
- Take care not to insert the clutch disc in the wrong direction.
| 5.
INSTALL CLUTCH COVER ASSEMBLY (for Manual Transmission)
|
|
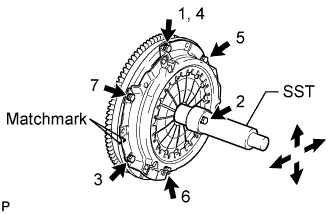
Align the matchmark on the clutch cover with the one on the flywheel.
In the order shown in the illustration, temporarily install the 6 bolts starting from the bolt located near the knock pin on the top.
Check that the disc is in the center by lightly moving SST up and down, and left and right.
- SST
- 09301-00110
Evenly tighten the bolts by following the order shown in the illustration.
-
Torque:
- 19 N*m{
195 kgf*cm
, 14 ft.*lbf
}
| 6.
INSPECT AND ADJUST CLUTCH COVER ASSEMBLY
|
|
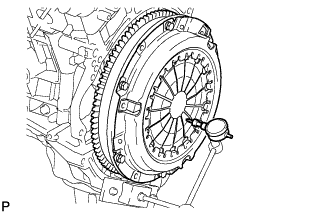
Using a dial indicator with a roller instrument, check the diaphragm spring tip alignment.
- Maximum Misalignment:
- 1.3 mm (0.0512 in.)
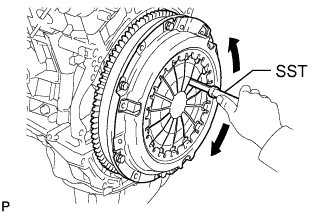
- If the alignment is not as specified, adjust the diaphragm spring tip alignment using SST.
- SST
- 09333-00013
| 7.
INSTALL AUTOMATIC TRANSMISSION ASSEMBLY (for Automatic Transmission) |
|
Install the automatic transmission (Click here).
| 8.
INSTALL MANUAL TRANSMISSION ASSEMBLY (for Manual Transmission) |
|
Install the manual transmission (Click here).