Home › Vehicle Exterior › WINDOW / GLASS › WINDOW DEFOGGER SYSTEMRear Window Defogger System does not Operate
Circuit diagnosis · Vehicles built from Jan 2012
Versions by build date: Sep 2011 – Dec 2011 from Jan 2012
DESCRIPTION
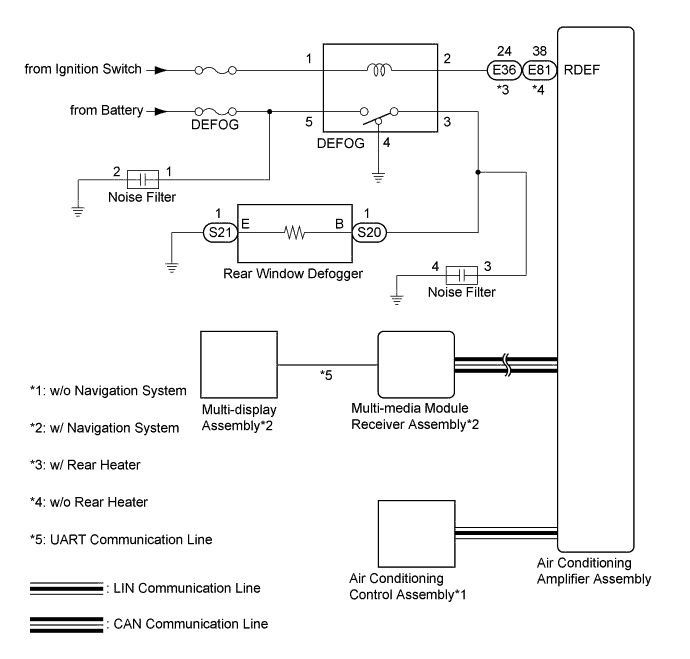
When the rear window defogger switch is turned on, a rear window defogger activation request signal is sent via the LIN communication line*1 or CAN communication line and UART communication line*2 to the air conditioning amplifier assembly. Then the air conditioning amplifier assembly operates the rear window defogger. When the on signal from the switch is received, the defogger relay (DEFOG) is operated for 15 minutes. Also, if the off signal from the switch is received within 15 minutes, the defogger relay (DEFOG) operation is stopped.
HINT:
*1: w/o Navigation System
*2: w/ Navigation System
WIRING DIAGRAM
INSPECTION PROCEDURE
NOTICE:
Inspect the fuses for circuits related to this system before performing the following inspection procedure.
1. CHECK FOR DTC
*1: w/o Navigation System
*2: w/ Navigation System
Check if the LIN communication system*1 or CAN communication system*2 is functioning normally.
LIN communication system: (Click here )
CAN communication system (for LHD): (Click here )
CAN communication system (for RHD): (Click here )
Result
Result
Proceed to
DTC is not output
A
LIN DTC is output*1
B
CAN DTC is output (for LHD)*2
C
CAN DTC is output (for RHD)*2
D
A
2. PERFORM ACTIVE TEST USING INTELLIGENT TESTER (DEFOGGER RELAY)
Select the Active Test using the intelligent tester to generate a control command, and then check that the rear window defogger operates (Click here ).
Air Conditioner
Tester Display
Test Part
Control Range
Diagnostic Note
Defogger Relay (Rear)
Rear window defogger relay operation
OFF or ON
-
OK:
On intelligent tester screen, item changes between ON and OFF according to above chart.
Result
Result
Proceed to
OK (w/o Navigation System)
A
OK (w/ Navigation System)
B
NG
C
B
C
A
3. REPLACE AIR CONDITIONING CONTROL ASSEMBLY
Temporarily replace the air conditioning control assembly with a new or normally functioning one (Click here ).
NEXT
4. CHECK WINDOW DEFOGGER SYSTEM
Turn the ignition switch ON.
Check that pressing the defogger switch illuminates the indicator and warms the rear window surface.
Check that after approximately 15 minutes, the indicator light turns off and the rear window defogger deactivates.
OK:
Rear window defogger system functioning normally.
NG
REPLACE AIR CONDITIONING AMPLIFIER ASSEMBLY (Click here )
OK
END (AIR CONDITIONING CONTROL ASSEMBLY IS DEFECTIVE)
5. CHECK NAVIGATION SYSTEM
Check if the navigation system function properly (Click here ).
OK:
Navigation system function properly.
NG
OK
6. REPLACE AIR CONDITIONING AMPLIFIER ASSEMBLY
Temporarily replace the air conditioning amplifier assembly with a new or normally functioning one (Click here ).
NEXT
7. CHECK WINDOW DEFOGGER SYSTEM
Turn the ignition switch ON.
Check that pressing the defogger switch illuminates the indicator and warms the rear window surface.
Check that after approximately 15 minutes, the indicator light turns off and the rear window defogger deactivates.
OK:
Rear window defogger system functioning normally.
NG
OK
END (AIR CONDITIONING AMPLIFIER ASSEMBLY IS DEFECTIVE)
8. REPLACE MULTI-MEDIA MODULE RECEIVER ASSEMBLY
Temporarily replace the multi-media module receiver assembly with a new or normally functioning one (Click here ).
NEXT
9. CHECK WINDOW DEFOGGER SYSTEM
Turn the ignition switch ON.
Check that pressing the defogger switch illuminates the indicator and warms the rear window surface.
Check that after approximately 15 minutes, the indicator light turns off and the rear window defogger deactivates.
OK:
Rear window defogger system functioning normally.
NG
OK
END (MULTI-MEDIA MODULE RECEIVER ASSEMBLY IS DEFECTIVE)
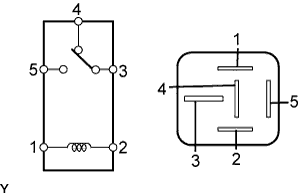
10. INSPECT DEFOGGER RELAY (DEFOG)
Remove the defogger relay from the engine room junction block. Measure the resistance according to the value(s) in the table below.
Standard Resistance:
Tester Connection
Condition
Specified Condition
3 - 4
Battery voltage is not applied to terminals 1 and 2
Below 1 Ω
3 - 5
10 kΩ or higher
3 - 4
Battery voltage is applied to terminals 1 and 2
10 kΩ or higher
3 - 5
Below 1 Ω
Result
Result
Proceed to
OK (w/ Rear Heater)
A
OK (w/o Rear Heater)
B
NG
C
B
C
A
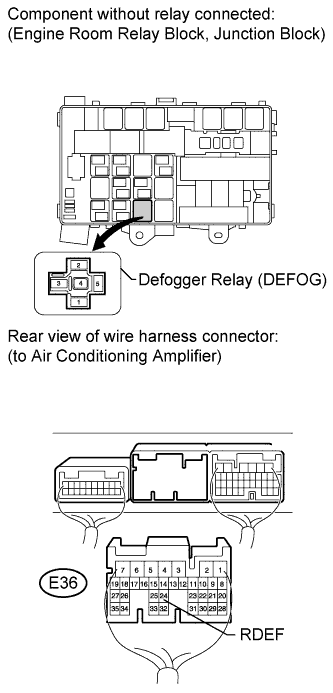
11. CHECK HARNESS AND CONNECTOR (DEFOGGER RELAY - AIR CONDITIONING AMPLIFIER AND BATTERY)
Remove the defogger relay from the engine room relay block. Disconnect the E36 air conditioning amplifier assembly connector.
Measure the voltage according to the value(s) in the table below.
Standard Voltage:
Tester Connection
Condition
Specified Condition
Defogger relay terminal 1 - Body ground
Ignition switch ON
11 to 14 V
Defogger relay terminal 5 - Body ground
Always
11 to 14 V
Measure the resistance according to the value(s) in the table below.
Standard Resistance:
Tester Connection
Condition
Specified Condition
Defogger relay terminal 2 - E36-24 (RDEF)
Always
Below 1 Ω
NG
REPAIR OR REPLACE HARNESS OR CONNECTOR
OK
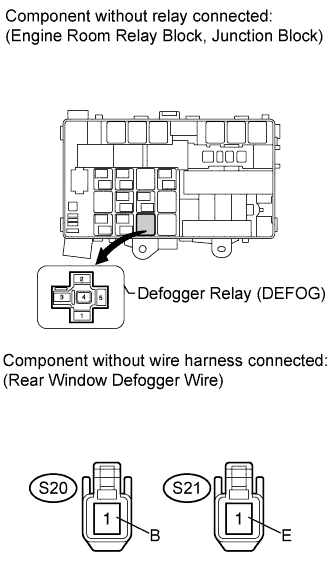
12. CHECK HARNESS AND CONNECTOR (REAR WINDOW DEFOGGER - DEFOGGER RELAY AND BODY GROUND)
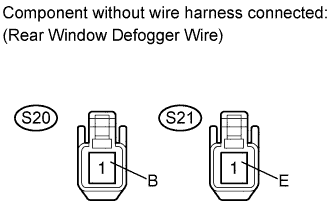
Disconnect the S20 and S21 defogger wire connectors. Remove the defogger relay from the engine room relay block.
Measure the resistance according to the value(s) in the table below.
Standard Resistance:
Tester Connection
Condition
Specified Condition
S20-1(B) - Defogger relay terminal 3
Always
Below 1 Ω
S21-1(B) - Body ground Defogger relay terminal 4 - Body ground
S20-1(B) - Body ground
Always
10 kΩ or higher
NG
REPAIR OR REPLACE HARNESS OR CONNECTOR
OK
13. CHECK REAR WINDOW DEFOGGER WIRE
Disconnect the S20 and S21 defogger wire connectors. Measure the resistance according to the value(s) in the table below.
Standard Resistance:
Tester Connection
Switch Condition
Specified Condition
S20-1 (B) - S21-1 (E)
Ignition switch ON and defogger switch on
10 kΩ or higher
NG
REPLACE AIR CONDITIONING AMPLIFIER ASSEMBLY (Click here )
OK
14. CHECK HARNESS AND CONNECTOR (DEFOGGER RELAY - AIR CONDITIONING AMPLIFIER AND BATTERY)
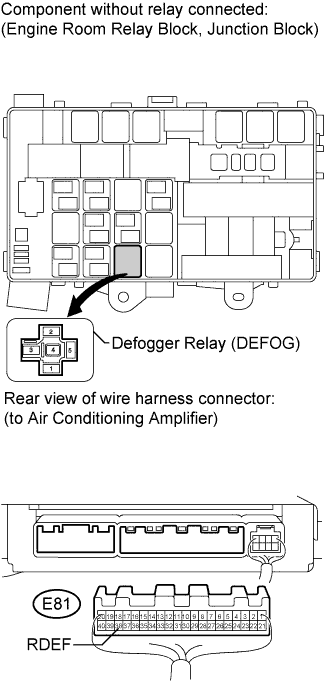
Remove the defogger relay from the engine room relay block. Disconnect the E81 air conditioning amplifier assembly connector.
Measure the voltage according to the value(s) in the table below.
Standard Voltage:
Tester Connection
Condition
Specified Condition
Defogger relay terminal 1 - Body ground
Ignition switch ON
11 to 14 V
Defogger relay terminal 5 - Body ground
Always
11 to 14 V
Measure the resistance according to the value(s) in the table below.
Standard Resistance:
Tester Connection
Condition
Specified Condition
Defogger relay terminal 2 - E81-38 (RDEF)
Always
Below 1 Ω
NG
REPAIR OR REPLACE HARNESS OR CONNECTOR
OK
15. CHECK HARNESS AND CONNECTOR (REAR WINDOW DEFOGGER - DEFOGGER RELAY AND BODY GROUND)
Disconnect the S20 and S21 defogger wire connectors. Remove the defogger relay from the engine room relay block.
Measure the resistance according to the value(s) in the table below.
Standard Resistance:
Tester Connection
Condition
Specified Condition
S20-1(B) - Defogger relay terminal 3
Always
Below 1 Ω
S21-1(B) - Body ground Defogger relay terminal 4 - Body ground
S20-1(B) - Body ground
Always
10 kΩ or higher
NG
REPAIR OR REPLACE HARNESS OR CONNECTOR
OK
16. CHECK REAR WINDOW DEFOGGER WIRE
Disconnect the S20 and S21 defogger wire connectors. Measure the voltage according to the value(s) in the table below.
Standard Voltage:
Tester Connection
Switch Condition
Specified Condition
S20-1 (B) - S21-1 (E)
Ignition switch ON and defogger switch on
11 to 14 V
NG
REPLACE AIR CONDITIONING AMPLIFIER ASSEMBLY (Click here )
OK