Image from Camera for Rear View Monitor is Abnormal
Circuit diagnosis · Vehicles built from Jan 2012
DESCRIPTION
This is the display signal circuit of the rear television camera assembly.WIRING DIAGRAM
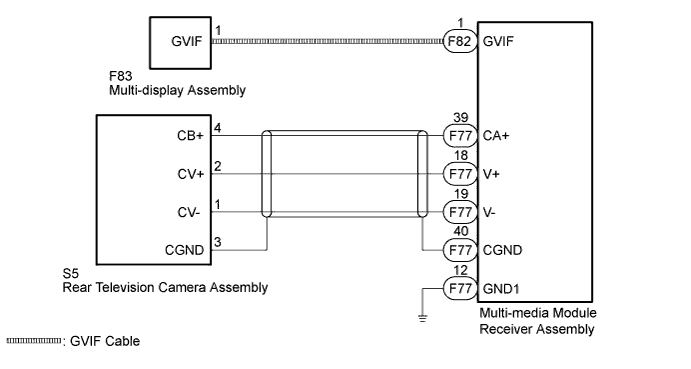

INSPECTION PROCEDURE
- HINT:
- Images may be unclear even in normal conditions if:
- Noise may occur in the image depending on electrical devices used in the cabin.
- Noise may occur in the image if accessories that generate radio waves have been installed.
- The camera screen is frosted over (the image immediately after turning the engine switch on (IG) may be blurred or darker than normal).
- The camera lens is dirty with snow, mud, etc.
- A strong beam of light, such as a sunbeam or headlight, hits the camera.
- It is too dark around the camera (at night etc.).
- The ambient temperature around the camera is either too high or too low.
- The vehicle is tilted at a steep angle.
- The ambient light surrounding the camera is too bright. (When a strong light, such as a sunbeam reflected off the vehicle body, hits the camera, the image may be blurred. This is called the "SMEAR" phenomenon, particular to the CCD camera.)
- When the camera is used under fluorescent lights, sodium lights, or mercury lights etc., the lights and the illuminated area may appear to flicker.
- Noise may occur in the image depending on electrical devices used in the cabin.
| 1. CHECK HARNESS AND CONNECTOR (MULTI-MEDIA MODULE RECEIVER - REAR TELEVISION CAMERA AND BODY GROUND) |

Disconnect the F77 multi-media module receiver assembly connector.
Disconnect the S5 rear television camera assembly connector.
Measure the resistance according to the value(s) in the table below.
- Standard Resistance:
Tester Connection
Condition
Specified Condition
F77-18 (V+) - S5-2 (CV+)
Always
Below 1 Ω
F77-19 (V-) - S5-1 (CV-)
Always
Below 1 Ω
F77-39 (CA+) - S5-4 (CB+)
Always
Below 1 Ω
F77-40 (CGND) - S5-3 (CGND)
Always
Below 1 Ω
F77-12 (GND1) - Body ground
Always
Below 1 Ω
F77-18 (V+) - Body ground
Always
10 kΩ or higher
F77-19 (V-) - Body ground
Always
10 kΩ or higher
F77-39 (CA+) - Body ground
Always
10 kΩ or higher
F77-40 (CGND) - Body ground
Always
10 kΩ or higher
|
|
||||

| OK | |
 |
| 2. CHECK MULTI-MEDIA MODULE RECEIVER DISPLAY (CA+, CGND) |
Reconnect the multi-media module receiver assembly connector.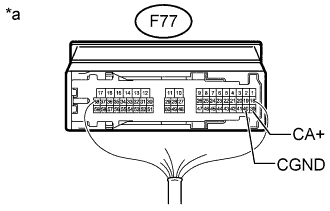
Measure the resistance according to the value(s) in the table below.
- Standard Resistance:
Tester Connection
Condition
Specified Condition
F77-40 (CGND) - Body ground
Always
Below 1 Ω
Measure the voltage according to the value(s) in the table below.
- Standard Voltage:
Tester Connection
Switch Condition
Specified Condition
F77-39 (CA+) - F77-40 (CGND)
Engine switch on (IG), shift lever in R
5.5 to 7.05 V
| *a |
Component with harness connected (Multi-media Module Receiver Assembly) |
|
|
||||
| OK | |
|
| 3. CHECK REAR TELEVISION CAMERA ASSEMBLY (CV+, CGND) |
Reconnect the S5 rear television camera assembly connector.
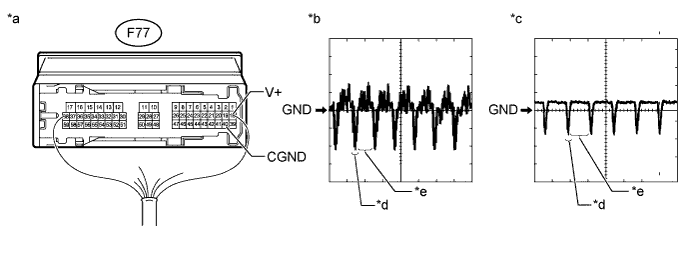
| *a |
Component with harness connected (Multi-media Module Receiver Assembly) |
*b |
Waveform A |
| *c |
Waveform B |
*d |
Synchronization Signal |
| *e |
Video Waveform |
- |
- |
Check the waveform of the rear television camera assembly using an oscilloscope.
- HINT:
- A waterproof connector is used for the rear television camera assembly. Therefore, inspect the waveform at the multi-media module receiver assembly with the connector connected.
- The video waveform changes according to the image sent by the rear television camera assembly.
- A waterproof connector is used for the rear television camera assembly. Therefore, inspect the waveform at the multi-media module receiver assembly with the connector connected.
Measurement Condition Item
Content
Tester No. (Symbol)
F77-18 (V+) - F77-40 (CGND)
Tool Setting
0.2 V/DIV., 50 μS/DIV
Condition
Waveform A: Engine starts, shift lever in R (camera lens is not covered, displaying an image)
Waveform B: Engine starts, shift lever in R (camera lens is covered, blacking out the screen)
- OK:
- Waveform is as shown in the illustration.
|
|
||||
| OK | |
|
| 4. REPLACE HARNESS AND CONNECTOR (GVIF CABLE) |
Replace the harness and connector (GVIF cable) with a normally functioning one.
| NEXT | |
|
| 5. CHECK REAR VIEW MONITOR SYSTEM |
Check the operation of rear view monitor system.
- OK:
- Rear view monitor system is operated normally.
|
|
||||

| OK | ||
 |
||
| ||
| 6. REPLACE MULTI-DISPLAY ASSEMBLY |
Replace the multi-display assembly with a normally functioning one (Click here).
| NEXT | |
|
| 7. CHECK REAR VIEW MONITOR SYSTEM |
Check the operation of rear view monitor system.
- OK:
- Rear view monitor system is operated normally.
|
|
||||
| OK | ||
|
||
| ||