REMOVAL
Removal / installation · Vehicles built Sep 2011 – Dec 2011
Versions by build date: Sep 2011 – Dec 2011 from Jan 2012
| 1. REMOVE REAR BUMPER COVER |

for Standard:
Remove the rear bumper cover (Click here).
w/ Towing Hitch:
Remove the rear bumper cover (Click here).
w/ Pintle Hook:
Remove the rear bumper cover (Click here).
| 2. REMOVE NO. 2 FRAME WIRE |
for Standard:
Remove the No. 2 frame wire (Click here).
w/ Towing Hitch:
Remove the No. 2 frame wire (Click here).
w/ Pintle Hook:
Remove the No. 2 frame wire (Click here).
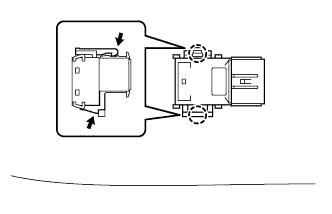
| 3. REMOVE NO. 2 ULTRASONIC SENSOR |
  |
- HINT:
- Use the same procedure to remove the No. 2 ultrasonic sensor on the other side.
While pushing down on the lever with a finger to release the one claw, detach the claw on the other side to remove the ultrasonic sensor.
- HINT:
- The type of claw on the top and bottom of the sensor are different. Observe the claws carefully before removing the sensor.
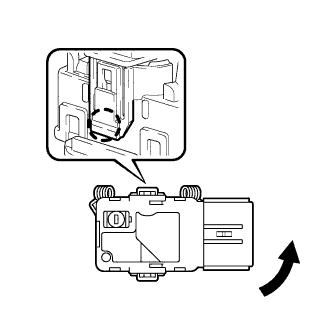
| 4. REMOVE NO. 3 ULTRASONIC SENSOR |
 |
- HINT:
- Use the same procedure to remove the No. 3 ultrasonic sensor on the other side.
Detach the claw and remove the ultrasonic sensor as shown in the illustration.
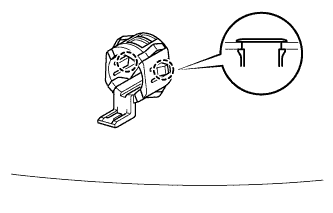
| 5. REMOVE NO. 2 ULTRASONIC SENSOR RETAINER |
 |
- HINT:
- Use the same procedure to remove the No. 2 ultrasonic sensor retainer on the other side.
Detach the 2 claws and remove the ultrasonic sensor retainer from the rear bumper cover.
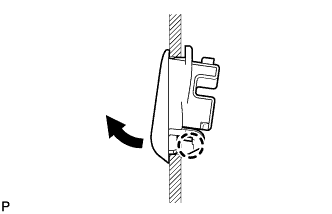
| 6. REMOVE NO. 3 ULTRASONIC SENSOR RETAINER |
 |
- HINT:
- Use the same procedure to remove the No. 3 ultrasonic sensor retainer on the other side.
Detach the claw and remove the ultrasonic sensor retainer from the rear bumper cover.