REMOVAL
Removal / installation · Vehicles built from Jan 2012
| 1. DISCHARGE FUEL SYSTEM PRESSURE |

- CAUTION:
- Do not disconnect any part of the fuel system until you have discharged the fuel system pressure.
- After discharging the fuel pressure, place a cloth or equivalent over fittings as you separate them to reduce the risk of fuel spray on yourself or in the engine compartment.
- Do not disconnect any part of the fuel system until you have discharged the fuel system pressure.
Disconnect the fuel pump ECU connector (Click here).
Start the engine. After the engine stops, turn the engine switch off.
- HINT:
- DTC P0171/0174 (system too lean) may be stored.
Crank the engine again, and then check that the engine does not start.
Loosen the fuel tank cap, and then discharge the pressure in the fuel tank completely.
Disconnect the cable from the negative (-) battery terminal.
- NOTICE:
- After turning the engine switch off, waiting time may be required before disconnecting the cable from the battery terminal. Therefore, make sure to read the disconnecting the cable from the battery terminal notice before proceeding with work (Click here).
- When disconnecting the cable, some systems need to be initialized after the cable is reconnected (Click here).
- After turning the engine switch off, waiting time may be required before disconnecting the cable from the battery terminal. Therefore, make sure to read the disconnecting the cable from the battery terminal notice before proceeding with work (Click here).
Connect the fuel pump ECU connector (Click here).
| 2. REMOVE FUEL TANK CAP ASSEMBLY |
| 3. REMOVE NO. 1 FUEL TANK PROTECTOR SUB-ASSEMBLY |
Remove the 5 bolts and fuel tank protector.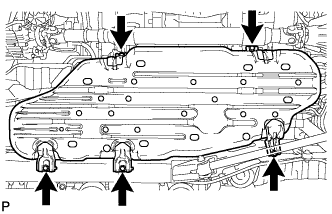

| 4. DISCONNECT FUEL TANK MAIN TUBE SUB-ASSEMBLY (for Single Tank Type) |
Detach the fuel tube clamp.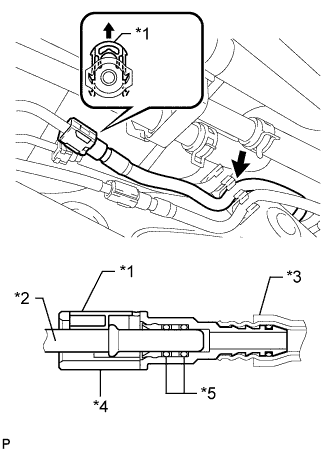
Pull up the retainer and disconnect the fuel tank main tube.
- NOTICE:
- Check for foreign matter in the pipe and around the connector. Clean if necessary. Foreign matter may damage the O-ring or cause leaks in the seal between the pipe and connector.
- Do not use any tools to separate the pipe and connector.
- Do not forcefully bend or twist the nylon tube.
- Check for foreign matter on the pipe seal surface. Clean if necessary.
- Put the pipe and connector ends in plastic bags to prevent damage and foreign matter contamination.
- If the pipe and connector are stuck together, pinch the connector between your fingers and turn it carefully to disconnect it.
- Check for foreign matter in the pipe and around the connector. Clean if necessary. Foreign matter may damage the O-ring or cause leaks in the seal between the pipe and connector.
Text in Illustration *1
Retainer
*2
Pipe
*3
Nylon Tube
*4
Connector
*5
O-Ring
| 5. DISCONNECT FUEL TANK MAIN TUBE SUB-ASSEMBLY (for Double Tank Type) |
Detach the fuel tube clamp.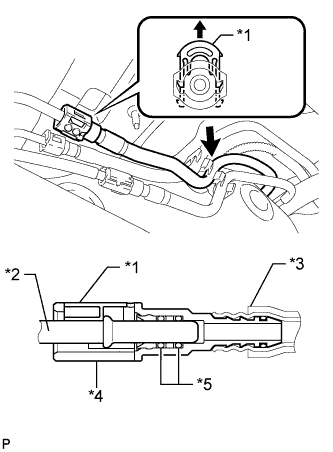
Pull up the retainer and disconnect the fuel tank main tube.
- NOTICE:
- Check for foreign matter in the pipe and around the connector. Clean if necessary. Foreign matter may damage the O-ring or cause leaks in the seal between the pipe and connector.
- Do not use any tools to separate the pipe and connector.
- Do not forcefully bend or twist the nylon tube.
- Check for foreign matter on the pipe seal surface. Clean if necessary.
- Put the pipe and connector ends in plastic bags to prevent damage and foreign matter contamination.
- If the pipe and connector are stuck together, pinch the connector between your fingers and turn it carefully to disconnect it.
- Check for foreign matter in the pipe and around the connector. Clean if necessary. Foreign matter may damage the O-ring or cause leaks in the seal between the pipe and connector.
Text in Illustration *1
Retainer
*2
Pipe
*3
Nylon Tube
*4
Connector
*5
O-Ring
| 6. DRAIN FUEL |
Connect the cable to the negative (-) battery terminal.
Connect the GTS to the DLC3.
Turn the engine switch on (IG).
- NOTICE:
- Do not start the engine.
Turn the GTS on.
Enter the following menus: Powertrain / Engine and ECT / Active Test / Control the Fuel Pump / Speed.
- CAUTION:
- Do not smoke or be near an open flame when working on the fuel system.
- Secure good ventilation.
- Keep gasoline away from rubber or leather parts.
- Do not smoke or be near an open flame when working on the fuel system.
- HINT:
-
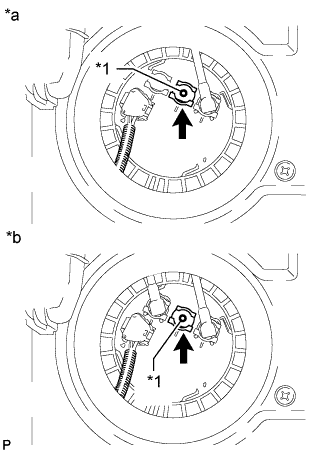
- If the fuel pump does not operate, remove the fuel tube joint clip and disconnect the fuel tank return tube, and drain fuel from the port shown in the illustration.
Text in Illustration *1
Port
*a
for Single Tank Type
*b
for Double Tank Type
Disconnect the cable from the negative (-) battery terminal.
- NOTICE:
- After turning the engine switch off, waiting time may be required before disconnecting the cable from the battery terminal. Therefore, make sure to read the disconnecting the cable from the battery terminal notice before proceeding with work (Click here).
- When disconnecting the cable, some systems need to be initialized after the cable is reconnected (Click here).
- After turning the engine switch off, waiting time may be required before disconnecting the cable from the battery terminal. Therefore, make sure to read the disconnecting the cable from the battery terminal notice before proceeding with work (Click here).
Disconnect the fuel pump and fuel sender gauge connector.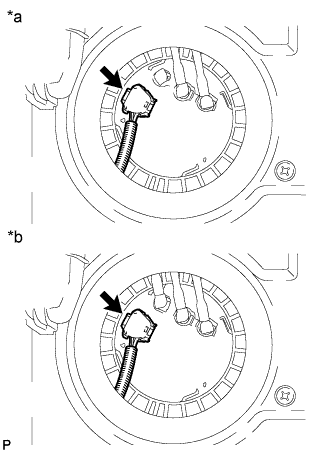
Text in Illustration *a
for Single Tank Type
*b
for Double Tank Type
| 7. PRECAUTION |
- NOTICE:
- After turning the engine switch off, waiting time may be required before disconnecting the cable from the battery terminal. Therefore, make sure to read the disconnecting the cable from the battery terminal notice before proceeding with work (Click here).
| 8. DISCONNECT CABLE FROM NEGATIVE BATTERY TERMINAL |
- NOTICE:
- When disconnecting the cable, some systems need to be initialized after the cable is reconnected (Click here).
| 9. REMOVE REAR NO. 1 SEAT ASSEMBLY RH (for 60/40 Split Seat Type 40 Side) |
| 10. REMOVE REAR NO. 1 SEAT ASSEMBLY LH (for 60/40 Split Seat Type 60 Side) |
| 11. REMOVE REAR NO. 2 SEAT ASSEMBLY |
- for Face to Face Seat Type (Click here)
- except Face to Face Seat Type (Click here)
| 12. REMOVE FRONT QUARTER TRIM PANEL ASSEMBLY LH |
- w/ Sliding Roof (Click here)
- w/o Sliding Roof (Click here)
| 13. REMOVE FRONT QUARTER TRIM PANEL ASSEMBLY RH |
- w/ Sliding Roof (Click here)
- w/o Sliding Roof (Click here)
| 14. REMOVE FRONT FLOOR CARPET ASSEMBLY |
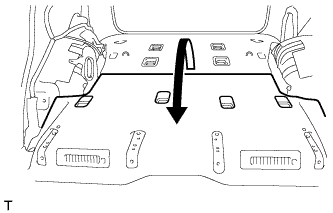 |
Turn over the floor carpet.
- HINT:
- Fold back the floor carpet so that the air duct can be removed.
| 15. REMOVE REAR FLOOR NO. 2 SERVICE HOLE COVER |
w/ Rear Air Conditioning System: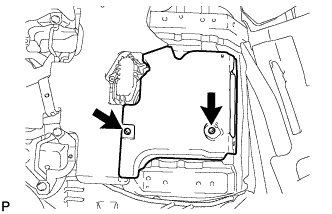
Remove the 2 screws and air duct.
Remove the service hole cover.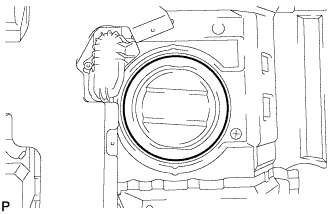
| 16. DISCONNECT NO. 2 FUEL TANK BREATHER TUBE (for Single Tank Type) |
Detach the fuel tube clamp.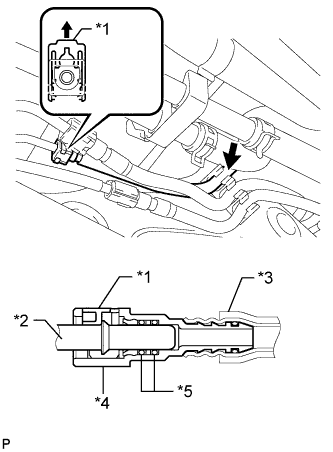
Pull up the retainer and disconnect the fuel tank breather tube.
- NOTICE:
- Check for foreign matter in the pipe and around the connector. Clean if necessary. Foreign matter may damage the O-ring or cause leaks in the seal between the pipe and connector.
- Do not use any tools to separate the pipe and connector.
- Do not forcefully bend or twist the nylon tube.
- Check for foreign matter on the pipe seal surface. Clean if necessary.
- Put the pipe and connector ends in plastic bags to prevent damage and foreign matter contamination.
- If the pipe and connector are stuck together, pinch the connector between your fingers and turn it carefully to disconnect it.
- Check for foreign matter in the pipe and around the connector. Clean if necessary. Foreign matter may damage the O-ring or cause leaks in the seal between the pipe and connector.
Text in Illustration *1
Retainer
*2
Pipe
*3
Nylon Tube
*4
Connector
*5
O-Ring
| 17. DISCONNECT FUEL TANK RETURN TUBE (for Single Tank Type) |
Detach the fuel tube clamp.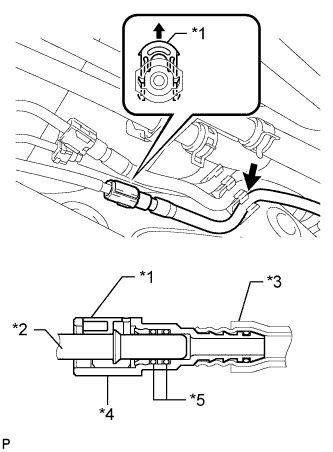
Pull up the retainer and disconnect the fuel tank return tube.
- NOTICE:
- Check for foreign matter in the pipe and around the connector. Clean if necessary. Foreign matter may damage the O-ring or cause leaks in the seal between the pipe and connector.
- Do not use any tools to separate the pipe and connector.
- Do not forcefully bend or twist the nylon tube.
- Check for foreign matter on the pipe seal surface. Clean if necessary.
- Put the pipe and connector ends in plastic bags to prevent damage and foreign matter contamination.
- If the pipe and connector are stuck together, pinch the connector between your fingers and turn it carefully to disconnect it.
- Check for foreign matter in the pipe and around the connector. Clean if necessary. Foreign matter may damage the O-ring or cause leaks in the seal between the pipe and connector.
Text in Illustration *1
Retainer
*2
Pipe
*3
Nylon Tube
*4
Connector
*5
O-Ring
| 18. DISCONNECT FUEL TANK RETURN TUBE (for Double Tank Type) |
Detach the fuel tube clamp.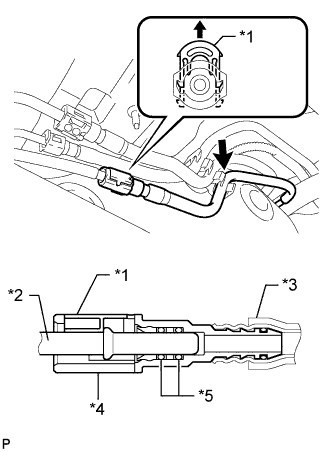
Pull up the retainer and disconnect the fuel tank return tube.
- NOTICE:
- Check for foreign matter in the pipe and around the connector. Clean if necessary. Foreign matter may damage the O-ring or cause leaks in the seal between the pipe and connector.
- Do not use any tools to separate the pipe and connector.
- Do not forcefully bend or twist the nylon tube.
- Check for foreign matter on the pipe seal surface. Clean if necessary.
- Put the pipe and connector ends in plastic bags to prevent damage and foreign matter contamination.
- If the pipe and connector are stuck together, pinch the connector between your fingers and turn it carefully to disconnect it.
- Check for foreign matter in the pipe and around the connector. Clean if necessary. Foreign matter may damage the O-ring or cause leaks in the seal between the pipe and connector.
Text in Illustration *1
Retainer
*2
Pipe
*3
Nylon Tube
*4
Connector
*5
O-Ring
| 19. DISCONNECT NO. 2 FUEL MAIN TUBE SUB-ASSEMBLY (for Double Tank Type) |
Detach the fuel tube clamp.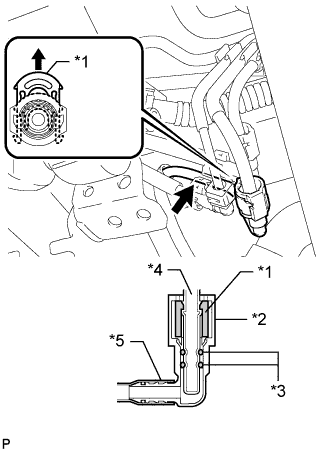
Pull up the retainer and disconnect the fuel tank main tube.
- NOTICE:
- Check for foreign matter in the pipe and around the connector. Clean if necessary. Foreign matter may damage the O-ring or cause leaks in the seal between the pipe and connector.
- Do not use any tools to separate the pipe and connector.
- Do not forcefully bend or twist the nylon tube.
- Check for foreign matter on the pipe seal surface. Clean if necessary.
- Put the pipe and connector ends in plastic bags to prevent damage and foreign matter contamination.
- If the pipe and connector are stuck together, pinch the connector between your fingers and turn it carefully to disconnect it.
- Check for foreign matter in the pipe and around the connector. Clean if necessary. Foreign matter may damage the O-ring or cause leaks in the seal between the pipe and connector.
Text in Illustration *1
Retainer
*2
Connector
*3
O-Ring
*4
Pipe
*5
Nylon Tube
| 20. DISCONNECT NO. 2 FUEL TANK BREATHER TUBE (for Double Tank Type) |
Detach the fuel tube clamp.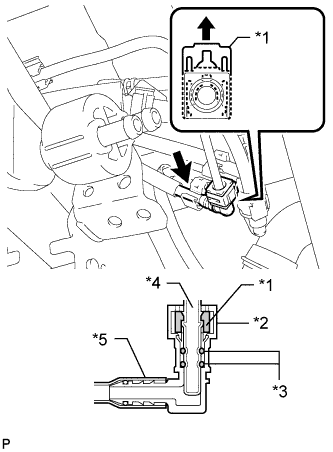
Pull up the retainer and disconnect the fuel tank breather tube.
- NOTICE:
- Check for foreign matter in the pipe and around the connector. Clean if necessary. Foreign matter may damage the O-ring or cause leaks in the seal between the pipe and connector.
- Do not use any tools to separate the pipe and connector.
- Do not forcefully bend or twist the nylon tube.
- Check for foreign matter on the pipe seal surface. Clean if necessary.
- Put the pipe and connector ends in plastic bags to prevent damage and foreign matter contamination.
- If the pipe and connector are stuck together, pinch the connector between your fingers and turn it carefully to disconnect it.
- Check for foreign matter in the pipe and around the connector. Clean if necessary. Foreign matter may damage the O-ring or cause leaks in the seal between the pipe and connector.
Text in Illustration *1
Retainer
*2
Connector
*3
O-Ring
*4
Pipe
*5
Nylon Tube
| 21. DISCONNECT FUEL TANK BREATHER TUBE (for Single Tank Type) |
Detach the fuel tube clamp.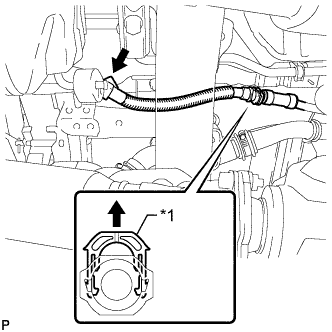
Pull up the retainer and disconnect the fuel tank breather tube from the filler pipe.
- NOTICE:
- Do not use any tools in this procedure.
- Check for any dirt and foreign matter contamination in the pipe and around the connector. Clean if necessary. Foreign matter may damage the O-ring or cause leaks in the seal between the pipe and connector.
- Do not use any tools in this procedure.
Text in Illustration *1
Retainer
| 22. DISCONNECT FUEL TANK BREATHER TUBE (for Double Tank Type) |
Detach the fuel tube clamp.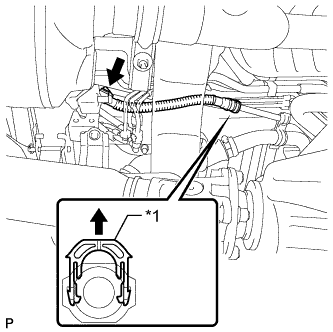
Pull up the retainer and disconnect the fuel tank breather tube from the filler pipe.
- NOTICE:
- Do not use any tools in this procedure.
- Check for any dirt and foreign matter contamination in the pipe and around the connector. Clean if necessary. Foreign matter may damage the O-ring or cause leaks in the seal between the pipe and connector.
- Do not use any tools in this procedure.
Text in Illustration *1
Retainer
| 23. DISCONNECT FUEL TANK TO FILLER PIPE HOSE (for Single Tank Type) |
Disconnect the hose from the filler pipe.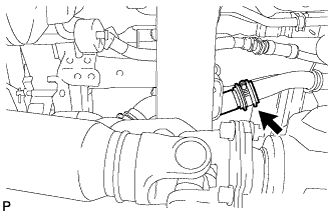
| 24. DISCONNECT FUEL TANK TO FILLER PIPE HOSE (for Double Tank Type) |
Disconnect the hose from the filler pipe.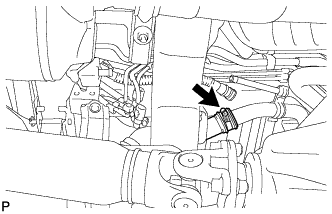
| 25. REMOVE FUEL TANK SUB-ASSEMBLY |
Place an engine lifter under the fuel tank.
Remove the 2 bolts, 2 clips, 2 pins and 2 fuel tank bands.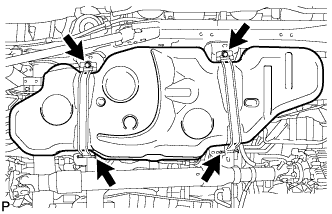
Slowly lower the engine lifter slightly.
| 26. REMOVE FUEL TANK MAIN TUBE SUB-ASSEMBLY AND FUEL TANK RETURN TUBE SUB-ASSEMBLY (for Single Tank Type) |
Remove the 2 fuel tube joint clips and pull out the 2 fuel tubes.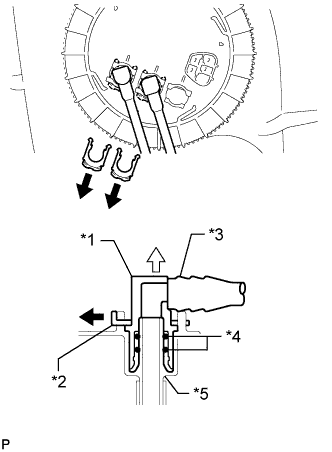
- NOTICE:
- Remove any dirt and foreign matter on the fuel tube joint before performing this work.
- Do not allow any scratches or foreign matter on the parts when disconnecting them, as the fuel tube joint contains the O-rings that seal the plug.
- Perform this work by hand. Do not use any tools.
- Do not forcibly bend, twist or turn the nylon tube.
- Protect the disconnected part by covering it with a plastic bag and tape after disconnecting the fuel tubes.
- Remove any dirt and foreign matter on the fuel tube joint before performing this work.
Text in Illustration *1
Tube Joint
*2
Tube Joint Clip
*3
Fuel Tank Tube
*4
O-Ring
*5
Fuel Suction Plate
Remove the 2 fuel tubes from the fuel tank.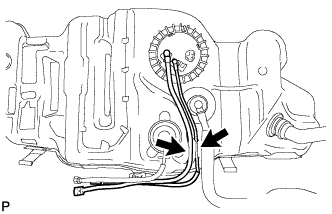
| 27. REMOVE FUEL TANK MAIN TUBE, FUEL TANK RETURN TUBE AND NO. 2 FUEL TANK MAIN TUBE SUB-ASSEMBLY (for Double Tank Type) |
Remove the 3 fuel tube joint clips and pull out the 3 fuel tubes.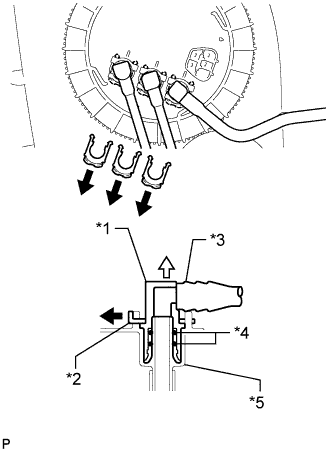
- NOTICE:
- Remove any dirt and foreign matter on the fuel tube joint before performing this work.
- Do not allow any scratches or foreign matter on the parts when disconnecting them, as the fuel tube joint contains the O-rings that seal the plug.
- Perform this work by hand. Do not use any tools.
- Do not forcibly bend, twist or turn the nylon tube.
- Protect the disconnected part by covering it with a plastic bag and tape after disconnecting the fuel tubes.
- Remove any dirt and foreign matter on the fuel tube joint before performing this work.
Text in Illustration *1
Tube Joint
*2
Tube Joint Clip
*3
Fuel Tank Tube
*4
O-Ring
*5
Fuel Suction Plate
Remove the 3 fuel tubes from the fuel tank.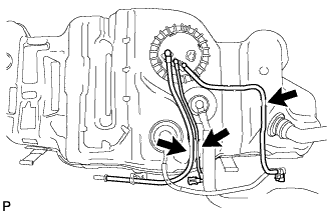
| 28. REMOVE FUEL SUCTION WITH PUMP AND GAUGE TUBE ASSEMBLY |
Set SST on the fuel pump gauge retainer.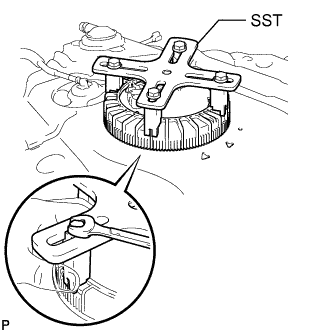
- SST
- 09808-14030
- HINT:
- Engage the claws of SST securely with the fuel pump gauge retainer holes to secure SST.
- Install SST while pressing the claws of SST against the fuel pump gauge retainer (towards the center of SST).
- Engage the claws of SST securely with the fuel pump gauge retainer holes to secure SST.
Using SST, loosen the retainer.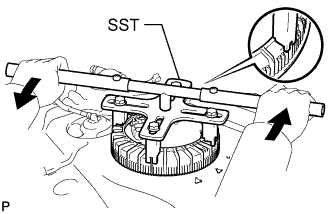
- SST
- 09808-14030
Text in Illustration 
Turn
- NOTICE:
- When the retainer is loosened, be careful as the pump and gauge tube will spring upward from the force of the spring.
- Remove foreign matter around the fuel suction with pump and gauge before this operation.
- When the retainer is loosened, be careful as the pump and gauge tube will spring upward from the force of the spring.
- HINT:
- Fit the tips of SST onto the ribs of the retainer.
Remove the retainer.
Remove the fuel suction with pump and gauge tube assembly from the fuel tank.
- NOTICE:
- Be careful not to bend the arm of the fuel sender gauge.
Remove the gasket from the fuel tank.
| 29. REMOVE FUEL TANK TO FILLER PIPE HOSE |
Remove the hose from the fuel tank.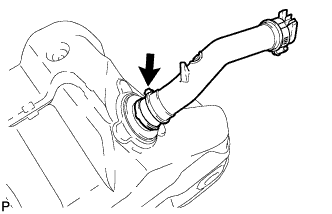
| 30. REMOVE NO. 1 FUEL TANK HEAT INSULATOR |
Remove the fuel tube clamp from the heat insulator.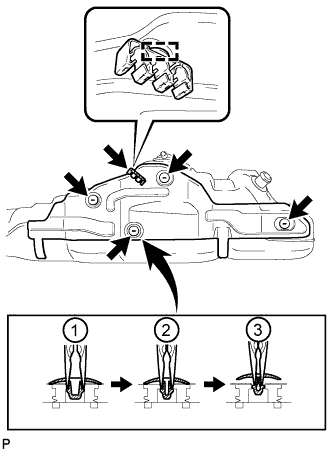
Using needle-nose pliers, remove the 4 clips shown in the illustration, and then remove the heat insulator.