C1AEC Front Sensor Communication Malfunction
Diagnostic trouble codes · Vehicles built Sep 2011 – Dec 2011
Versions by build date: Sep 2011 – Dec 2011 from Jan 2012
DESCRIPTION
This DTC is stored when there is an open or short circuit in the communication line between the front sensors and the ECU, or when there is a malfunction in a front sensor.| DTC Code |
DTC Detection Condition |
Trouble Area |
| C1AEC |
An open or short circuit in the communication line between the front sensors and ECU or a malfunction in a front sensor during initialization mode after the engine switch is turned on (IG). |
|
- HINT:
- *1: w/ Parking Assist Monitor System
- *2: w/o Parking Assist Monitor System
WIRING DIAGRAM
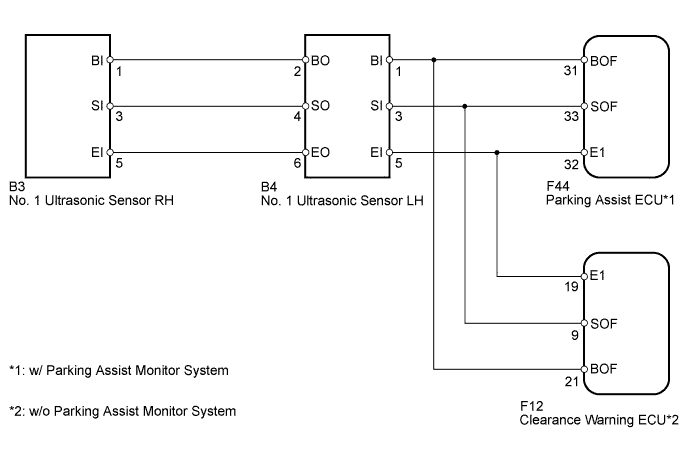

INSPECTION PROCEDURE
| 1. CHECK DTC OUTPUT |

Clear the DTCs (Click here).
Check for DTCs (Click here).
Result Result
Proceed to
DTC C1AEC is output (w/ Parking Assist Monitor System)
A
DTC C1AEC is output (w/o Parking Assist Monitor System)
B
No DTC is output
C
|
|
||||
|
|
||||


| A | |
 |
| 2. CHECK PARKING ASSIST ECU |
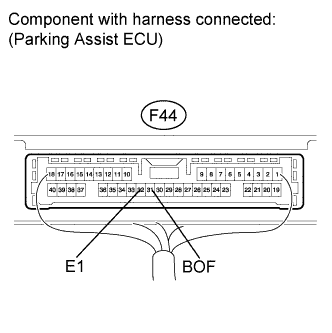 |
Measure the voltage according to the value(s) in the table below.
- Standard Voltage:
Tester Connection
Condition
Specified Condition
F44-31 (BOF) - Body ground
Engine switch on (IG)
7.2 to 8.8 V
Measure the resistance according to the value(s) in the table below.
- Standard Resistance:
Tester Connection
Condition
Specified Condition
F44-32 (E1) - Body ground
Always
Below 1 Ω
|
|
||||
| OK | |
|
| 3. CHECK HARNESS AND CONNECTOR (NO. 1 ULTRASONIC SENSOR LH - PARKING ASSIST ECU) |
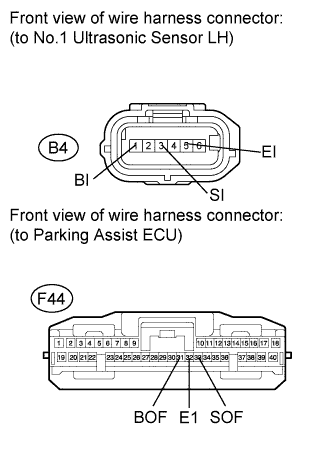 |
Disconnect the B4 sensor connector.
Disconnect the F44 ECU connector.
Measure the resistance according to the value(s) in the table below.
- Standard Resistance:
Tester Connection
Condition
Specified Condition
B4-1 (BI) - F44-31 (BOF)
Always
Below 1 Ω
B4-3 (SI) - F44-33 (SOF)
Always
Below 1 Ω
B4-5 (EI) - F44-32 (E1)
Always
Below 1 Ω
B4-1 (BI) - Body ground
Always
10 kΩ or higher
B4-3 (SI) - Body ground
Always
10 kΩ or higher
B4-5 (EI) - Body ground
Always
10 kΩ or higher
|
|
||||
| OK | |
|
| 4. CHECK HARNESS AND CONNECTOR (NO. 1 ULTRASONIC SENSOR LH - NO. 1 ULTRASONIC SENSOR RH) |
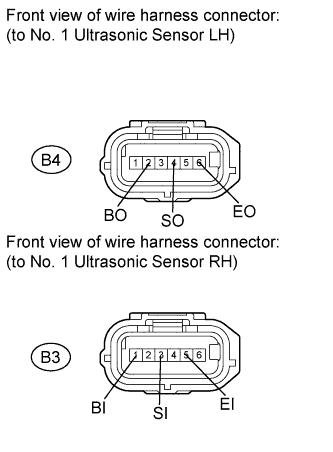 |
Disconnect the B4 and B3 sensor connectors.
Measure the resistance according to the value(s) in the table below.
- Standard Resistance:
Tester Connection
Condition
Specified Condition
B4-2 (BO) - B3-1 (BI)
Always
Below 1 Ω
B4-4 (SO) - B3-3 (SI)
Always
Below 1 Ω
B4-6 (EO) - B3-5 (EI)
Always
Below 1 Ω
B4-2 (BO) - Body ground
Always
10 kΩ or higher
B4-4 (SO) - Body ground
Always
10 kΩ or higher
B4-6 (EO) - Body ground
Always
10 kΩ or higher
|
|
||||
| OK | |
|
| 5. CHECK DTC OUTPUT |
Clear the DTCs (Click here).
Check for DTCs (Click here).
Result Result
Proceed to
DTC C1AEC is output
A
No DTC is output
B
|
|
||||
| A | |
|
| 6. REPLACE NO. 1 ULTRASONIC SENSOR LH |
Replace the No. 1 ultrasonic sensor LH with a normally functioning sensor (Click here).
| NEXT | |
|
| 7. CHECK DTC OUTPUT |
Clear the DTCs (Click here).
Check for DTCs (Click here).
Result Result
Proceed to
DTC C1AEC is output
A
No DTC is output
B
|
|
||||
| OK | |
|
| 8. REPLACE NO. 1 ULTRASONIC SENSOR RH |
Replace the No. 1 ultrasonic sensor RH with a normally functioning sensor (Click here)
| NEXT | |
|
| 9. CHECK DTC OUTPUT |
Clear the DTCs (Click here).
Check for DTCs (Click here).
Result Result
Proceed to
DTC C1AEC is output
A
No DTC is output
B
|
|
||||
| A | ||
 |
||
| ||
| 10. CHECK CLEARANCE WARNING ECU |
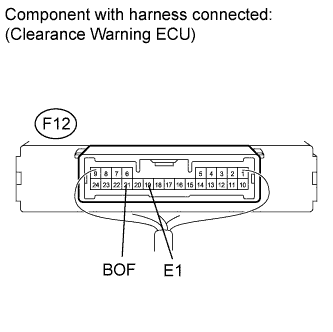 |
Measure the voltage according to the value(s) in the table below.
- Standard Voltage:
Tester Connection
Condition
Specified Condition
F12-21 (BOF) - Body ground
Engine switch on (IG)
7.2 to 8.8 V
Measure the resistance according to the value(s) in the table below.
- Standard Resistance:
Tester Connection
Condition
Specified Condition
F12-19 (E1) - Body ground
Always
Below 1 Ω
|
|
||||
| OK | |
|
| 11. CHECK HARNESS AND CONNECTOR (NO. 1 ULTRASONIC SENSOR LH - CLEARANCE WARNING ECU) |
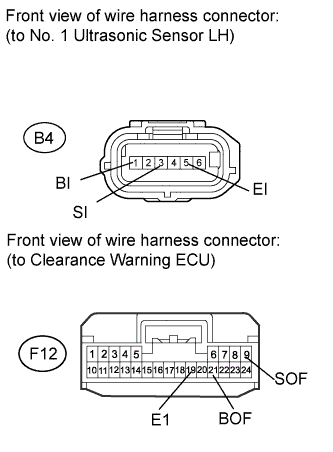 |
Disconnect the B4 sensor connector.
Disconnect the F12 ECU connector.
Measure the resistance according to the value(s) in the table below.
- Standard Resistance:
Tester Connection
Condition
Specified Condition
B4-1 (BI) - F12-21 (BOF)
Always
Below 1 Ω
B4-3 (SI) - F12-9 (SOF)
Always
Below 1 Ω
B4-5 (EI) - F12-19 (EI)
Always
Below 1 Ω
B4-1 (BI) - Body ground
Always
10 kΩ or higher
B4-3 (SI) - Body ground
Always
10 kΩ or higher
B4-5 (EI) - Body ground
Always
10 kΩ or higher
|
|
||||
| OK | |
|
| 12. CHECK HARNESS AND CONNECTOR (NO. 1 ULTRASONIC SENSOR LH - NO. 1 ULTRASONIC SENSOR RH) |
|
|
Disconnect the B4 and B3 sensor connectors.
Measure the resistance according to the value(s) in the table below.
- Standard Resistance:
Tester Connection
Condition
Specified Condition
B4-2 (BO) - B3-1 (BI)
Always
Below 1 Ω
B4-4 (SO) - B3-3 (SI)
Always
Below 1 Ω
B4-6 (EO) - B3-5 (EI)
Always
Below 1 Ω
B4-2 (BO) - Body ground
Always
10 kΩ or higher
B4-4 (SO) - Body ground
Always
10 kΩ or higher
B4-6 (EO) - Body ground
Always
10 kΩ or higher
|
|
||||
| OK | |
|
| 13. CHECK DTC OUTPUT |
Clear the DTCs (Click here).
Check for DTCs (Click here).
Result Result
Proceed to
DTC C1AEC is output
A
No DTC is output
B
|
|
||||
| A | |
|
| 14. REPLACE NO. 1 ULTRASONIC SENSOR LH |
Replace the No. 1 ultrasonic sensor LH with a normally functioning sensor (Click here).
| NEXT | |
|
| 15. CHECK DTC OUTPUT |
Clear the DTCs (Click here).
Check for DTCs (Click here).
Result Result
Proceed to
DTC C1AEC is output
A
No DTC is output
B
|
|
||||
| A | |
|
| 16. REPLACE NO. 1 ULTRASONIC SENSOR RH |
Replace the No. 1 ultrasonic sensor RH with a normally functioning sensor (Click here).
| NEXT | |
|
| 17. CHECK DTC OUTPUT |
Clear the DTCs (Click here).
Check for DTCs (Click here).
Result Result
Proceed to
DTC C1AEC is output
A
No DTC is output
B
|
|
||||
| A | ||
|
||
| ||