1.
INSTALL AIR FUEL RATIO SENSOR (for Bank 2 Sensor 1)
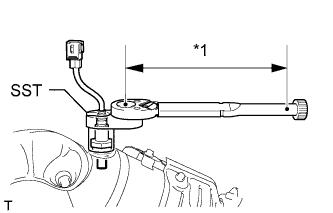
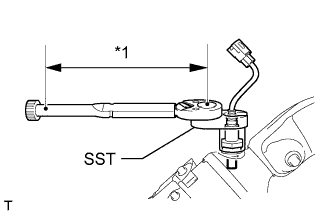
Using SST, install the air fuel ratio sensor.
SST
09224-00010
Torque:
without SST:
44 N*m{
449 kgf*cm
, 32 ft.*lbf
}
with SST:
40 N*m{
408 kgf*cm
, 30 ft.*lbf
}
Text in Illustration
*1
Fulcrum Length
HINT:
Use a torque wrench with a fulcrum length of 300 mm (11.8 in.). When using a torque wrench with a fulcrum length that is not 300 mm (11.8 in.), calculate the torque specification for the torque wrench and SST based on the "without SST" torque specification (Click here).
Make sure SST and the wrench are connected in a straight line.
2.
INSTALL EXHAUST MANIFOLD SUB-ASSEMBLY LH
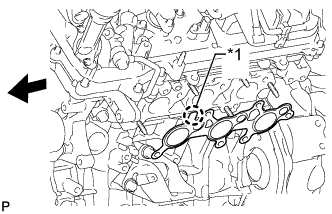
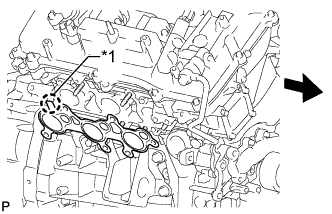
Install a new gasket to the cylinder head.
Text in Illustration
*1
Protrusion
Front
NOTICE:
Be careful of the installation direction.
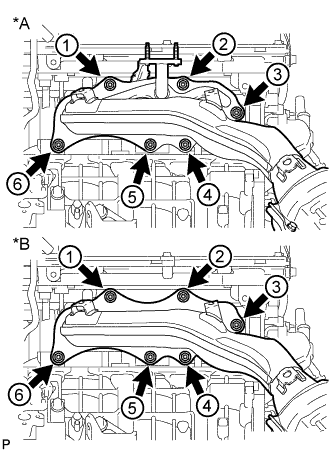
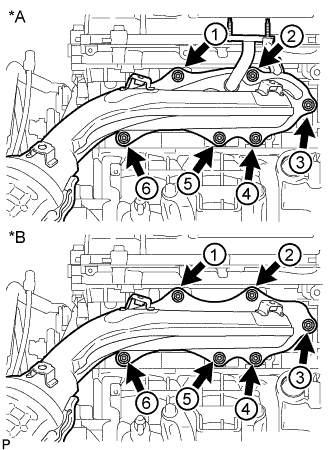
Temporarily install the manifold with 6 new nuts.
Tighten the 6 nuts in the sequence shown in the illustration.
Torque:
21 N*m{
214 kgf*cm
, 15 ft.*lbf
}
Text in Illustration
*A
w/ Secondary Air Injection System
*B
w/o Secondary Air Injection System
Connect the air fuel ratio sensor connector.
3.
INSTALL NO. 2 EXHAUST MANIFOLD HEAT INSULATOR
Install the heat insulator with the 3 bolts.
Torque:
13 N*m{
133 kgf*cm
, 10 ft.*lbf
}
4.
INSTALL NO. 2 AIR TUBE (w/ Secondary Air Injection System)
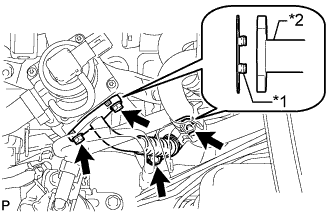
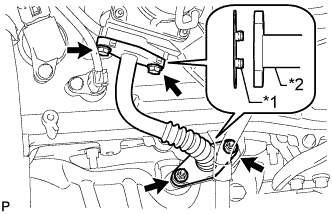
Install 2 new gaskets.
Text in Illustration
*1
Claw
*2
No. 2 Air Tube
NOTICE:
Make sure the gasket's claws are not caught between the No. 2 emission control valve set and No. 2 air tube.
Install the No. 2 air tube with the 2 bolts and 2 nuts.
Torque:
10 N*m{
102 kgf*cm
, 7 ft.*lbf
}
5.
INSTALL NO. 2 MANIFOLD STAY
Install the No. 2 manifold stay with the 3 bolts.
Torque:
40 N*m{
408 kgf*cm
, 30 ft.*lbf
}
6.
INSTALL AIR FUEL RATIO SENSOR (for Bank 1 Sensor 1)
Using SST, install the air fuel ratio sensor.
SST
09224-00010
Torque:
without SST:
44 N*m{
449 kgf*cm
, 32 ft.*lbf
}
with SST:
40 N*m{
408 kgf*cm
, 30 ft.*lbf
}
Text in Illustration
*1
Fulcrum Length
HINT:
Use a torque wrench with a fulcrum length of 300 mm (11.8 in.). When using a torque wrench with a fulcrum length that is not 300 mm (11.8 in.), calculate the torque specification for the torque wrench and SST based on the "without SST" torque specification (Click here).
Make sure SST and the wrench are connected in a straight line.
7.
INSTALL EXHAUST MANIFOLD SUB-ASSEMBLY RH
Install a new gasket to the cylinder head.
Text in Illustration
*1
Protrusion
Front
NOTICE:
Be careful of the installation direction.
Temporarily install the manifold with 6 new nuts.
Tighten the 6 nuts in the sequence shown in the illustration.
Install the No. 2 engine under cover with the 2 bolts.
Torque:
29 N*m{
296 kgf*cm
, 21 ft.*lbf
}
14.
INSTALL NO. 1 ENGINE UNDER COVER SUB-ASSEMBLY
Install the No. 1 engine under cover with the 10 bolts.
Torque:
29 N*m{
296 kgf*cm
, 21 ft.*lbf
}
15.
INSTALL FRONT FENDER SPLASH SHIELD SUB-ASSEMBLY RH
Push in the clip to install the front fender splash shield sub-assembly RH.
Install the 3 bolts and 2 screws.
16.
INSTALL FRONT FENDER SPLASH SHIELD SUB-ASSEMBLY LH
Push in the clip to install the front fender splash shield sub-assembly LH.
Install the 3 bolts and screw.
17.
INSTALL AIR CLEANER CASE SUB-ASSEMBLY
Install the air cleaner case with the 3 bolts.
Torque:
5.0 N*m{
51 kgf*cm
, 44 in.*lbf
}
Install the air cleaner filter element.
18.
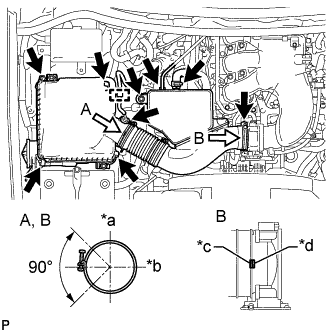
INSTALL AIR CLEANER CAP AND HOSE
Install the air cleaner cap and hose.
Text in Illustration
*a
Top
*b
Front
*c
Protrusion (Hose)
*d
Protrusion (Throttle body)
Install the air cleaner cap and hose with the bolt and fasten the 4 hook clamps.
Torque:
5.0 N*m{
51 kgf*cm
, 44 in.*lbf
}
Tighten the clamp.
Torque:
2.5 N*m{
25 kgf*cm
, 22 in.*lbf
}
Attach the 4 clamps and connect the No. 2 PCV hose, vacuum hose and mass air flow meter connector.
HINT:
The direction of the hose clamp is indicated in the illustration.
19.
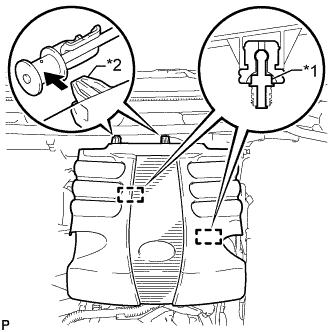
INSTALL V-BANK COVER
Attach the 2 V-bank cover hooks to the bracket. Then align the 2 V-bank cover grommets with the 2 pins and press down on the V-bank cover to attach the pins.
Text in Illustration
*1
Pin
*2
Hook
20.
INSPECT FOR EXHAUST GAS LEAK
If gas is leaking, tighten the areas necessary to stop the leak. Replace damaged parts as necessary.
21.
INSTALL FRONT FENDER APRON TRIM PACKING B
w/ KDSS: Install the front fender apron trim packing B with the 3 clips.
w/o KDSS: Install the front fender apron trim packing B with the 4 clips.
22.
INSTALL FRONT FENDER APRON TRIM PACKING A
Install the front fender apron trim packing A with the 3 clips.
23.
INSTALL FRONT FENDER APRON TRIM PACKING D
Install the front fender apron trim packing D with the 4 clips.
24.
INSTALL FRONT FENDER APRON TRIM PACKING C
Install the front fender apron trim packing C with the 4 clips.