AE80F AUTOMATIC TRANSMISSION / TRANSAXLE AUTOMATIC TRANSMISSION UNIT DISASSEMBLY
PROCEDURE

 1.REMOVE TRANSMISSION BREATHER HOSE SUB-ASSEMBLY
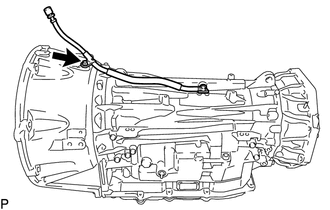
Remove the bolt and transmission breather hose sub-assembly from the automatic transmission case sub-assembly.
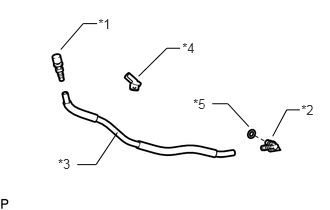
Remove the clamp from the breather plug hose.
| *1 | No. 2 Breather Plug |
| *2 | No. 1 Breather Plug |
| *3 | Breather Plug Hose |
| *4 | Clamp |
| *5 | Breather Plug O-ring |
Remove the No. 1 breather plug and No. 2 breather plug from the breather plug hose.
Remove the breather plug O-ring from the No. 1 breather plug.
35111
2.REMOVE AUTOMATIC TRANSMISSION HOUSING
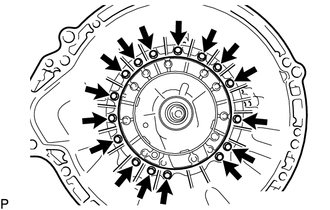
Remove the 16 bolts and automatic transmission housing from the automatic transmission case sub-assembly.
35000
3.FIX AUTOMATIC TRANSMISSION ASSEMBLY
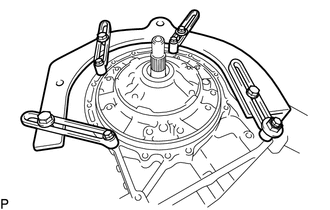
Install the automatic transmission assembly to an overhaul attachment.
35015G
4.REMOVE REAR TRANSFER ADAPTER
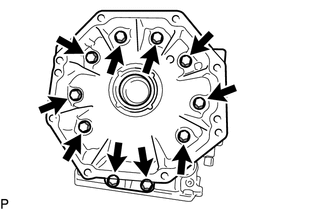
Remove the 10 bolts.
Remove the rear transfer adapter.
- HINT:
-
Tap on the circumference of the rear transfer adapter with a plastic-faced hammer to remove the rear transfer adapter.
Remove the O-ring from the rear transfer adapter.
35015J
5.REMOVE TRANSFER CASE ADAPTER REAR OIL SEAL
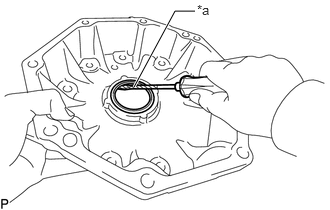
Using a screwdriver, pry out the transfer case adapter rear oil seal.
| *a | Protective Tape |
- NOTICE:
-
Be careful not to damage the rear transfer adapter.
- HINT:
-
Tape the screwdriver tip before use.
84540
6.REMOVE PARK/NEUTRAL POSITION SWITCH ASSEMBLY
7.REMOVE OIL COOLER TUBE UNION
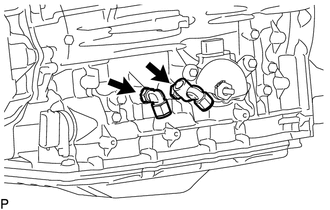
Remove the 2 oil cooler tube unions from the automatic transmission case sub-assembly.
Remove the 2 O-rings from the 2 oil cooler tube unions.
35104A
8.REMOVE REFILL PLUG
Remove the refill plug from the automatic transmission case sub-assembly.
Remove the O-ring from the refill plug.
35141B
9.REMOVE AUTOMATIC TRANSMISSION CASE PLUG
for T55H "TORX" Type:
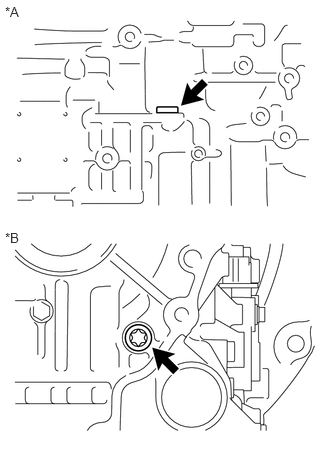
Using a T55H "TORX" socket wrench, remove the 2 automatic transmission case plugs from the automatic transmission case sub-assembly.
| *A | for LH Side |
| *B | for Rear Side |
Remove the 2 O-rings from the 2 automatic transmission case plugs.
for 17 mm Hexagon Type:
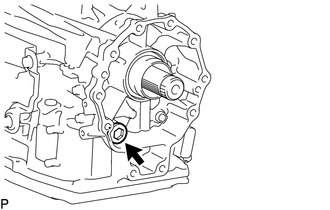
Remove the automatic transmission case plug from the automatic transmission case sub-assembly.
Remove the O-ring from the automatic transmission case plug.
35106
10.REMOVE AUTOMATIC TRANSMISSION OIL PAN SUB-ASSEMBLY
35330
11.REMOVE VALVE BODY OIL STRAINER ASSEMBLY
35410
12.REMOVE TRANSMISSION VALVE BODY ASSEMBLY
82125J
13.REMOVE TRANSMISSION WIRE
89413R
14.REMOVE TRANSMISSION REVOLUTION SENSOR (SP2)
35595
15.REMOVE PARKING LOCK PAWL BRACKET
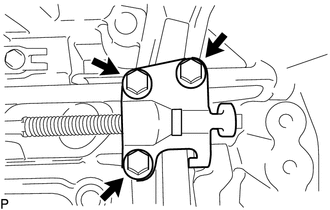
Remove the 3 bolts and parking lock pawl bracket.
35505
16.REMOVE MANUAL VALVE LEVER SUB-ASSEMBLY
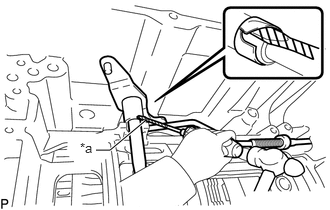
Using a screwdriver and hammer, cut off the spacer and remove it from the manual valve lever sub-assembly.
| *a | Protective Tape |
- NOTICE:
-
Be careful not to damage the manual valve lever sub-assembly.
- HINT:
-
Tape the screwdriver tip before use.
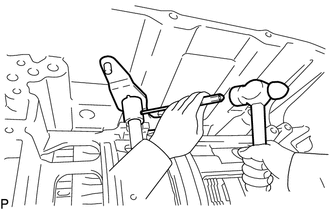
Using a 3 mm pin punch and a hammer, remove the spring pin.
- HINT:
-
Slowly tap out the spring pin so that it does not fall into the automatic transmission case sub-assembly.
Remove the manual valve lever shaft and manual valve lever sub-assembly from the automatic transmission case sub-assembly.
35501
17.REMOVE PARKING LOCK ROD SUB-ASSEMBLY
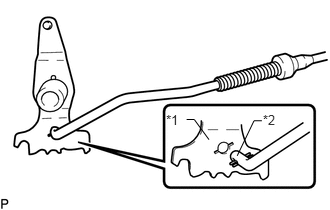
Remove the parking lock rod sub-assembly from the manual valve lever sub-assembly.
| *1 | Manual Valve Lever Sub-assembly |
| *2 | Parking Lock Rod Sub-assembly |
35556
18.REMOVE PARKING LOCK PAWL SHAFT
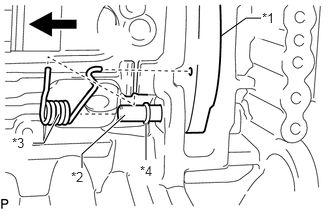
Remove the parking lock pawl shaft, parking lock pawl and spring.
| *1 | Parking Lock Pawl |
| *2 | Parking Lock Pawl Shaft |
| *3 | Spring |
| *4 | E-ring |
Remove the E-ring from the parking lock pawl shaft.
35506F
19.REMOVE MANUAL VALVE LEVER SHAFT OIL SEAL
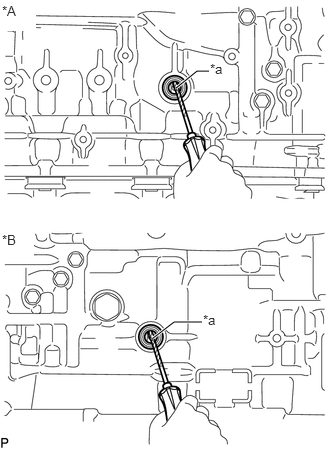
Using a screwdriver, pry out the 2 manual valve lever shaft oil seals.
| *A | for RH Side |
| *B | for LH Side |
| *a | Protective Tape |
- NOTICE:
-
Be careful not to damage the automatic transmission case sub-assembly.
- HINT:
-
Tape the screwdriver tip before use.
35409D
20.REMOVE MANUAL DETENT SPRING SUB-ASSEMBLY
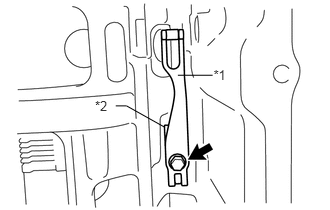
Remove the bolt, manual detent spring sub-assembly and manual detent spring cover.
| *1 | Manual Detent Spring Sub-assembly |
| *2 | Manual Detent Spring Cover |
21.REMOVE OIL PUMP ASSEMBLY
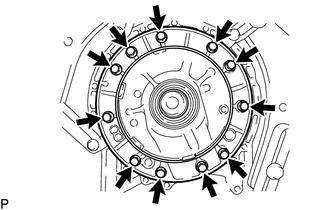
Remove the 11 bolts from the oil pump assembly.
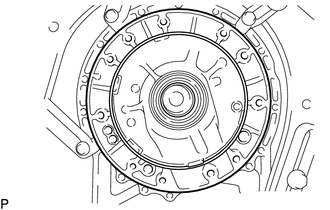
Pull out the oil pump assembly from the automatic transmission case sub-assembly.
- NOTICE:
-
Do not damage the oil pump assembly.
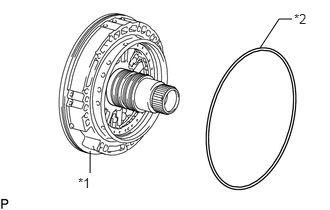
Remove the oil pump O-ring from the oil pump assembly.
| *1 | Oil Pump Assembly |
| *2 | Oil Pump O-ring |
34629
22.REMOVE OVERDRIVE BRAKE PLATE STOPPER SPRING
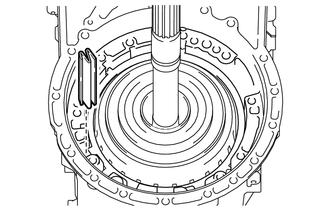
Remove the overdrive brake plate stopper spring from the automatic transmission case sub-assembly.
23.REMOVE OVERDRIVE AND REVERSE MULTIPLE DISC CLUTCH ASSEMBLY AND FRONT PLANETARY GEAR ASSEMBLY WITH NO. 1 BRAKE DISC SET
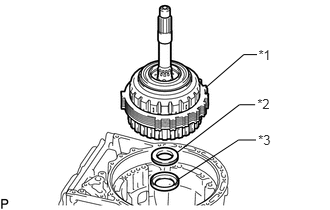
Remove the overdrive and reverse multiple disc clutch assembly and front planetary gear assembly with No. 1 brake disc set from the automatic transmission case sub-assembly.
| *1 | Overdrive and Reverse Multiple Disc Clutch Assembly and Front Planetary Gear Assembly with No. 1 Brake Disc Set |
| *2 | Thrust Needle Roller Bearing |
| *3 | Thrust Bearing Race |
Remove the thrust needle roller bearing and thrust bearing race from the automatic transmission case sub-assembly.
Remove the snap ring from the automatic transmission case sub-assembly.
35681A
24.REMOVE NO. 1 BRAKE DISC SET
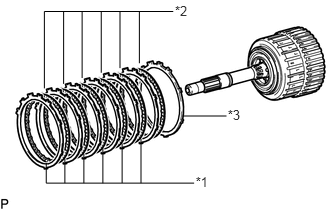
Remove the 6 No. 1 brake plates, 6 No. 1 brake discs and No. 1 brake flange.
| *1 | No. 1 Brake Plate |
| *2 | No. 1 Brake Disc |
| *3 | No. 1 Brake Flange |
35681A
25.INSPECT NO. 1 BRAKE DISC
35720
26.REMOVE FRONT PLANETARY GEAR ASSEMBLY
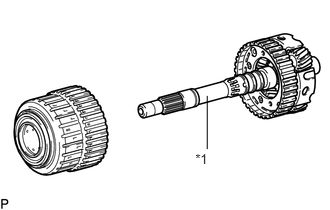
Remove the front planetary gear assembly together with the planetary sun gear from the overdrive and reverse multiple disc clutch assembly.
| *1 | Front Planetary Gear Assembly |
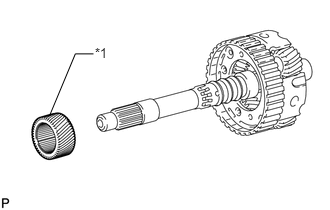
Remove the front planetary sun gear from the front planetary gear assembly.
| *1 | Front Planetary Sun Gear |
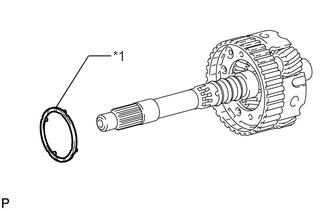
Remove the planetary carrier thrust washer from the front planetary gear assembly.
| *1 | Planetary Carrier Thrust Washer |
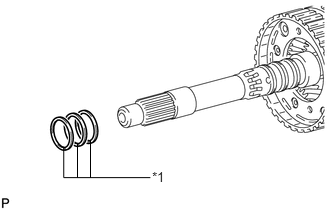
Remove the 3 oil seal rings from the front planetary gear assembly.
| *1 | Oil Seal Ring |
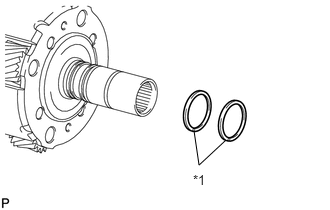
Remove the 2 oil seal rings from the front planetary gear assembly.
| *1 | Oil Seal Ring |
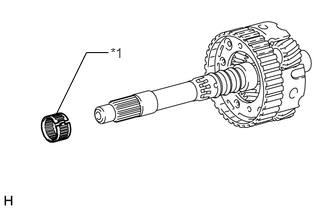
Remove the front planetary gear radial needle roller bearing from the front planetary gear assembly.
| *1 | Front Planetary Gear Radial Needle Roller Bearing |
35720
27.INSPECT FRONT PLANETARY GEAR ASSEMBLY
35677G
28.REMOVE NO. 3 CLUTCH DISC SET
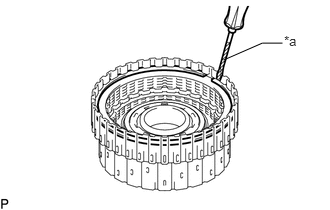
Using a screwdriver, remove the snap ring from the reverse clutch drum sub-assembly.
| *a | Protective Tape |
- NOTICE:
-
Be careful not to damage the reverse clutch drum sub-assembly.
- HINT:
-
Tape the screwdriver tip before use.
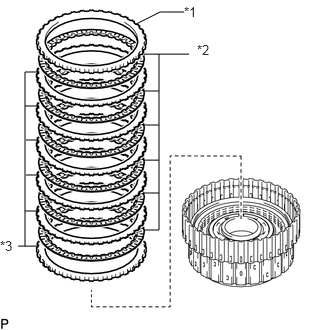
Remove the No. 3 clutch flange, 6 No. 3 clutch discs and 6 No. 3 clutch plates from the reverse clutch drum sub-assembly.
| *1 | No. 3 Clutch Flange |
| *2 | No. 3 Clutch Discs |
| *3 | No. 3 Clutch Plate |
35677G
29.INSPECT NO. 3 CLUTCH DISC
35633D
30.REMOVE OVERDRIVE DIRECT CLUTCH DISC
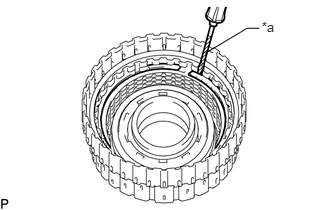
Using a screwdriver, remove the snap ring from the overdrive direct clutch drum sub-assembly.
| *a | Protective Tape |
- NOTICE:
-
Be careful not to damage the overdrive direct clutch drum sub-assembly.
- HINT:
-
Tape the screwdriver tip before use.
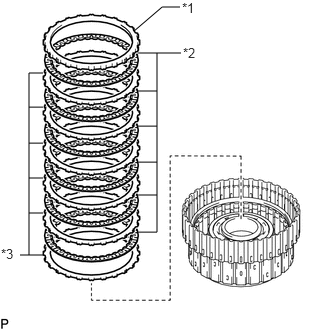
Remove the overdrive clutch flange, 6 overdrive direct clutch discs and 6 overdrive direct clutch plates from the overdrive direct clutch drum sub-assembly.
| *1 | Overdrive Clutch Flange |
| *2 | Overdrive Direct Clutch Disc |
| *3 | Overdrive Direct Clutch Plate |
35633D
31.INSPECT OVERDRIVE DIRECT CLUTCH DISC
34638
32.REMOVE NO. 4 CLUTCH PISTON
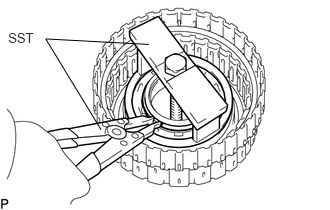
Place SST on the reverse clutch balancer, and compress the reverse clutch return spring sub-assembly (rear) with a press.
- SST
- 09380-50010 (09381-05020)
Using SST, remove the snap ring.
- SST
- 09350-30020 (09350-07070)
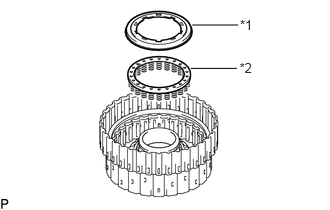
Remove the reverse clutch balancer and reverse clutch return spring sub-assembly (rear) from the overdrive direct clutch drum sub-assembly.
| *1 | Reverse Clutch Balancer |
| *2 | Reverse Clutch Return Spring Sub-assembly (Rear) |
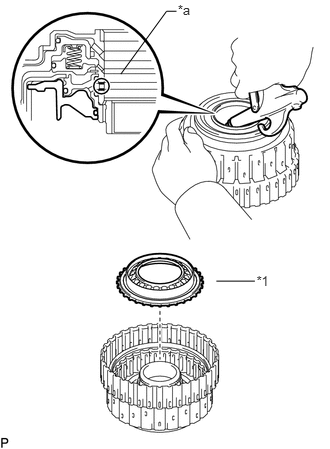
While holding the overdrive direct clutch drum sub-assembly, apply compressed air to the oil hole to remove the No. 4 clutch piston.
| *1 | No. 4 Clutch Piston |
| *a | Oil Hole |
Remove the O-ring from the No. 4 clutch piston.
35047
33.INSPECT REVERSE CLUTCH RETURN SPRING SUB-ASSEMBLY (REAR)
34601
34.REMOVE OVERDRIVE DIRECT CLUTCH DRUM SUB-ASSEMBLY
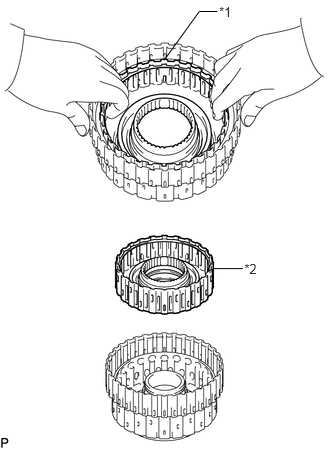
Remove the overdrive direct clutch drum sub-assembly from the reverse clutch drum sub-assembly.
| *1 | Snap Ring |
| *2 | Overdrive Direct Clutch Drum Sub-assembly |
- HINT:
-
If the overdrive direct clutch drum sub-assembly is difficult to remove, reinstall the snap ring for the overdrive direct clutch discs.
Remove the 3 O-rings from the overdrive direct clutch drum sub-assembly.
35048
35.REMOVE REVERSE CLUTCH PISTON SUB-ASSEMBLY
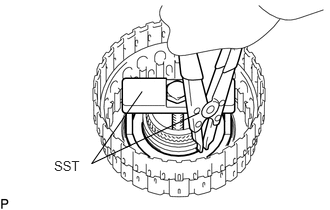
Place SST on the No. 3 clutch balancer, and compress the reverse clutch return spring sub-assembly (front) with a press.
- SST
- 09380-50010 (09381-05020)
Using SST, remove the snap ring.
- SST
- 09350-30020 (09350-07070)
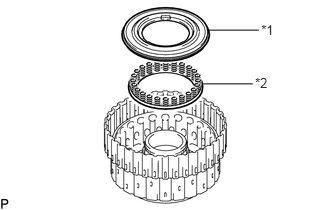
Remove the No. 3 clutch balancer and reverse clutch return spring sub-assembly (front).
| *1 | No. 3 Clutch Balancer |
| *2 | Reverse Clutch Return Spring Sub-assembly (Front) |
Remove the O-ring from the No. 3 clutch balancer.
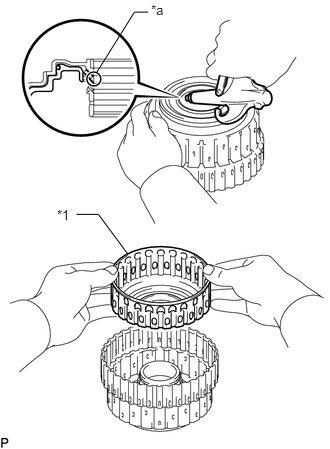
Hold the reverse clutch drum sub-assembly and apply compressed air to the oil hole of the reverse clutch drum sub-assembly to remove the reverse clutch piston sub-assembly.
| *1 | Reverse Clutch Piston Sub-assembly |
| *a | Oil Hole |
Remove the O-ring from the reverse clutch piston sub-assembly.
Remove the O-ring from the reverse clutch drum sub-assembly.
35047
36.INSPECT REVERSE CLUTCH RETURN SPRING SUB-ASSEMBLY (FRONT)
35601F
37.INSPECT REVERSE CLUTCH DRUM SUB-ASSEMBLY
38.REMOVE FORWARD MULTIPLE DISC CLUTCH ASSEMBLY WITH FRONT PLANETARY RING GEAR
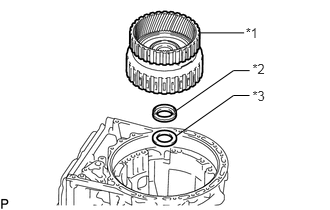
Remove the forward multiple disc clutch assembly with front planetary ring gear, thrust needle roller bearing and thrust bearing race from the automatic transmission case sub-assembly.
| *1 | Forward Multiple Disc Clutch Assembly with Front Planetary Ring Gear |
| *2 | Thrust Needle Roller Bearing |
| *3 | Thrust Bearing Race |
35743
39.REMOVE FRONT PLANETARY RING GEAR
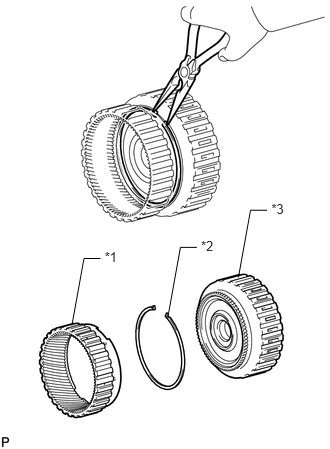
Using needle-nose pliers, detach the snap ring and remove the front planetary ring gear and snap ring from the forward multiple disc clutch assembly.
| *1 | Front Planetary Ring Gear |
| *2 | Snap Ring |
| *3 | Forward Multiple Disc Clutch Assembly |
35633B
40.REMOVE FORWARD MULTIPLE CLUTCH DISC SET
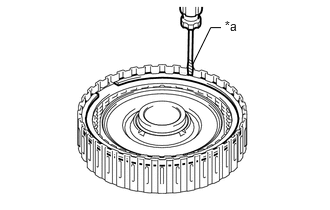
Using a screwdriver, remove the snap ring.
| *a | Protective Tape |
- NOTICE:
-
Be careful not to damage the forward multiple clutch disc assembly.
- HINT:
-
Tape the screwdriver tip before use.
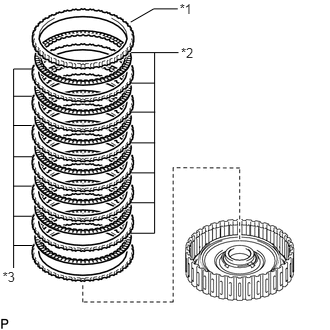
Remove the forward clutch flange, 7 forward multiple clutch discs and 7 forward multiple clutch plates.
| *1 | Forward Clutch Flange |
| *2 | Forward Multiple Clutch Disc |
| *3 | Forward Multiple Clutch Plate |
35633B
41.INSPECT FORWARD MULTIPLE CLUTCH DISC
35612B
42.REMOVE FORWARD CLUTCH PISTON
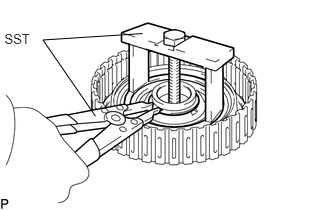
Place SST on the No. 1 clutch balancer, and compress the forward clutch return spring sub-assembly with a press.
- SST
- 09380-50010 (09381-05020)
Using SST, remove the snap ring.
- SST
- 09350-30020 (09350-07070)
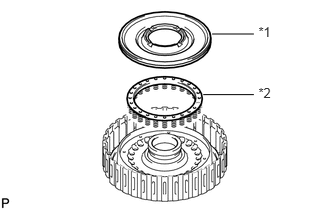
Remove the No. 1 clutch balancer and forward clutch return spring sub-assembly from the forward clutch drum sub-assembly.
| *1 | No. 1 Clutch Balancer |
| *2 | Forward Clutch Return Spring Sub-assembly |
Remove the O-ring from the No. 1 clutch balancer.
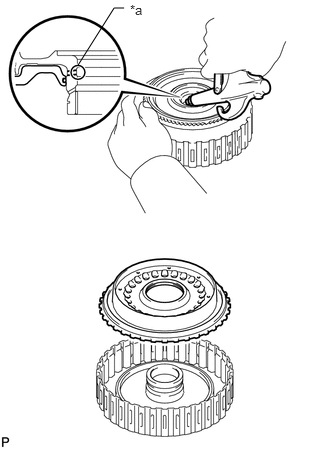
Hold the forward clutch drum sub-assembly and apply compressed air to the oil hole of the forward clutch drum sub-assembly to remove the forward clutch piston.
| *a | Oil Hole |
Remove the 2 O-rings from the forward clutch piston.
35603A
43.INSPECT FORWARD CLUTCH RETURN SPRING SUB-ASSEMBLY
35601E
44.INSPECT FORWARD CLUTCH DRUM SUB-ASSEMBLY
35631
45.REMOVE FORWARD MULTIPLE DISC CLUTCH HUB
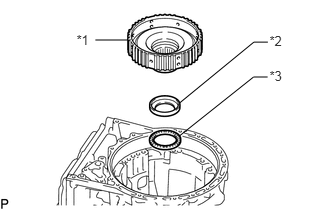
Remove the forward multiple disc clutch hub from the automatic transmission case sub-assembly.
| *1 | Forward Multiple Disc Clutch Hub |
| *2 | Thrust Bearing Race |
| *3 | Thrust Needle Roller Bearing |
Remove the thrust bearing race and thrust needle roller bearing from the automatic transmission case sub-assembly.
35709J
46.REMOVE SUN GEAR INPUT DRUM SUB-ASSEMBLY
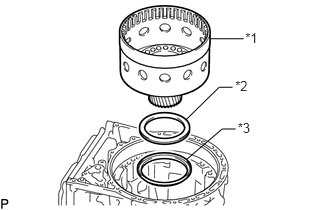
Remove the sun gear input drum sub-assembly, thrust needle roller bearing and thrust bearing race from the automatic transmission case sub-assembly.
| *1 | Sun Gear Input Drum Sub-assembly |
| *2 | Thrust Needle Roller Bearing |
| *3 | Thrust Bearing Race |
35709J
47.INSPECT SUN GEAR INPUT DRUM SUB-ASSEMBLY
35707D
48.REMOVE REAR PLANETARY SUN GEAR SUB-ASSEMBLY
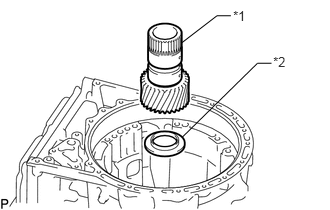
Remove the rear planetary sun gear sub-assembly and thrust bearing race from the automatic transmission case sub-assembly.
| *1 | Rear Planetary Sun Gear Sub-assembly |
| *2 | Thrust Bearing Race |
35707D
49.INSPECT REAR PLANETARY SUN GEAR SUB-ASSEMBLY
35795
50.REMOVE ONE-WAY CLUTCH OUTER RACE WITH NO. 1 ONE-WAY CLUTCH
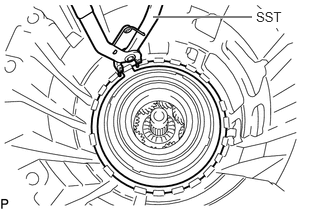
Using SST, remove the snap ring from the automatic transmission case sub-assembly.
- SST
- 09350-30020 (09350-07060)
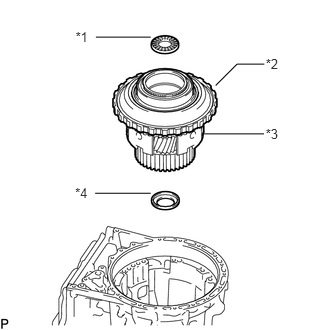
Remove the thrust needle roller bearing, rear planetary gear assembly, one-way clutch outer race with No. 1 one-way clutch and thrust bearing race from the automatic transmission case sub-assembly.
| *1 | Thrust Needle Roller Bearing |
| *2 | One-way Clutch Outer Race with No. 1 One-way Clutch |
| *3 | Rear Planetary Gear Assembly |
| *4 | Thrust Bearing Race |
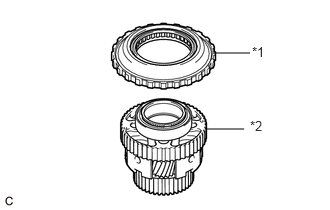
Remove the one-way clutch outer race with No. 1 one-way clutch from the rear planetary gear assembly.
| *1 | One-way Clutch Outer Race with No. 1 One-way Clutch |
| *2 | Rear Planetary Gear Assembly |
35791A
51.INSPECT NO. 1 ONE-WAY CLUTCH
35791A
52.REMOVE NO. 1 ONE-WAY CLUTCH
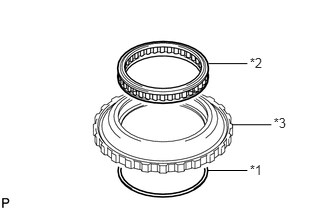
Remove the snap ring and No. 1 one-way clutch from the one-way clutch outer race.
| *1 | Snap Ring |
| *2 | No. 1 One-way Clutch |
| *3 | One-way Clutch Outer Race |
35760
53.INSPECT REAR PLANETARY GEAR ASSEMBLY
35682A
54.REMOVE NO. 2 BRAKE DISC SET
Remove the snap ring from the automatic transmission case sub-assembly.
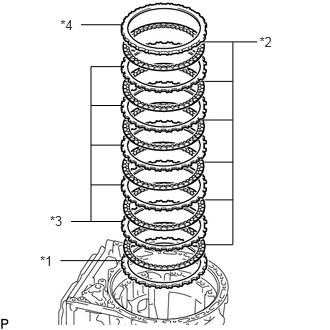
Remove the brake plate, 6 No. 2 brake discs, 5 No. 2 brake plates and No. 2 brake flange from the automatic transmission case sub-assembly.
| *1 | Brake Plate |
| *2 | No. 2 Brake Disc |
| *3 | No. 2 Brake Plate |
| *4 | No. 2 Brake Flange |
35682A
55.INSPECT NO. 2 BRAKE DISC
56.REMOVE DIRECT MULTIPLE DISC CLUTCH ASSEMBLY WITH REAR PLANETARY RING GEAR AND OUTPUT SHAFT SUB-ASSEMBLY
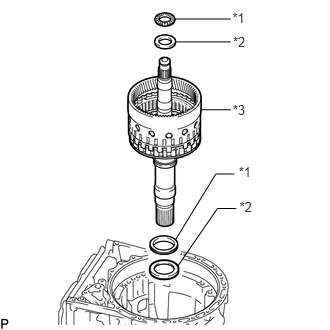
Remove the 2 thrust needle roller bearings, 2 thrust bearing races and direct multiple disc clutch assembly with rear planetary ring gear and output shaft sub-assembly from the automatic transmission case sub-assembly.
| *1 | Thrust Needle Roller Bearing |
| *2 | Thrust Bearing Race |
| *3 | Direct Multiple Disc Clutch Assembly with Rear Planetary Ring Gear and Output Shaft Sub-assembly |
35761
57.REMOVE REAR PLANETARY RING GEAR
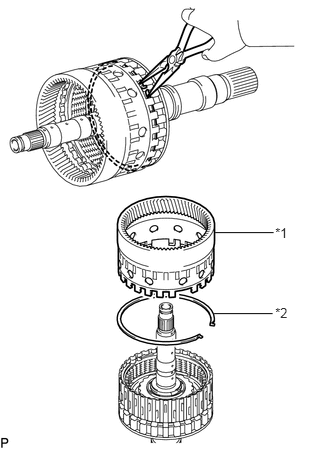
Using needle-nose pliers, detach the snap ring and remove the rear planetary ring gear from the output shaft sub-assembly.
| *1 | Rear Planetary Ring Gear |
| *2 | Snap Ring |
35605A
58.REMOVE DIRECT MULTIPLE DISC CLUTCH ASSEMBLY
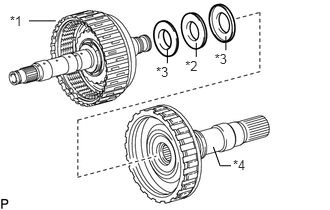
Remove the direct multiple disc clutch assembly from the output shaft sub-assembly.
| *1 | Direct Multiple Disc Clutch Assembly |
| *2 | Thrust Needle Roller Bearing |
| *3 | Thrust Bearing Race |
| *4 | Output Shaft Sub-assembly |
Remove the thrust needle roller bearing and 2 thrust bearing races from the output shaft sub-assembly.
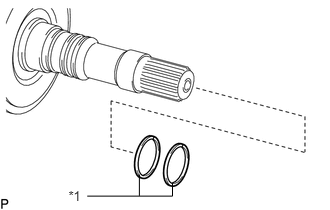
Remove the 2 oil seal ring from the output shaft sub-assembly.
| *1 | Oil Seal Ring |
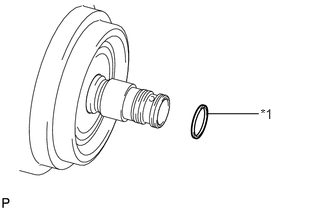
Remove the oil seal ring from the direct multiple disc clutch assembly.
| *1 | Oil Seal Ring |
35667B
59.REMOVE NO. 2 CLUTCH DISC SET
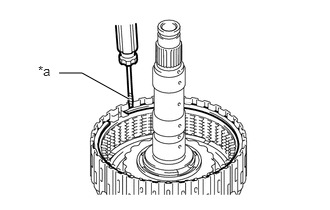
Using a screwdriver, remove the snap ring from the direct clutch drum sub-assembly.
| *a | Protective Tape |
- NOTICE:
-
Be careful not to damage the direct clutch drum sub-assembly.
- HINT:
-
Tape the screwdriver tip before use.
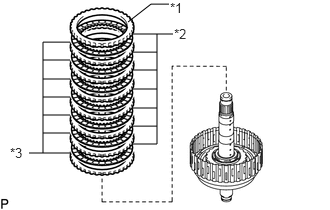
Remove the No. 2 clutch flange, 7 No. 2 clutch discs and 7 No. 2 clutch plates from the direct clutch drum sub-assembly.
| *1 | No. 2 Clutch Flange |
| *2 | No. 2 Clutch Disc |
| *3 | No. 2 Clutch Plate |
35667B
60.INSPECT NO. 2 CLUTCH DISC
35652C
61.REMOVE DIRECT CLUTCH PISTON
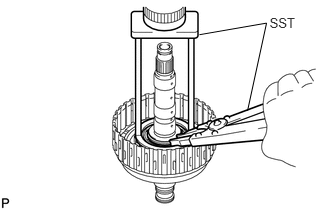
Place SST on the No. 2 clutch balancer, and compress the direct clutch return spring sub-assembly with a press.
- SST
- 09387-00020
Using SST, remove the snap ring.
- SST
- 09350-30020 (09350-07070)
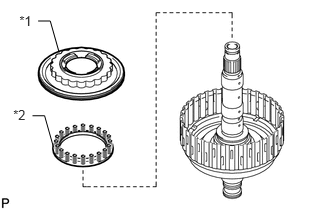
Remove the No. 2 clutch balancer and direct clutch return spring sub-assembly from the direct clutch drum sub-assembly.
| *1 | No. 2 Clutch Balancer |
| *2 | Direct Clutch Return Spring Sub-assembly |
Remove the O-ring from the No. 2 clutch balancer.
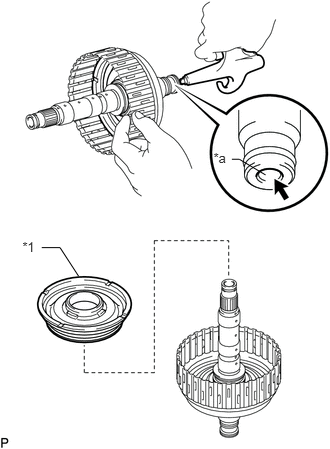
Hold the direct clutch drum sub-assembly and apply compressed air to the oil hole of the direct clutch drum sub-assembly to remove the direct clutch piston.
| *1 | Direct Clutch Piston |
| *a | Oil Hole |
Remove the O-ring from the direct clutch piston.
Remove the O-ring from the direct clutch drum sub-assembly.
35604
62.INSPECT DIRECT CLUTCH RETURN SPRING SUB-ASSEMBLY
35622G
63.REMOVE NO. 2 BRAKE PISTON
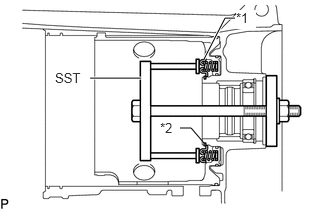
Set SST on the No. 2 brake piston return spring sub-assembly, tighten SST and compress the No. 2 brake piston return spring sub-assembly.
- SST
- 09380-50010 (09381-05010, 09381-05020, 09381-05030, 09381-05040, 09381-05050)
| *1 | No. 2 Brake Piston Return Spring Sub-assembly |
| *2 | Snap Ring |
Using SST, remove the snap ring and the No. 2 brake piston return spring sub-assembly.
- SST
- 09350-30020 (09350-07070)
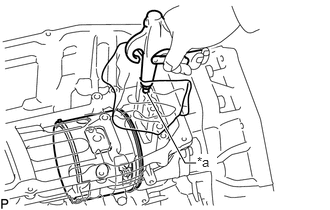
Apply compressed air to the oil hole of the automatic transmission case sub-assembly to remove the No. 2 brake piston from the automatic transmission case sub-assembly.
| *a | Oil Hole |
Remove the 3 O-rings from the No. 2 brake piston.
35608
64.INSPECT NO. 2 BRAKE PISTON RETURN SPRING SUB-ASSEMBLY
35629
65.REMOVE 1ST AND REVERSE BRAKE PLATE STOPPER SPRING
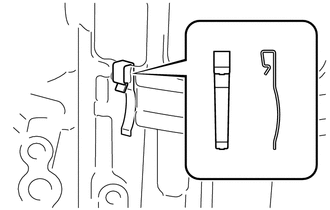
Remove the 1st and reverse brake plate stopper spring from the automatic transmission case sub-assembly.
35073D
66.REMOVE OUTPUT SHAFT REAR RADIAL BALL BEARING
Using snap ring pliers, remove the snap ring from the automatic transmission case sub-assembly.
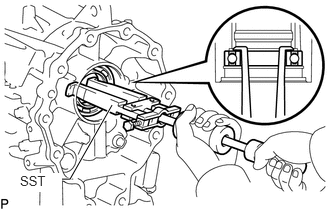
Using SST, remove the output shaft rear radial ball bearing.
- SST
- 09308-00010