SUSPENSION CONTROL HEIGHT CONTROL SENSOR(for Front Side) INSTALLATION
CAUTION / NOTICE / HINT
- HINT:
- ·
Use the same procedures for the RH side and LH side.
·The procedures listed below are for the LH side.
·A bolt without a torque specification is shown in the standard bolt chart (See page General>SPECIFICATIONS>STANDARD BOLT>SPECIFIED TORQUE FOR STANDARD BOLTS).
PROCEDURE

 89406
1.INSTALL FRONT HEIGHT CONTROL SENSOR SUB-ASSEMBLY LH
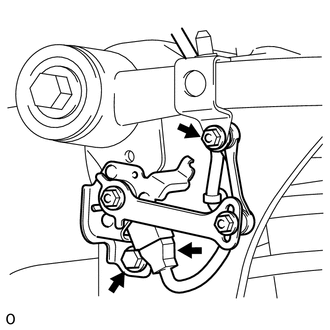
Install the sensor with the bolt and nut.
- Torque:
- for bolt : 13 N*m (127 kgf*cm, 9 ft.*lbf)
- for nut : 5.6 N*m (57 kgf*cm, 50 in.*lbf)
Connect the connector.
2.INSTALL FRONT WHEEL
- Torque:
- for Aluminum Wheel : 131 N*m (1336 kgf*cm, 97 ft.*lbf)
- for Steel Wheel : 209 N*m (2131 kgf*cm, 154 ft.*lbf)
3.CONNECT CABLE TO NEGATIVE BATTERY TERMINAL
- NOTICE:
-
When disconnecting the cable, some systems need to be initialized after the cable is reconnected (See page General>INTRODUCTION>REPAIR INSTRUCTION>INITIALIZATION).
4.PERFORM VEHICLE HEIGHT OFFSET CALIBRATION
Perform the vehicle height offset calibration (See page Suspension>SUSPENSION CONTROL>ACTIVE HEIGHT CONTROL SUSPENSION>INITIALIZATION).
5.ADJUST FRONT HEIGHT CONTROL SENSOR LINK SUB-ASSEMBLY
53783
6.INSTALL FRONT FENDER APRON TRIM PACKING B
7.PERFORM ZERO POINT CALIBRATION OF G SENSOR
Perform the zero point calibration of G sensor (See page Brake>BRAKE CONTROL / DYNAMIC CONTROL SYSTEMS>VEHICLE STABILITY CONTROL SYSTEM>CALIBRATION).
8.ADJUST HEADLIGHT ASSEMBLY
for Standard:
Adjust the headlight (See page Vehicle Exterior>LIGHTING (EXT)>HEADLIGHT ASSEMBLY (for Halogen Headlight)>ADJUSTMENT).
for HID Headlight:
Adjust the headlight (See page Vehicle Exterior>LIGHTING (EXT)>HEADLIGHT ASSEMBLY(for HID Headlight)>ADJUSTMENT).