Home › Power Source / Network › NETWORKING › LIN COMMUNICATION SYSTEM › 2014.08–2015.08
RM2660E _57 Power Source / Network _052837 NETWORKING _0255535 LIN COMMUNICATION SYSTEM J

NETWORKING  LIN COMMUNICATION SYSTEM  Rear Heater Control Panel LIN Communication Malfunction  


DESCRIPTION

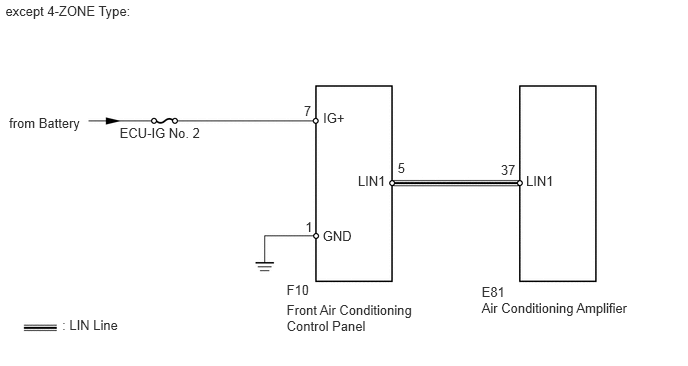
The LIN communication of the components related to the rear air conditioning occurs between the air conditioning amplifier (A/C ECU), rear air conditioning control panel and front air conditioning control panel.

WIRING DIAGRAM
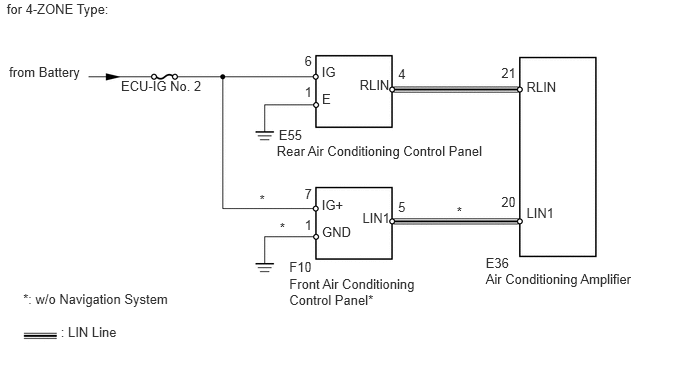
E237270E01
5.484,0.818 5.866,1.007 0.383,0.188 10 RLIN 3.746,0.804 4.259,0.993 0.512,0.188 10 RLIN 3.351,0.667 3.634,0.855 0.283,0.188 10 IG 3.354,0.951 3.556,1.139 0.202,0.188 10 E 5.059,2.66 5.441,2.848 0.383,0.188 10 E36 5.059,2.819 6.701,3.007 1.642,0.188 10 Air Conditioning Amplifier 2.904,1.327 4.084,1.516 1.180,0.188 10 E55 1.26,0.81 2.245,0.999 0.985,0.188 10 ECU-IG No. 2 0.094,0.664 0.949,0.853 0.855,0.188 10 from Battery 0.633,3.373 1.290,3.561 0.657,0.188 10 : LIN Line 2.882,1.486 5.284,1.675 2.401,0.188 10 Rear Air Conditioning Control Panel 5.222,0.678 5.409,0.867 0.187,0.188 10 21 5.484,2.135 5.866,2.324 0.383,0.188 10 LIN1 3.775,2.189 4.158,2.378 0.383,0.188 10 LIN1 5.222,2.021 5.409,2.209 0.187,0.188 10 20 4.147,0.686 4.287,0.874 0.141,0.188 10 4 3.172,0.557 3.299,0.745 0.127,0.188 10 6 3.173,0.877 3.316,1.066 0.143,0.188 10 1 3.351,2.051 3.668,2.240 0.317,0.188 10 IG+ 3.354,2.336 3.681,2.524 0.327,0.188 10 GND 3.013,2.698 4.193,2.887 1.180,0.188 10 F10 3.013,2.88 4.549,3.218 1.535,0.338 10 Front Air Conditioning Control Panel* 4.147,2.07 4.287,2.259 0.141,0.188 10 5 3.172,1.942 3.299,2.130 0.127,0.188 10 7 3.173,2.262 3.316,2.450 0.143,0.188 10 1 2.914,2.29 3.084,2.440 0.170,0.149 10 * 2.703,2.003 2.874,2.152 0.170,0.149 10 * 4.757,2.129 4.927,2.278 0.170,0.149 10 * 0.241,3.028 1.883,3.177 1.643,0.149 10 *: w/o Navigation System 0.07,0.01 1.205,0.180 1.135,0.170 10 for 4-ZONE Type:

E237271E01
5.017,2.956 5.288,3.123 0.272,0.167 10 E81 5.017,3.129 6.659,3.317 1.642,0.188 10 Air Conditioning Amplifier 1.246,1.302 2.231,1.491 0.985,0.188 10 ECU-IG No. 2 0.094,1.198 0.949,1.387 0.855,0.188 10 from Battery 0.647,3.3 1.304,3.488 0.657,0.188 10 : LIN Line 5.479,1.801 5.827,1.961 0.348,0.161 10 LIN1 3.728,1.803 4.062,1.992 0.334,0.188 10 LIN1 5.217,1.686 5.405,1.833 0.187,0.147 10 37 3.365,1.149 3.682,1.338 0.317,0.188 10 IG+ 3.361,2.373 3.688,2.561 0.327,0.188 10 GND 2.985,2.938 3.262,3.126 0.277,0.188 10 F10 2.985,3.147 4.396,3.486 1.410,0.338 10 Front Air Conditioning Control Panel 4.142,1.67 4.262,1.838 0.120,0.167 10 5 3.165,1.068 3.292,1.235 0.127,0.167 10 7 3.18,2.278 3.323,2.466 0.143,0.188 10 1 0.056,0.033 1.460,0.217 1.404,0.184 10 except 4-ZONE Type:

CAUTION / NOTICE / HINT

NOTICE:

When using the intelligent tester with the ignition switch off to troubleshoot:

Connect the intelligent tester to the vehicle, and turn a courtesy switch on and off at 1.5 second intervals until communication between the intelligent tester and vehicle begins.


PROCEDURE

1.CHECK AIR CONDITIONING TYPE
a.

Check air conditioning type.


Result
Result Proceed to
for 4-ZONE Type A
except 4-ZONE Type B


A

2.CHECK HARNESS AND CONNECTOR (A/C ECU - REAR AIR CONDITIONING CONTROL PANEL AND FRONT AIR CONDITIONING CONTROL PANEL*)

B

7.CHECK HARNESS AND CONNECTOR (A/C ECU - FRONT AIR CONDITIONING CONTROL PANEL)
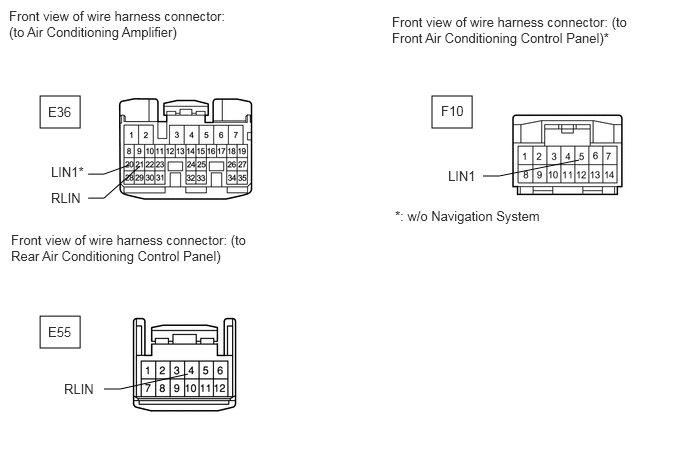
2.CHECK HARNESS AND CONNECTOR (A/C ECU - REAR AIR CONDITIONING CONTROL PANEL AND FRONT AIR CONDITIONING CONTROL PANEL*)
E349679E01
0.417,3.292 0.833,3.625 0.417,0.333 0.417,1 0.833,1.333 0.417,0.333 4.5,1 4.917,1.333 0.417,0.333 1.083,4.052 1.25,4.052 1.25,4.052 1.958,3.896 false 5.031,1.833 5.198,1.833 5.198,1.833 6.031,1.667 false 0.917,2.063 1.083,2.063 1.083,2.063 1.458,1.729 false 0.917,1.813 1.083,1.813 1.083,1.813 1.344,1.719 false 0.5,1.083 0.833,1.333 0.333,0.25 10 false E36 4.594,1.073 4.917,1.333 0.323,0.26 10 false F10 0.5,3.375 0.833,3.625 0.333,0.25 10 false E55 0.094,0.083 2.417,0.646 2.323,0.563 10 false Front view of wire harness connector: (to Air Conditioning Amplifier) 0.115,2.417 2.667,3.146 2.552,0.729 10 false Front view of wire harness connector: (to Rear Air Conditioning Control Panel) 4.083,0.146 6.646,0.833 2.563,0.688 10 false Front view of wire harness connector: (to Front Air Conditioning Control Panel)* 4.115,2.167 5.99,2.646 1.875,0.479 10 false *: w/o Navigation System 0.531,1.708 0.99,1.906 0.458,0.198 10 false LIN1* 0.531,1.979 0.99,2.177 0.458,0.198 10 false RLIN 0.667,3.969 1.125,4.167 0.458,0.198 10 false RLIN 4.667,1.75 5.125,1.948 0.458,0.198 10 false LIN1

HINT:

*: w/o Navigation System


a.

Disconnect the E36 amplifier connector.


b.

Disconnect the F10* and E55 panel connector.


c.

Measure the resistance and voltage according to the value(s) in the tables below.

Standard Resistance:
Tester Connection Condition Specified Condition
E36-21 (RLIN) - E55-4 (RLIN) Always Below 1 Ω
E36-20 (LIN1) - F10-5 (LIN1)* Always Below 1 Ω
E36-21 (RLIN) - Body ground Always 10 kΩ or higher
E36-20 (LIN1) - Body ground* Always 10 kΩ or higher


Standard Voltage:
Tester Connection Condition Specified Condition
E36-21 (RLIN) - Body ground Always Below 1 V
E36-20 (LIN1) - Body ground* Always Below 1 V


OK

3.CHECK AIR CONDITIONING CONTROL PANEL (BATTERY VOLTAGE AND BODY GROUND)

NG

REPAIR OR REPLACE HARNESS OR CONNECTOR

3.CHECK AIR CONDITIONING CONTROL PANEL (BATTERY VOLTAGE AND BODY GROUND)
a.
U165874E01
0.711,1.963 0.851,1.963 0.851,1.963 1.188,1.611 false 2.183,1.56 2.579,1.56 false 0.088,0.023 2.579,0.411 2.491,0.388 10 Front view of wire harness connector: (to Rear Air Conditioning Control Panel) 0.31,1.042 0.637,1.224 0.326,0.182 10 E55 0.5,1.867 0.695,2.049 0.194,0.182 10 E 2.603,1.491 2.954,1.673 0.352,0.182 10 IG

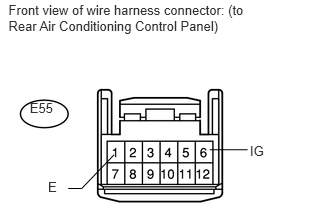
Disconnect the E55 panel connector.


b.

Measure the resistance and voltage according to the value(s) in the tables below.

Standard Resistance:
Tester Connection Condition Specified Condition
E55-1 (E) - Body ground Always Below 1 Ω


Standard Voltage:
Tester Connection Switch Condition Specified Condition
E55-6 (IG) - Body ground Ignition switch ON 11 to 14 V


OK

4.CHECK REAR AIR CONDITIONING CONTROL PANEL

NG

REPAIR OR REPLACE HARNESS OR CONNECTOR

4.CHECK REAR AIR CONDITIONING CONTROL PANEL
a.

Temporarily replace the rear air conditioning control panel with a new or normally functioning one (See page Vehicle Interior>HEATING / AIR CONDITIONING>REAR AIR CONDITIONING PANEL>REMOVAL).


b.

Check that the rear air conditioning function is normal.

OK:

Rear air conditioning function is normal.


Result
Result Proceed to
OK A
NG (w/ Navigation System) B
NG (w/o Navigation System) (for LHD) C
NG (w/o Navigation System) (for RHD) D


A

END (REAR AIR CONDITIONING CONTROL PANEL IS DEFECTIVE)

B

5.CHECK FRONT AIR CONDITIONING CONTROL PANEL

C

D

5.CHECK FRONT AIR CONDITIONING CONTROL PANEL
a.
U165885E02
1.073,1.448 0.865,1.625 0.865,1.625 0.729,1.625 false 2.229,1.458 2.438,1.635 2.438,1.635 2.573,1.635 false 0.052,0.042 2.479,0.76 2.427,0.719 10 false Front view of wire harness connector: (to Front Air Conditioning Control Panel) 0.323,0.969 0.615,1.156 0.292,0.188 10 false F10 0.385,1.552 0.75,1.74 0.365,0.188 10 false GND 2.625,1.563 2.99,1.75 0.365,0.188 10 false IG+

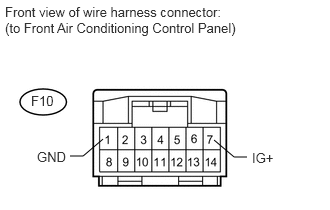
Disconnect the F10 panel connector.


b.

Measure the resistance and voltage according to the value(s) in the tables below.

Standard Resistance:
Tester Connection Condition Specified Condition
F10-1 (GND) - Body ground Always Below 1 Ω


Standard Voltage:
Tester Connection Switch Condition Specified Condition
F10-7 (IG+) - Body ground Ignition switch ON 11 to 14 V


OK

6.CHECK FRONT AIR CONDITIONING CONTROL PANEL

NG

6.CHECK FRONT AIR CONDITIONING CONTROL PANEL
a.

Temporarily replace the front air conditioning control panel with a new or normally functioning one (See page Vehicle Interior>HEATING / AIR CONDITIONING>AIR CONDITIONING PANEL(w/o Multi-display)>REMOVAL).


b.

Check the that front air conditioning function is normal.

OK:

Front air conditioning function is normal.


Result
Result Proceed to
OK A
NG (for LHD) B
NG (for RHD) C


A

END (FRONT AIR CONDITIONING CONTROL PANEL IS DEFECTIVE)

B

C

7.CHECK HARNESS AND CONNECTOR (A/C ECU - FRONT AIR CONDITIONING CONTROL PANEL)
U166250E02
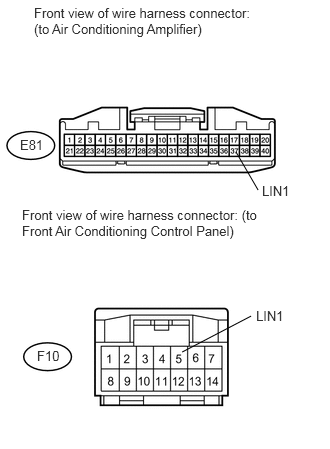
2.458,1.583 2.688,1.979 false 1.896,3.667 2.615,3.292 false 0.354,0.052 2.688,0.656 2.333,0.604 10 false Front view of wire harness connector: (to Air Conditioning Amplifier) 2.729,1.906 3.052,2.052 0.323,0.146 10 false LIN1 0.208,1.427 0.521,1.656 0.313,0.229 10 false E81 0.229,2.156 2.792,2.719 2.563,0.563 10 false Front view of wire harness connector: (to Front Air Conditioning Control Panel) 2.667,3.208 3.063,3.469 0.396,0.26 10 false LIN1 0.385,3.625 0.677,3.854 0.292,0.229 10 false F10

a.

Disconnect the E81 amplifier connector.


b.

Disconnect the F10 panel connector.


c.

Measure the resistance and voltage according to the value(s) in the tables below.

Standard Resistance:
Tester Connection Condition Specified Condition
E81-37 (LIN1) - F10-5 (LIN1) Always Below 1 Ω
E81-37 (LIN1) - Body ground Always 10 kΩ or higher


Standard Voltage:
Tester Connection Condition Specified Condition
E81-37 (LIN1) - Body ground Always Below 1 V


OK

8.CHECK FRONT AIR CONDITIONING CONTROL ASSEMBLY (BATTERY VOLTAGE AND BODY GROUND)

NG

REPAIR OR REPLACE HARNESS OR CONNECTOR

8.CHECK FRONT AIR CONDITIONING CONTROL ASSEMBLY (BATTERY VOLTAGE AND BODY GROUND)
a.
U165885E02
1.073,1.448 0.865,1.625 0.865,1.625 0.729,1.625 false 2.229,1.458 2.438,1.635 2.438,1.635 2.573,1.635 false 0.052,0.042 2.479,0.76 2.427,0.719 10 false Front view of wire harness connector: (to Front Air Conditioning Control Panel) 0.323,0.969 0.615,1.156 0.292,0.188 10 false F10 0.385,1.552 0.75,1.74 0.365,0.188 10 false GND 2.625,1.563 2.99,1.75 0.365,0.188 10 false IG+

Disconnect the F10 panel connector.


b.

Measure the resistance and voltage according to the value(s) in the tables below.

Standard Resistance:
Tester Connection Condition Specified Condition
F10-1 (GND) - Body ground Always Below 1 Ω


Standard Voltage:
Tester Connection Switch Condition Specified Condition
F10-7 (IG+) - Body ground Ignition switch ON 11 to 14 V


OK

9.CHECK FRONT AIR CONDITIONING CONTROL ASSEMBLY

NG

9.CHECK FRONT AIR CONDITIONING CONTROL ASSEMBLY
a.

Temporarily replace the front air conditioning control panel with a new or normally functioning one (See page Vehicle Interior>HEATING / AIR CONDITIONING>AIR CONDITIONING PANEL(w/o Multi-display)>REMOVAL).

Check the that front air conditioning function is normal.

OK:

Front air conditioning function is normal.


Result
Result Proceed to
OK A
NG (for LHD) B
NG (for RHD) C


A

END (FRONT AIR CONDITIONING CONTROL PANEL IS DEFECTIVE)

B

REPLACE AIR CONDITIONING AMPLIFIER ASSEMBLY

C

REPLACE AIR CONDITIONING AMPLIFIER ASSEMBLY