Home › Vehicle Interior › THEFT DETERRENT / KEYLESS ENTRY › ENTRY AND START SYSTEM(for Entry Function) › 2014.08–2015.08
RM2660E _58 Vehicle Interior _052839 THEFT DETERRENT / KEYLESS ENTRY _0255572 ENTRY AND START SYSTEM(for Entry Function) J

THEFT DETERRENT / KEYLESS ENTRY  ENTRY AND START SYSTEM(for Entry Function)  Rear Door LH Entry Unlock Function does not Operate  


DESCRIPTION

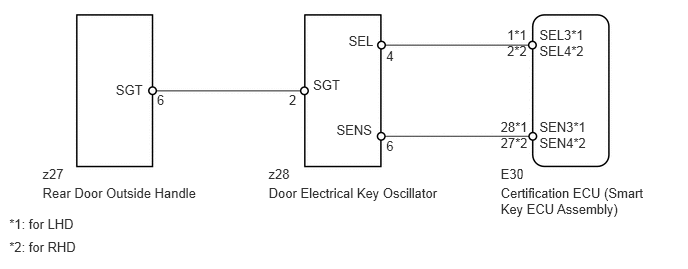
If the rear door LH entry unlock function does not operate but the entry lock function operates, the communication line between the vehicle and electrical key transmitter is normal. The part at fault may be a touch sensor circuit (certification ECU (smart key ECU assembly) → rear door outside handle LH → rear door electrical key oscillator LH).

HINT:

For vehicles with entry function for rear doors.


WIRING DIAGRAM
B186274E07
4.023,0.495 4.175,0.656 0.152,0.161 10 4 5.282,0.279 5.524,0.439 0.242,0.161 10 1*1 1.634,0.962 1.785,1.122 0.152,0.161 10 6 3.01,0.962 3.161,1.122 0.152,0.161 10 2 5.215,1.928 6.789,2.278 1.574,0.351 10 Certification ECU (Smart Key ECU Assembly) 0.443,1.928 2.137,2.264 1.694,0.337 10 Rear Door Outside Handle 2.798,1.928 4.704,2.284 1.906,0.357 10 Door Electrical Key Oscillator 5.215,1.733 5.519,1.909 0.304,0.176 10 E30 2.797,1.733 3.050,1.901 0.253,0.167 10 z28 0.443,1.733 0.693,1.925 0.250,0.192 10 z27 3.261,0.798 3.631,0.982 0.370,0.184 10 SGT 5.619,0.279 6.119,0.443 0.500,0.165 10 SEL3*1 5.619,1.236 6.137,1.384 0.518,0.148 10 SEN3*1 3.505,1.274 3.939,1.472 0.434,0.198 10 SENS 3.631,0.344 3.940,0.542 0.309,0.198 10 SEL 1.206,0.853 1.591,1.064 0.385,0.211 10 SGT 4.023,1.438 4.175,1.599 0.152,0.161 10 6 5.215,1.236 5.519,1.401 0.305,0.166 10 28*1 0.096,2.247 1.150,2.417 1.054,0.170 10 *1: for LHD 0.096,2.487 1.150,2.657 1.054,0.170 10 *2: for RHD 5.282,0.447 5.524,0.608 0.242,0.161 10 2*2 5.619,0.447 6.119,0.611 0.500,0.165 10 SEL4*2 5.619,1.404 6.137,1.552 0.518,0.148 10 SEN4*2 5.215,1.404 5.519,1.570 0.305,0.166 10 27*2

PROCEDURE

1.CHECK POWER DOOR LOCK OPERATION
a.

When the master switch assembly door control switch is operated, check that the locked doors unlock.

OK:

Door locks operate normally.


OK

2.READ VALUE USING INTELLIGENT TESTER (DOOR LOCK POSITION SWITCH)

NG

GO TO POWER DOOR LOCK CONTROL SYSTEM

2.READ VALUE USING INTELLIGENT TESTER (DOOR LOCK POSITION SWITCH)
a.

Connect the intelligent tester to the DLC3.


b.

Turn the engine switch on (IG).


c.

Turn the intelligent tester on.


d.

Enter the following menus: Body / Main Body / Data List.


e.

Read the Data List according to the display on the intelligent tester.

i.

for LHD

Main Body
Tester Display Measurement Item/Range Normal Condition Diagnostic Note
DR Door Lock Position SW Driver side rear door lock position switch signal / ON or OFF ON: Driver side rear door unlocked
OFF: Driver side rear door locked
-

OK:

On the intelligent tester screen, the display changes between ON and OFF as shown in the chart above.


ii.

for RHD

Main Body
Tester Display Measurement Item/Range Normal Condition Diagnostic Note
PR Door Lock Position SW Passenger side rear door lock position switch signal / ON or OFF ON: Passenger side rear door unlocked
OFF: Passenger side rear door locked
-

OK:

On the intelligent tester screen, the display changes between ON and OFF as shown in the chart above.


OK

3.READ VALUE USING INTELLIGENT TESTER (TOUCH SENSOR)

NG

GO TO POWER DOOR LOCK CONTROL SYSTEM (Proceed to Only Rear Door LH LOCK/UNLOCK Functions do not Operate)

3.READ VALUE USING INTELLIGENT TESTER (TOUCH SENSOR)
a.

Using the intelligent tester, read the Data List.

i.

for LHD

Entry & Start
Tester Display Measurement Item/Range Normal Condition Diagnostic Note
Dr-Door Touch Sensor Driver side rear door touch sensor / ON or OFF ON: Touch sensor touched
OFF: Touch sensor not touched
-

OK:

"ON" (sensor is touched) and "OFF" (sensor is not touched) appears on the screen.


ii.

for RHD

Entry & Start
Tester Display Measurement Item/Range Normal Condition Diagnostic Note
Pr-Door Touch Sensor Passenger side rear door touch sensor / ON or OFF ON: Touch sensor touched
OFF: Touch sensor not touched
-

OK:

"ON" (sensor is touched) and "OFF" (sensor is not touched) appears on the screen.


OK

REPLACE CERTIFICATION ECU (SMART KEY ECU ASSEMBLY)

NG

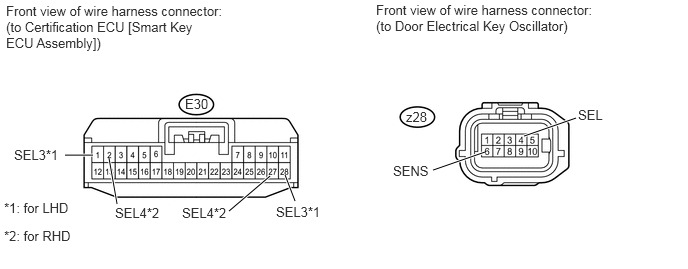
4.CHECK HARNESS AND CONNECTOR (CERTIFICATION ECU [SMART KEY ECU ASSEMBLY] - DOOR ELECTRICAL KEY OSCILLATOR)
a.

Disconnect the E30 ECU connector.

B449201E01
0.969,1.615 0.677,1.615 true 1.135,1.646 1.219,2.125 true 2.813,1.833 2.385,2.198 true 2.969,1.823 3.073,2.094 true 5.052,1.583 4.51,1.771 true 6,1.229 5.458,1.417 true 0.063,0.031 2.333,0.573 2.271,0.542 10 false Front view of wire harness connector:(to Certification ECU [Smart Key ECU Assembly]) 3.917,0.021 6.188,0.563 2.271,0.542 10 false Front view of wire harness connector: (to Door Electrical Key Oscillator) 1.927,1 2.177,1.167 0.25,0.167 10 false E30 4.229,1.135 4.479,1.302 0.25,0.167 10 false z28 0.146,1.531 0.656,1.729 0.51,0.198 10 false SEL3*1 1.198,2.135 1.708,2.333 0.51,0.198 10 false SEL4*2 1.896,2.135 2.406,2.333 0.51,0.198 10 false SEL4*2 2.875,2.125 3.385,2.323 0.51,0.198 10 false SEL3*1 4.094,1.698 4.604,1.896 0.51,0.198 10 false SENS 6.021,1.115 6.323,1.292 0.302,0.177 10 false SEL 0.042,2.083 0.781,2.271 0.74,0.188 10 false *1: for LHD 0.042,2.375 0.781,2.563 0.74,0.188 10 false *2: for RHD


b.

Disconnect the z28 oscillator connector.


c.

Measure the resistance according to the value(s) in the table below.

Standard Resistance:
for LHD:
Tester Connection Condition Specified Condition
E30-1 (SEL3) - z28-4 (SEL) Always Below 1 Ω
E30-28 (SEN3) - z28-6 (SENS) Always Below 1 Ω
E30-1 (SEL3) - Body ground Always 10 kΩ or higher
E30-28 (SEN3) - Body ground Always 10 kΩ or higher

for RHD:
Tester Connection Condition Specified Condition
E30-2 (SEL4) - z28-4 (SEL) Always Below 1 Ω
E30-27 (SEN4) - z28-6 (SENS) Always Below 1 Ω
E30-2 (SEL4) - Body ground Always 10 kΩ or higher
E30-27 (SEN4) - Body ground Always 10 kΩ or higher


OK

5.CHECK HARNESS AND CONNECTOR (DOOR ELECTRICAL KEY OSCILLATOR - REAR DOOR OUTSIDE HANDLE)

NG

REPAIR OR REPLACE HARNESS OR CONNECTOR

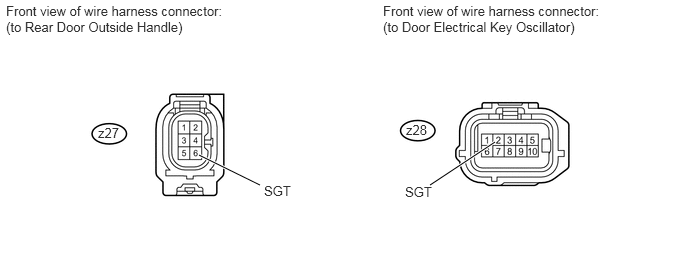
5.CHECK HARNESS AND CONNECTOR (DOOR ELECTRICAL KEY OSCILLATOR - REAR DOOR OUTSIDE HANDLE)
a.

Disconnect the z27 handle connector.

B449202E01
2.073,1.615 2.708,1.927 true 5.156,1.479 4.479,1.927 true 0.063,0.031 2.323,0.385 2.26,0.354 10 false Front view of wire harness connector: (to Rear Door Outside Handle) 3.99,0.031 6.25,0.385 2.26,0.354 10 false Front view of wire harness connector: (to Door Electrical Key Oscillator) 1.021,1.302 1.271,1.469 0.25,0.167 10 false z27 4.229,1.271 4.479,1.438 0.25,0.167 10 false z28 2.75,1.906 3,2.073 0.25,0.167 10 false SGT 4.219,1.917 4.469,2.083 0.25,0.167 10 false SGT


b.

Disconnect the z28 oscillator connector.


c.

Measure the resistance according to the value(s) in the table below.

Standard Resistance:
Tester Connection Condition Specified Condition
z27-6 (SGT) - z28-2 (SGT) Always Below 1 Ω
z27-6 (SGT) - Body ground Always 10 kΩ or higher


OK

6.REPLACE DOOR ELECTRICAL KEY OSCILLATOR

NG

REPAIR OR REPLACE HARNESS OR CONNECTOR

6.REPLACE DOOR ELECTRICAL KEY OSCILLATOR
a.

Replace the door electrical key oscillator (See page Vehicle Exterior>DOOR / HATCH>REAR DOOR>DISASSEMBLY).


NEXT

7.CHECK DOOR ELECTRICAL KEY OSCILLATOR (OPERATION)
a.

Check that the entry function operates normally.

OK:

Operates normally.


OK

END (DOOR ELECTRICAL KEY OSCILLATOR IS DEFECTIVE)

NG

8.REPLACE REAR DOOR OUTSIDE HANDLE

NEXT

9.CHECK REAR DOOR OUTSIDE HANDLE (OPERATION)
a.

Check that the entry function operates normally.

OK:

Operates normally.


OK

END (REAR DOOR OUTSIDE HANDLE IS DEFECTIVE)

NG

REPLACE CERTIFICATION ECU (SMART KEY ECU ASSEMBLY)