THEFT DETERRENT / KEYLESS ENTRY ENGINE IMMOBILISER SYSTEM(w/o Entry and Start System) Key Cannot be Registered
DESCRIPTION
A maximum of 5 master key codes and 3 sub key codes can be registered.
WIRING DIAGRAM
Refer to "System Diagram" (See page Vehicle Interior>THEFT DETERRENT / KEYLESS ENTRY>ENGINE IMMOBILISER SYSTEM(w/o Entry and Start System)>SYSTEM DIAGRAM).
CAUTION / NOTICE / HINT
- NOTICE:
-
When replacing the key and transponder key ECU assembly, refer to the Service Bulletin.
PROCEDURE
Check that the system enters registration mode.
- OK:
System enters registration mode
OK
NG
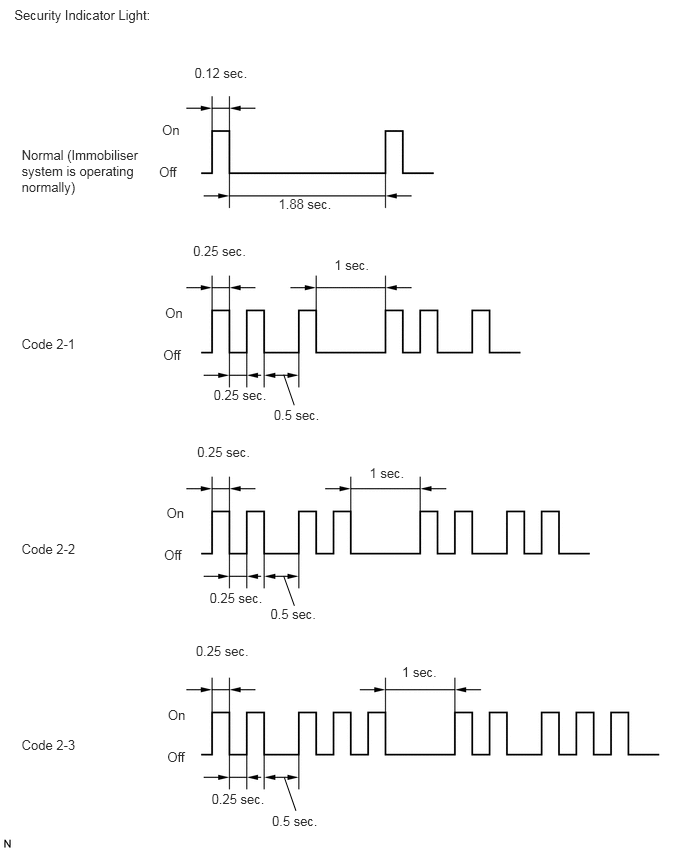
In registration mode, when the key is inserted in the ignition key cylinder, check that the security indicator light blinks in the normal pattern shown below.
- HINT:
-
If the new key code registration fails, code 2-1 will be output through the security indicator light. Trying to reregister an already registered key will cause code 2-2 to be output when the key is inserted. If the number of registered key codes exceeds the maximum limit, code 2-3 will be output through the security indicator light. The output details are shown below.
| Result | Proceed to |
|---|---|
| Code 2-1 or Code 2-3 | A |
| Code 2-2 | B |
A
B
Connect the intelligent tester to the DLC3.
Turn the ignition switch to ON.
Turn the intelligent tester on.
Enter the following menus: Body / Immobiliser / Data List.
According to the display on the intelligent tester, read the Data List.
| Tester Display | Measurement Item/Range | Normal Condition | Diagnostic Note |
|---|---|---|---|
| Transponder S-code | Number of registered sub-keys / min.: 0, max.: 3 | Number of registered sub-keys | - |
| Transponder M-code | Number of registered master keys / min.: 0, max.: 5 | Number of registered master keys | - |
| Result | Proceed to |
|---|---|
| None of the following | A |
| Registered master keys: 5, registered sub-keys: 0 | B |
| Registered master keys: 0, registered sub-keys: 3 | C |
| Registered master keys: 5, registered sub-keys: 3 | D |
A
B
C
D
Refer to the table below to determine if additional keys can be registered.
| Number of Keys Registered (Master and Sub) | Proceed to |
|---|---|
| 0 | New key ID registration (refer to the Service Bulletin) |
| 1 to 7 | Additional key ID registration (refer to the Service Bulletin) |
Check whether key registration.
OK
NG
Inspect the unlock warning switch assembly (See page Vehicle Interior>DOOR LOCK>UNLOCK WARNING SWITCH>INSPECTION).
OK
NG
Disconnect the E94 unlock warning switch assembly connector.
Disconnect the E96 transponder key ECU assembly connector.
Measure the resistance according to the value(s) in the table below.
- Standard Resistance:
Tester Connection Condition Specified Condition E94-1 (UN+) - E96-3 (KSW) Always Below 1 Ω E94-2 (UN-) - Body ground Always Below 1 Ω E94-1 (UN+) - Body ground Always 10 kΩ or higher
OK
NG
Inspect the front door courtesy light switch assembly (See page Vehicle Interior>LIGHTING (INT)>DOOR COURTESY LIGHT(for Front)>REMOVAL).
OK
NG
for LHD:
Disconnect the K2 front door courtesy light switch assembly connector.
Disconnect the E96 transponder key ECU assembly connector.
Measure the resistance according to the value(s) in the table below.
- Standard Resistance:
Tester Connection Condition Specified Condition K2-1 - E96-7 (CTY) Always Below 1 Ω K2-1 - Body ground Always 10 kΩ or higher
for RHD:
Disconnect the L1 front door courtesy light switch assembly connector.
Disconnect the E96 transponder key ECU assembly connector.
Measure the resistance according to the value(s) in the table below.
- Standard Resistance:
Tester Connection Condition Specified Condition L1-1 - E96-7 (CTY) Always Below 1 Ω L1-1 - Body ground Always 10 kΩ or higher
OK
NG