SEAT FRONT SEAT ASSEMBLY(for Manual Seat) REASSEMBLY
CAUTION / NOTICE / HINT
- CAUTION:
-
Wear protective gloves. Sharp areas on the parts may injure your hands.
- HINT:
- ·
Use the same procedure for RHD and LHD vehicles.
·The procedure listed below is for LHD vehicles.
·Use the same procedure for the RH and LH sides.
·The procedure listed below is for the LH side.
PROCEDURE

 72120
1.INSTALL FRONT OUTER SEAT TRACK ASSEMBLY LH
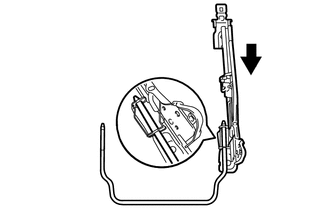
Attach the spring to install the front outer seat track assembly LH to the seat track adjusting handle as shown in the illustration.
72140A
2.INSTALL FRONT INNER SEAT TRACK ASSEMBLY LH
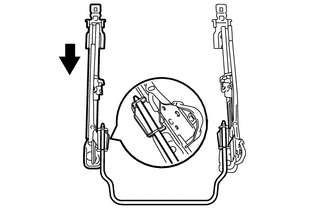
Attach the spring to install the front inner seat track assembly LH to the seat track adjusting handle as shown in the illustration.
for 4 Way Seat Type:
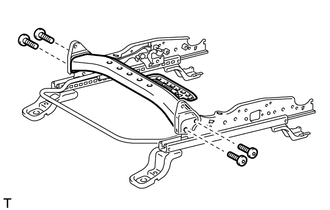
Using a T40 "TORX" socket wrench, install the reinforcement with the 4 "TORX" bolts.
- Torque:
- 25 N*m (255 kgf*cm, 18 ft.*lbf)
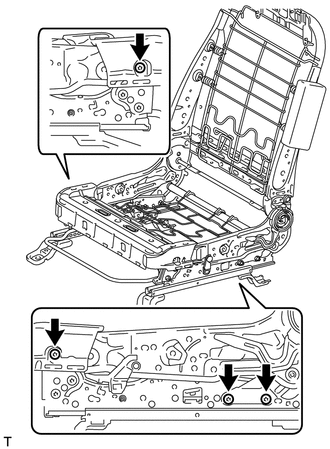
Temporarily install the seat frame with adjuster with 4 "TORX" bolts.
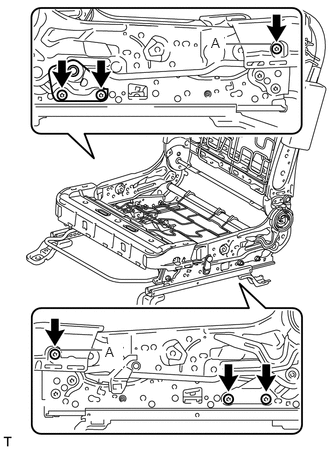
Temporarily install the inner seat track bracket with 2 "TORX" bolts.
Using a T40 "TORX" socket wrench , tighten the 6 "TORX" bolts.
- Torque:
- 25 N*m (255 kgf*cm, 18 ft.*lbf)
- Bolt A : 13 N*m (133 kgf*cm, 10 ft.*lbf)
for 8 Way Seat Type:
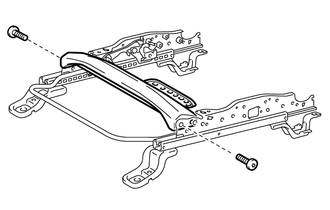
Using a T40 "TORX" socket wrench , install the reinforcement with the 2 "TORX" bolts.
- Torque:
- 25 N*m (255 kgf*cm, 18 ft.*lbf)
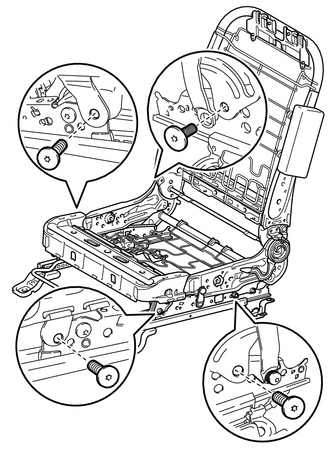
Temporarily install the seat frame with adjuster with the 4 "TORX" bolts.
Using a T40 "TORX" socket wrench, tighten the 4 "TORX" bolts.
- Torque:
- 25 N*m (255 kgf*cm, 18 ft.*lbf)
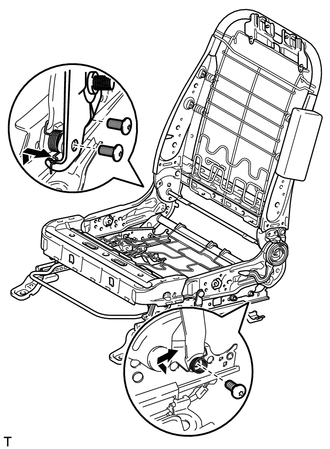
Install the spring and then using a T40 "TORX" socket wrench, install the "TORX" bolt.
- Torque:
- 25 N*m (255 kgf*cm, 18 ft.*lbf)
Using a T40 "TORX" socket wrench, install the inner seat track bracket with the 2 "TORX" bolts.
- Torque:
- 25 N*m (255 kgf*cm, 18 ft.*lbf)
Attach the spring.
82192
3.INSTALL FRONT SEAT WIRE LH (w/ Wire Harness)
Attach the claw to install the front seat wire LH.
Attach the wire harness clamps.
73920A
4.INSTALL FRONT SEAT AIRBAG ASSEMBLY LH (w/ Front Seat Side Airbag)
89178A
5.INSTALL SEAT POSITION SENSOR (w/ Front Seat Side Airbag)
71874
6.INSTALL FRONT LOWER SEAT CUSHION SHIELD LH
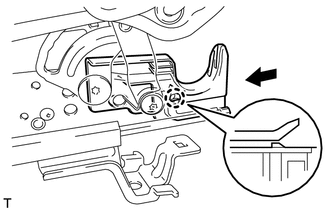
Attach the claw to install the front lower seat cushion shield LH.
71873
7.INSTALL FRONT LOWER SEAT CUSHION SHIELD RH
Attach the claw to install the front lower seat cushion shield RH.
71643A
8.INSTALL UPPER ACTIVE HEADREST UNIT (w/ Active Headrest)
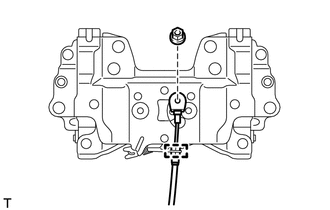
Attach the cable clamp to install the upper active headrest unit to the lower active headrest unit.
Install the nut.
- Torque:
- 5.0 N*m (51 kgf*cm, 44 in.*lbf)
71644
9.INSTALL LOWER ACTIVE HEADREST UNIT (w/ Active Headrest)
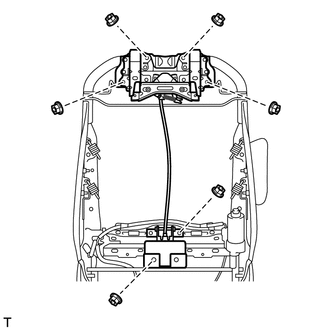
Install the lower active headrest unit together with the upper active headrest unit with the 6 nuts.
- Torque:
- Upper active headrest unit : 14 N*m (143 kgf*cm, 10 ft.*lbf)
- Lower active headrest unit : 5.0 N*m (51 kgf*cm, 44 in.*lbf)
72760D
10.INSTALL LUMBAR SUPPORT ADJUSTER ASSEMBLY LH (w/Lumbar Support)
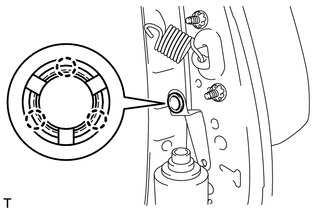
Attach the 3 claws to install the bush to the seat frame.
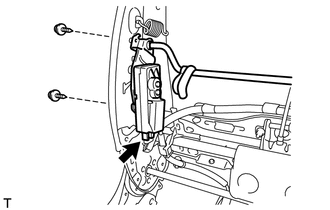
Install the lumbar support adjuster assembly LH with the 2 screws.
Connect the lumbar support adjuster connector.
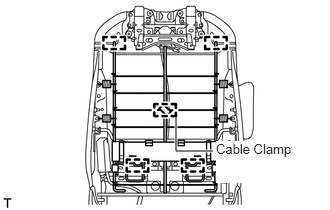
Attach the 4 hooks to install the seatback spring.
w/ Active Headrest:
Connect the active headrest cable with the cable clamp.
Install the 4 springs.
71876G
11.INSTALL OUTSIDE RECLINING ADJUSTER COVER LH
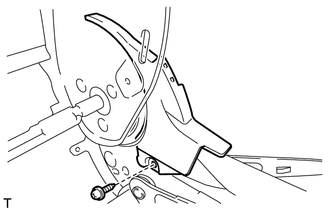
Install the outside reclining adjuster cover LH with the screw.
71875F
12.INSTALL OUTSIDE RECLINING ADJUSTER COVER RH
Install the outside reclining adjuster cover RH with the screw.
71876
13.INSTALL INSIDE RECLINING ADJUSTER COVER LH
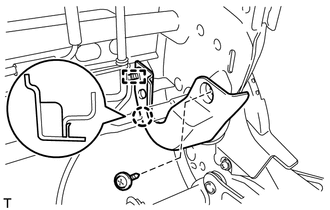
Attach the claw to install the inside reclining adjuster cover LH.
Install the screw.
w/ Front Seat Side Airbag:
Attach the wire harness clamp.
71875A
14.INSTALL INSIDE RECLINING ADJUSTER COVER RH
Attach the claw to install the inside reclining adjuster cover RH.
Install the screw.
w/ Lumbar Support:
Attach the wire harness clamp.
71074S
15.INSTALL FRONT SEPARATE TYPE SEATBACK COVER
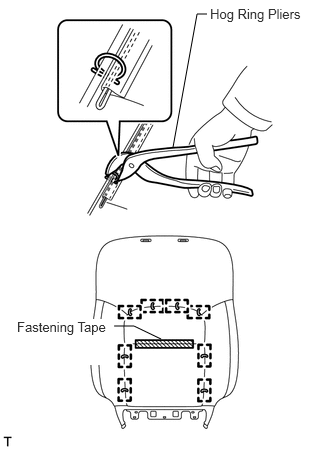
Attach the fastening tape to install the front separate type seatback cover to the front separate type seatback pad.
Using hog ring pliers, install new hog rings.
- NOTICE:
- ·
Be careful not to damage the cover.
·When installing the hog rings, avoid wrinkling the cover.
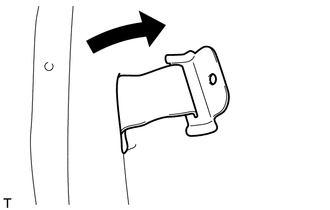
w/ Front Seat Side Airbag:
Connect the seatback cover bracket to the front separate type seatback pad.
16.INSTALL SEATBACK COVER WITH PAD
Set the seatback cover with pad in place.
w/ Seatback Board:
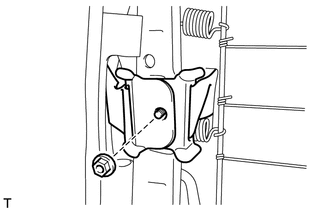
w/ Front Seat Side Airbag:
Install the seatback cover bracket to the seat frame with the nut.
- Torque:
- 5.0 N*m (51 kgf*cm, 44 in.*lbf)
- CAUTION:
-
After the seatback cover with pad is installed, make sure the seatback cover bracket is not twisted.
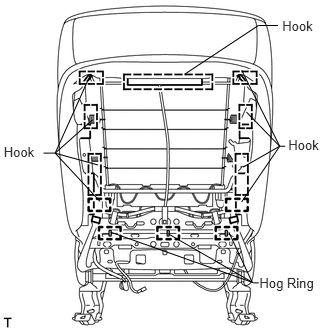
Attach the 9 hooks.
Using hog ring pliers, install new hog rings.
- NOTICE:
- ·
Be careful not to damage the cover.
·When installing the hog rings, avoid wrinkling the cover.
w/o Seatback Board:
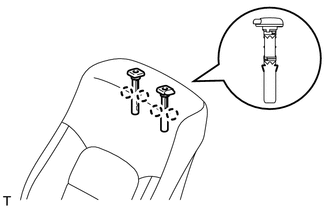
Attach the 4 claws to install the 2 headrest supports.
w/ Front Seat Side Airbag:
Install the seatback cover bracket to the seat frame with the nut.
- Torque:
- 5.0 N*m (51 kgf*cm, 44 in.*lbf)
- CAUTION:
-
After the seatback cover with pad is installed, make sure the seatback cover bracket is not twisted.
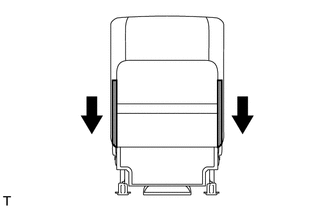
Close the 2 fasteners.
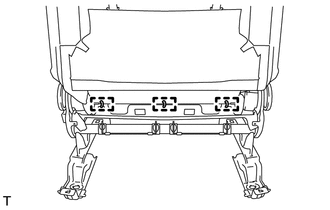
Using hog ring pliers, install new hog rings.
- NOTICE:
- ·
Be careful not to damage the cover.
·When installing the hog rings, avoid wrinkling the cover.
71931
17.INSTALL FRONT SEAT HEADREST SUPPORT (w/ Active Headrest)
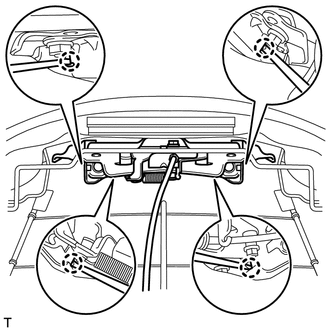
Attach the 4 claws to install the 2 front seat headrest supports.
71706
18.INSTALL FRONT SEATBACK BOARD SUB-ASSEMBLY LH (w/ Seatback Board)
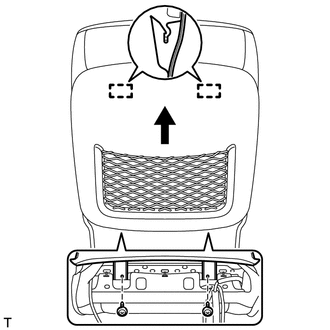
Move the front seatback board sub-assembly in the direction of the arrow to attach the 2 hooks and install it.
Install the 2 screws.
71072S
19.INSTALL FRONT SEPARATE TYPE SEAT CUSHION COVER
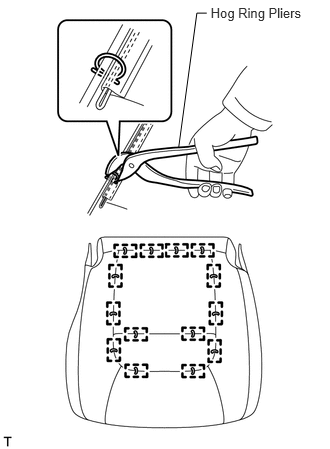
Using hog ring pliers, install the front separate type seat cushion cover to the front separate type seat cushion pad with new hog rings.
- NOTICE:
- ·
Be careful not to damage the cover.
·When installing the hog rings, avoid wrinkling the cover.
20.INSTALL SEAT CUSHION COVER WITH PAD
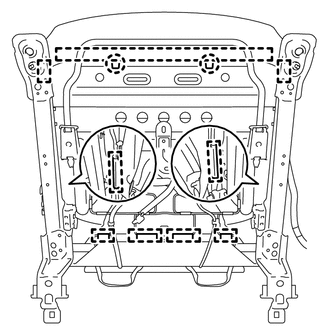
Attach the hooks to install the seat cushion cover with pad.
Bend the 2 seat frame claws downward.
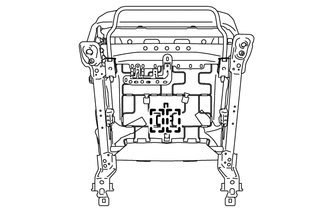
w/ Occupant Detection Sensor:
Attach the 2 clamps to install connector holder.
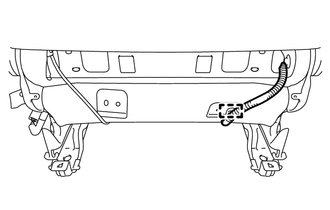
w/ Lumbar Support:
Attach the wire harness clamp.
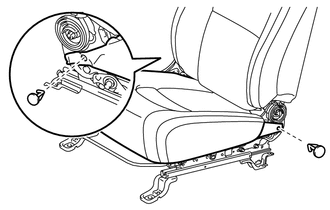
Install the 2 clips.
71862
21.INSTALL FRONT INNER SEAT CUSHION SHIELD LH
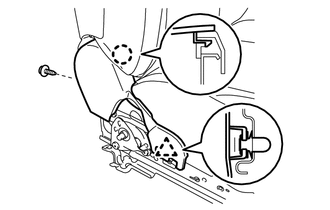
Attach the claw and clip to install the front inner seat cushion shield LH.
Install the screw.
73240
22.INSTALL FRONT SEAT INNER BELT ASSEMBLY LH (for Manual Seat)
73240
23.INSTALL FRONT SEAT INNER BELT ASSEMBLY LH (for Bench Seat Type)
84920
24.INSTALL LUMBAR SWITCH (w/ Lumbar Support)
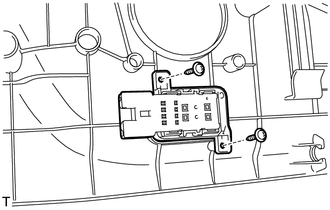
Install the lumbar switch with the 2 screws.
71812D
25.INSTALL FRONT SEAT CUSHION SHIELD LH
w/ Lumbar Support:
Connect the lumbar switch connector.
for 4 Way Seat Type:
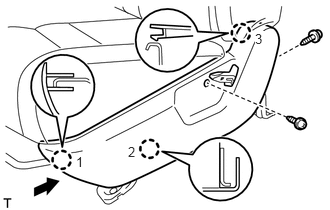
Attach the 3 claws in the order shown in the illustration to install the front seat cushion shield LH.
Install the 2 screws.
for 8 Way Seat Type:
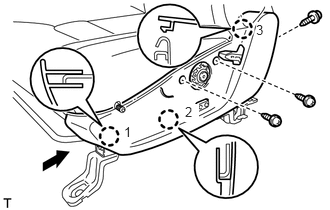
Attach the 3 claws in the order shown in the illustration to install the front seat cushion shield LH.
Install the 3 screws.
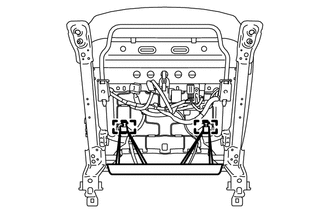
w/ Seatback Board:
Connect the 2 rubber bands to the 2 hooks.
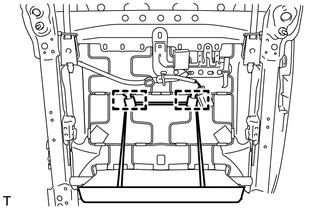
w/o Seatback Board:
Connect the rubber band to the 2 hooks.
72526A
26.INSTALL RECLINING ADJUSTER RELEASE HANDLE LH
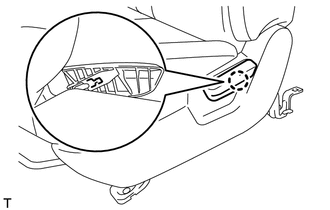
Attach the claw to install the reclining adjuster release handle LH.
72457
27.INSTALL VERTICAL SEAT ADJUSTER KNOB (for 8 Way Seat Type)
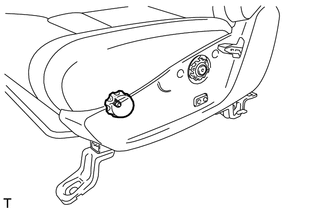
Install the snap ring to the vertical seat adjuster knob.
Install the vertical seat adjuster knob.
72495
28.INSTALL VERTICAL ADJUSTING HANDLE LH (for 8 Way Seat Type)
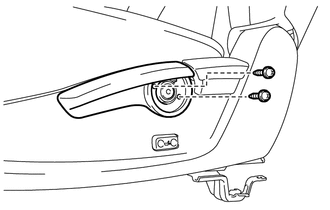
Install the vertical adjusting handle with the 2 screws.
72462A
29.INSTALL VERTICAL ADJUSTER COVER LH (for 8 Way Seat Type)
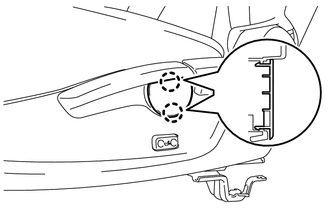
Attach the 2 claws to install the vertical adjuster cover LH.