Home › Vehicle Interior › HEATING / AIR CONDITIONING › AIR CONDITIONING SYSTEM (for Automatic Air Conditioning System) › 2014.08–2015.08
RM2660E _58 Vehicle Interior _052847 HEATING / AIR CONDITIONING _0255699 AIR CONDITIONING SYSTEM(for Automatic Air Conditioning System) J

HEATING / AIR CONDITIONING  AIR CONDITIONING SYSTEM(for Automatic Air Conditioning System)  Rear Blower Motor Circuit  


DESCRIPTION
E349882E02
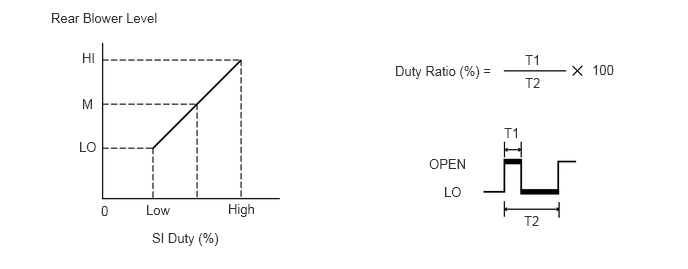
0.531,0.104 1.844,0.313 1.313,0.208 10 false Rear Blower Level 0.823,1.448 1.135,1.646 0.313,0.198 10 false LO 0.854,0.521 1.167,0.719 0.313,0.198 10 false HI 0.854,1 1.167,1.198 0.313,0.198 10 false M 1.052,2.115 1.365,2.313 0.313,0.198 10 false 0 1.521,2.104 1.833,2.302 0.313,0.198 10 false Low 2.375,2.094 2.688,2.292 0.313,0.198 10 false High 1.583,2.396 2.615,2.604 1.031,0.208 10 false SI Duty (%) 4.115,0.656 5.219,0.865 1.104,0.208 10 false Duty Ratio (%) = 5.469,0.542 5.719,0.74 0.25,0.198 10 false T1 5.469,0.781 5.719,0.979 0.25,0.198 10 false T2 6.167,0.646 6.417,0.844 0.25,0.198 10 false 100 5.25,1.302 5.5,1.5 0.25,0.198 10 false T1 5.458,2.219 5.708,2.417 0.25,0.198 10 false T2 4.469,1.625 5.021,1.833 0.552,0.208 10 false OPEN 4.625,1.917 4.938,2.115 0.313,0.198 10 false LO

The rear blower motor (w/ rear heater) is operated by signals from the air conditioning amplifier assembly. The rear blower motor speed signals are transmitted by changes in the duty ratio.

Duty Ratio:

The duty ratio is the ratio of the rear blower motor OPEN time (T1) to the total of the rear blower motor OPEN and LO time (T2).

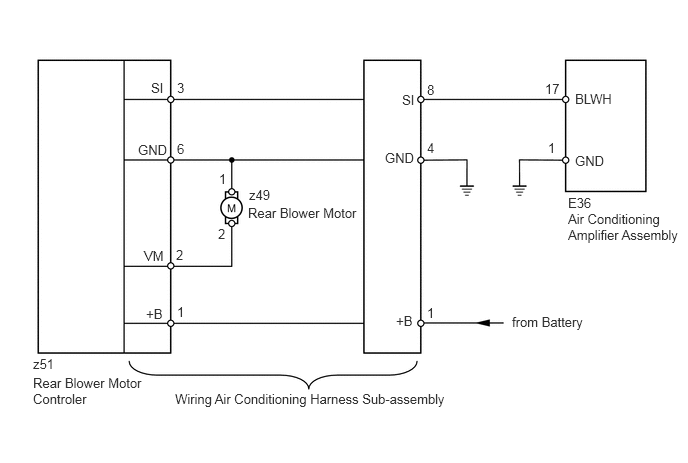
The rear blower motor controller controls the rear blower motor speed.

WIRING DIAGRAM
E157377E07
1.573,0.833 1.823,1.021 0.25,0.188 10 false SI 1.438,1.479 1.792,1.677 0.354,0.198 10 false GND 1.5,2.583 1.75,2.76 0.25,0.177 10 false VM 1.521,3.188 1.781,3.354 0.26,0.167 10 false +B 1.833,2.573 2.031,2.771 0.198,0.198 10 false 2 1.844,3.167 2.042,3.365 0.198,0.198 10 false 1 1.844,1.469 2.042,1.667 0.198,0.198 10 false 6 1.844,0.833 2.063,1.031 0.219,0.198 10 false 3 0.344,3.708 0.677,3.896 0.333,0.188 10 false z51 0.344,3.906 1.667,4.271 1.323,0.365 10 false Rear Blower Motor Controler 1.823,4.073 4.833,4.417 3.01,0.344 10 false Wiring Air Conditioning Harness Sub-assembly 2.271,2.354 2.448,2.552 0.177,0.198 10 false 2 2.281,1.781 2.458,1.979 0.177,0.198 10 false 1 2.594,1.948 2.865,2.146 0.271,0.198 10 false z49 2.583,2.135 3.792,2.333 1.208,0.198 10 false Rear Blower Motor 4.188,0.958 4.417,1.125 0.229,0.167 10 false SI 4.01,1.563 4.427,1.781 0.417,0.219 10 false GND 4.125,3.26 4.344,3.417 0.219,0.156 10 false +B 4.448,1.458 4.635,1.677 0.188,0.219 10 false 4 4.448,0.854 4.635,1.073 0.188,0.219 10 false 8 5.708,1.458 5.833,1.635 0.125,0.177 10 false 1 5.677,0.844 5.885,1.021 0.208,0.177 10 false 17 5.99,1.594 6.448,1.75 0.458,0.156 10 false GND 5.99,0.948 6.448,1.104 0.458,0.156 10 false BLWH 4.448,3.177 4.625,3.344 0.177,0.167 10 false 1 5.333,3.271 6.552,3.458 1.219,0.188 10 false from Battery 5.917,2.031 6.198,2.198 0.281,0.167 10 false E36 5.917,2.198 7.135,2.542 1.219,0.344 10 false Air Conditioning Amplifier Assembly

PROCEDURE

1.PERFORM ACTIVE TEST USING INTELLIGENT TESTER (REAR BLOWER MOTOR)
a.

Select the Active Test, use the intelligent tester to generate a control command, and then check that the rear blower motor operates.

Air Conditioner
Tester Display Test Part Control Range Diagnostic Note
Rear Blower Motor Rear blower motor Min.: 0, Max.: 31 -

Result
Result Proceed to
Rear blower motor operates normally A
Rear blower motor does not operate B
Rear blower motor operates but does not change speed C


A

B

2.CHECK HARNESS AND CONNECTOR (WIRING AIR CONDITIONING HARNESS - BODY GROUND)

C

5.CHECK HARNESS AND CONNECTOR (AIR CONDITIONING AMPLIFIER - WIRING AIR CONDITIONING HARNESS)
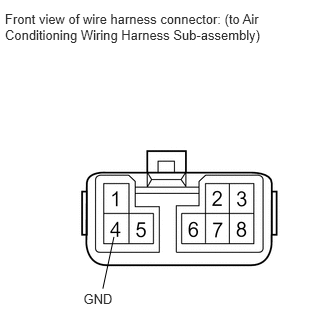
2.CHECK HARNESS AND CONNECTOR (WIRING AIR CONDITIONING HARNESS - BODY GROUND)
E157378E01
0.051,0.11 2.758,0.732 2.707,0.621 10 Front view of wire harness connector: (to Air Conditioning Wiring Harness Sub-assembly) 0.869,3.028 1.205,3.170 0.336,0.142 10 GND 1.186,2.467 1.071,3.006 false

a.

Disconnect the wiring air conditioning harness sub-assembly connector.


b.

Measure the resistance according to the value(s) in the table below.

Standard Resistance:
Tester Connection Condition Specified Condition
4 (GND) - Body ground Always Below 1 Ω


OK

3.CHECK HARNESS AND CONNECTOR (WIRING AIR CONDITIONING HARNESS - BATTERY)

NG

REPAIR OR REPLACE HARNESS OR CONNECTOR

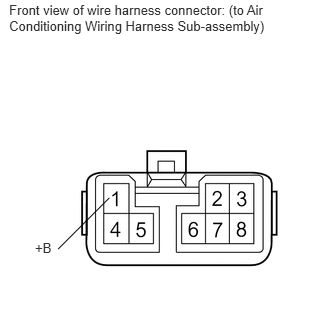
3.CHECK HARNESS AND CONNECTOR (WIRING AIR CONDITIONING HARNESS - BATTERY)
E157378E02
0.095,0.017 2.782,0.518 2.687,0.501 10 Front view of wire harness connector: (to Air Conditioning Wiring Harness Sub-assembly) 0.364,2.498 0.604,2.696 0.239,0.198 10 +B 1.139,2.06 0.605,2.594 false

a.

Disconnect the wiring air conditioning harness sub-assembly connector.


b.

Measure the voltage according to the value(s) in the table below.

Standard Voltage:
Tester Connection Condition Specified Condition
1 (+B) - Body ground Always 11 to 14 V


OK

4.CHECK WIRING AIR CONDITIONING HARNESS SUB-ASSEMBLY (SI VOLTAGE)

NG

REPAIR OR REPLACE HARNESS OR CONNECTOR

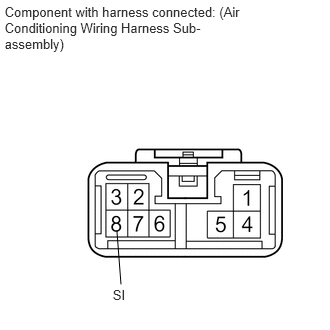
4.CHECK WIRING AIR CONDITIONING HARNESS SUB-ASSEMBLY (SI VOLTAGE)
E157379E01
0.048,0.046 2.528,0.593 2.480,0.547 10 Component with harness connected: (Air Conditioning Wiring Harness Sub-assembly) 1.174,2.988 1.358,3.144 0.184,0.156 10 SI 1.217,2.398 1.26,2.962 false

a.

Disconnect the E36 amplifier connector.


b.

Reconnect the wiring air conditioning harness sub-assembly connector.


c.

Measure the voltage according to the value(s) in the table below.

Standard Voltage:
Tester Connection Switch Condition Specified Condition
8 (SI) - Body ground Engine switch on (IG) 4.5 to 5.5 V


OK

5.CHECK HARNESS AND CONNECTOR (AIR CONDITIONING AMPLIFIER - WIRING AIR CONDITIONING HARNESS)

NG

7.CHECK WIRING AIR CONDITIONING HARNESS SUB-ASSEMBLY (OPERATION)
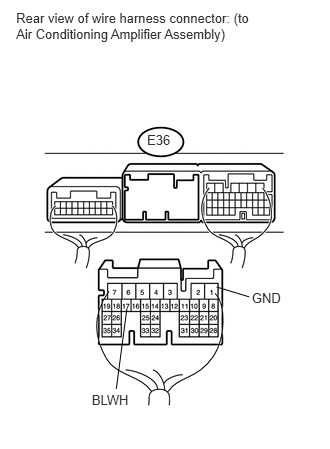
5.CHECK HARNESS AND CONNECTOR (AIR CONDITIONING AMPLIFIER - WIRING AIR CONDITIONING HARNESS)
U165941E01
0.168,0.109 2.719,0.640 2.551,0.531 10 Rear view of wire harness connector: (to Air Conditioning Amplifier Assembly) 1.532,1.373 1.823,1.548 0.291,0.175 10 E36 2.623,3.017 2.975,3.174 0.352,0.156 10 GND 0.956,4.079 1.420,4.228 0.463,0.149 10 BLWH 2.256,2.989 2.596,3.092 false 1.321,3.216 1.211,4.05 false

a.

Disconnect the E36 amplifier connector.


b.

Measure the voltage according to the value(s) in the table below.

Standard Voltage:
Tester Connection Switch Condition Specified Condition
E36-17 (BLWH) - E36-1 (GND) Engine switch on (IG)
Blower switch off
4.5 to 5.5 V


OK

6.CHECK AIR CONDITIONING AMPLIFIER ASSEMBLY (BLWH SIGNAL)

NG

REPAIR OR REPLACE HARNESS OR CONNECTOR

6.CHECK AIR CONDITIONING AMPLIFIER ASSEMBLY (BLWH SIGNAL)
a.

Remove the air conditioning amplifier assembly with its connectors still connected (See page Vehicle Interior>HEATING / AIR CONDITIONING>AIR CONDITIONING AMPLIFIER>REMOVAL).
E349914E03
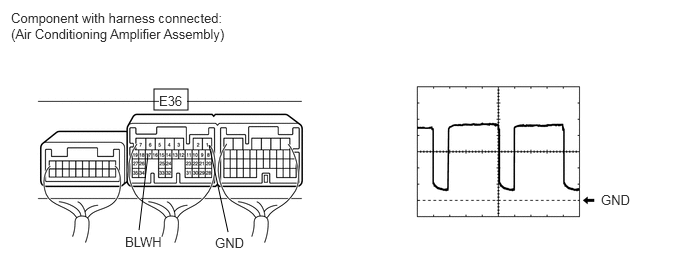
1.604,0.927 1.958,1.146 0.354,0.219 1.448,2.396 1.542,1.604 false 2.375,2.417 2.177,1.51 false 0.115,0.104 2.406,0.51 2.292,0.406 10 false Component with harness connected: (Air Conditioning Amplifier Assembly) 1.656,0.969 1.948,1.135 0.292,0.167 10 true E36 1.302,2.438 1.677,2.646 0.375,0.208 10 true BLWH 2.24,2.448 2.615,2.656 0.375,0.208 10 true GND 6.26,2 6.635,2.208 0.375,0.208 10 true GND


b.

Using an oscilloscope, check the waveform.

Measurement Condition
Item Content
Terminal No.(Symbol) E36-17 (BLWH) - E36-1 (GND)
Tool Setting 1 V/DIV., 500 μs/DIV.
Condition Engine switch on (IG)
Blower switch: off → on

OK:

Waveform is as shown in the illustration.


HINT:

Waveform varies with the blower level.


OK

7.CHECK WIRING AIR CONDITIONING HARNESS SUB-ASSEMBLY (OPERATION)

NG

REPLACE AIR CONDITIONING AMPLIFIER ASSEMBLY

7.CHECK WIRING AIR CONDITIONING HARNESS SUB-ASSEMBLY (OPERATION)
a.

Replace the wiring air conditioning harness sub-assembly with a normal one and check that the condition returns to normal.

OK:

Same problem does not occur.


OK

REPLACE WIRING AIR CONDITIONING HARNESS SUB-ASSEMBLY

NG

8.INSPECT REAR BLOWER MOTOR
a.
E160302E01
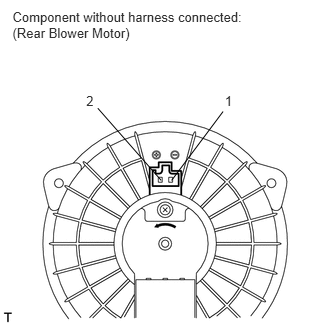
0.13,0.09 2.647,0.668 2.517,0.577 10 Component without harness connected: (Rear Blower Motor) 0.898,0.973 1.086,1.152 0.188,0.179 10 2 2.342,0.973 2.530,1.152 0.188,0.179 10 1 1.679,1.879 1.018,1.127 false 1.787,1.879 2.323,1.161 false

Disconnect the z32 motor connector.


b.

Connect the positive (+) lead of the battery to terminal 2 and the negative (-) lead to terminal 1, then check that the rear blower motor operates smoothly.

OK:

The rear blower motor operates smoothly.


OK

NG