SUPPLEMENTAL RESTRAINT SYSTEMS AIRBAG SYSTEM B009387 Left Side Restraints Sensor 3 Missing Message
DESCRIPTION
| DTC No. | Detection Item | DTC Detection Condition | Trouble Area | Warning Indicate | DTC Output from | Priority | Test Mode / Check Mode |
|---|---|---|---|---|---|---|---|
| B009387 | Left Side Restraints Sensor 3 Missing Message | One of the following conditions is met:
·
The airbag ECU assembly detects a line short in the side collision sensor LH circuit (bus 1) for 2 seconds.
·
The airbag ECU assembly detects a short to ground in the side collision sensor LH circuit (bus 1) for 2 seconds.
·
The airbag ECU assembly detects a short to B+ in the side collision sensor LH circuit (bus 1) for 2 seconds.
·
The airbag ECU assembly detects an open in the side collision sensor LH circuit (bus 1) for 2 seconds.
·
A No. 2 side airbag sensor assembly LH malfunction.
·
A side airbag pressure sensor LH malfunction.
·
An airbag ECU assembly malfunction |
·
Wire harness
·
No. 2 side airbag sensor assembly LH
·
Side airbag pressure sensor LH
·
Airbag ECU assembly |
Comes on | SRS Airbag | A | Not applicable |
WIRING DIAGRAM
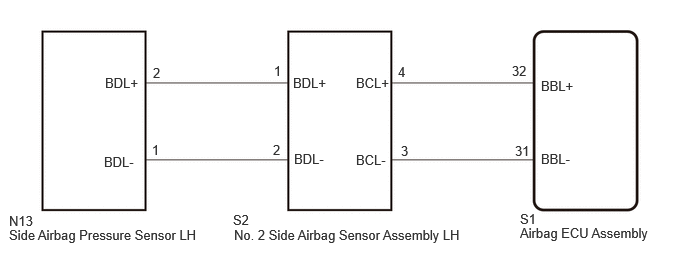
CAUTION / NOTICE / HINT
- NOTICE:
-
·
After the ignition switch is turned off, there may be a waiting time before disconnecting the negative (-) battery terminal.
Click hereGeneral>SETUP>WHEN DISCONNECTING OR RECONNECTING BATTERY TERMINAL>BEFORE DISCONNECTING BATTERY
·When disconnecting and reconnecting the battery
Click hereGeneral>SETUP>WHEN DISCONNECTING OR RECONNECTING BATTERY TERMINAL>WORK PROCEDURE
- HINT:
-
When disconnecting and reconnecting the cable to the battery terminal, there is an automatic learning function that completes learning when the respective system is used.
-
Click hereGeneral>SETUP>WHEN DISCONNECTING OR RECONNECTING BATTERY TERMINAL>AUTOMATIC LEARNING CHART
·After replacing the airbag ECU assembly, refer to initialization.
Click hereGeneral>SETUP>WHEN REPLACING OR REMOVING/INSTALLING PARTS>WORK PROCEDURE
PROCEDURE
Pre-procedure1
Turn the ignition switch to ON, and wait for at least 60 seconds.
Procedure1
Check for DTCs.
- Body Electrical > SRS Airbag > Trouble Codes
- 50001 444
- Result:
-
Result Proceed to DTC B009387 and B009B87 are output A DTC B009387 is output B DTC B009387 and B009B87 are not output C
Post-procedure1
None
A
B
Click hereVehicle Interior>SUPPLEMENTAL RESTRAINT SYSTEMS>SIDE AIRBAG SENSOR (for Quarter Pillar)>REMOVAL
C
Click hereGeneral>INTRODUCTION>HOW TO TROUBLESHOOT ECU CONTROLLED SYSTEMS>HOW TO PROCEED WITH TROUBLESHOOTING
Disconnect the cable from the negative (-) battery terminal, and wait for at least 60 seconds.
Disconnect the N13 side airbag pressure sensor LH connector.
Connect the cable to the negative (-) battery terminal, and wait for at least 2 seconds.
Turn the ignition switch to ON, and wait for at least 60 seconds.
Clear the DTCs stored in memory.
- Body Electrical > SRS Airbag > Clear DTCs
- 50002 444
- Result:
-
Proceed to NEXT
NEXT
Pre-procedure1
Turn the ignition switch off.
Turn the ignition switch to ON, and wait for at least 60 seconds.
Procedure1
Check for DTCs.
- Body Electrical > SRS Airbag > Trouble Codes
- 50001 444
- Result:
-
Result Proceed to DTC B009387 and B009B87 are output A DTC B009B87 is output B
Post-procedure1
Turn the ignition switch off.
Disconnect the cable from the negative (-) battery terminal, and wait for at least 60 seconds.
Connect the side airbag pressure sensor LH connector.
A
B
Click hereVehicle Interior>SUPPLEMENTAL RESTRAINT SYSTEMS>SIDE AIRBAG SENSOR (for Front Door)>REMOVAL
Pre-procedure1
None
Procedure1
Check that the connectors are properly connected to the airbag ECU assembly, side airbag pressure sensor LH and No. 2 side airbag sensor assembly LH.
- OK:
-
The connectors are properly connected.
- Result:
-
Proceed to OK NG
Post-procedure1
None
OK
NG
Pre-procedure1
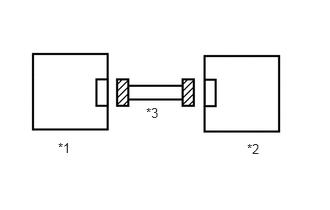
| *1 | No. 2 Side Airbag Sensor Assembly LH |
| *2 | Side Airbag Pressure Sensor LH |
| *3 | Wire Harness |
Disconnect the S2 No. 2 side airbag sensor assembly LH connector.
Disconnect the N13 side airbag pressure sensor LH connector.
Procedure1
Check that the terminals of the connectors are not deformed or damaged.
- OK:
-
The terminals of the connectors are not deformed or damaged.
- Result:
-
Proceed to OK NG
Post-procedure1
None
OK
NG
Pre-procedure1
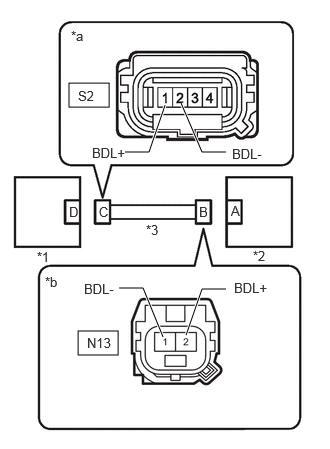
| *1 | No. 2 Side Airbag Sensor Assembly LH |
| *2 | Side Airbag Pressure Sensor LH |
| *3 | Wire Harness |
| *a | Front view of wire harness connector (to No. 2 Side Airbag Sensor Assembly LH) |
| *b | Front view of wire harness connector (to Side Airbag Pressure Sensor LH) |
None
Procedure1
Measure the resistance according to the value(s) in the table below.
- Standard Resistance:
-
Tester Connection Condition Specified Condition Click Location & Routing(S2)Location & Routingewd_type=routing;type=c;code=S2
Click Connector(S2)Body>No. 2 Floor Wire / Step Rear Floor Wire LH>No. 2 Side Airbag Sensor Assembly LHewd_type=component;type=c;code=S2;pinno=1,2
S2-1 (BDL+) - S2-2 (BDL-) Always 1 MΩ or higher
- Result:
-
Proceed to OK NG
Post-procedure1
None
OK
NG
Pre-procedure1
| *1 | No. 2 Side Airbag Sensor Assembly LH |
| *2 | Side Airbag Pressure Sensor LH |
| *3 | Wire Harness |
| *a | Front view of wire harness connector (to No. 2 Side Airbag Sensor Assembly LH) |
| *b | Front view of wire harness connector (to Side Airbag Pressure Sensor LH) |
None
Procedure1
Measure the resistance according to the value(s) in the table below.
- Standard Resistance:
-
Tester Connection Condition Specified Condition Click Location & Routing(S2)Location & Routingewd_type=routing;type=c;code=S2
Click Connector(S2)Body>No. 2 Floor Wire / Step Rear Floor Wire LH>No. 2 Side Airbag Sensor Assembly LHewd_type=component;type=c;code=S2;pinno=1,2
S2-1 (BDL+) - Body ground Always 1 MΩ or higher S2-2 (BDL-) - Body ground Always 1 MΩ or higher
- Result:
-
Proceed to OK NG
Post-procedure1
None
OK
NG
Pre-procedure1
| *1 | No. 2 Side Airbag Sensor Assembly LH |
| *2 | Side Airbag Pressure Sensor LH |
| *3 | Wire Harness |
| *a | Front view of wire harness connector (to No. 2 Side Airbag Sensor Assembly LH) |
| *b | Front view of wire harness connector (to Side Airbag Pressure Sensor LH) |
Connect the cable to the negative (-) battery terminal, and wait for at least 2 seconds.
Turn the ignition switch to ON.
Procedure1
Measure the voltage according to the value(s) in the table below.
- Standard Voltage:
-
Tester Connection Switch Condition Specified Condition Click Location & Routing(S2)Location & Routingewd_type=routing;type=c;code=S2
Click Connector(S2)Body>No. 2 Floor Wire / Step Rear Floor Wire LH>No. 2 Side Airbag Sensor Assembly LHewd_type=component;type=c;code=S2;pinno=1,2
S2-1 (BDL+) - Body ground Ignition switch ON Below 1 V S2-2 (BDL-) - Body ground Ignition switch ON Below 1 V
- Result:
-
Proceed to OK NG
Post-procedure1
Turn the ignition switch off.
Disconnect the cable from the negative (-) battery terminal, and wait for at least 60 seconds.
OK
NG
Pre-procedure1
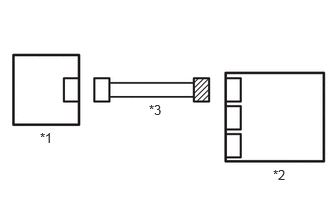
| *1 | No. 2 Side Airbag Sensor Assembly LH |
| *2 | Airbag ECU Assembly |
| *3 | Wire Harness |
Disconnect the airbag ECU assembly connector.
Procedure1
Check that the terminals of the connectors are not deformed or damaged.
- OK:
-
The terminals of the connectors are not deformed or damaged.
- Result:
-
Proceed to OK NG
Post-procedure1
None
OK
NG
Pre-procedure1
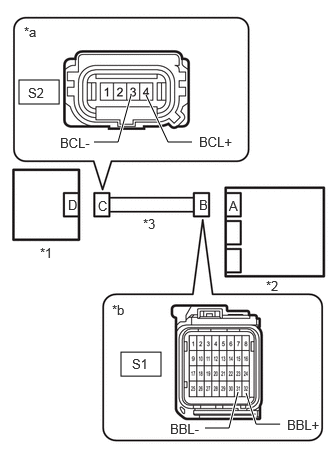
| *1 | No. 2 Side Airbag Sensor Assembly LH |
| *2 | Airbag ECU Assembly |
| *3 | Wire Harness |
| *a | Front view of wire harness connector (to No. 2 Side Airbag Sensor Assembly LH) |
| *b | Front view of wire harness connector (to Airbag ECU Assembly) |
None
Procedure1
Measure the resistance according to the value(s) in the table below.
- Standard Resistance:
-
Tester Connection Condition Specified Condition Click Location & Routing(S2)Location & Routingewd_type=routing;type=c;code=S2
Click Connector(S2)Body>No. 2 Floor Wire / Step Rear Floor Wire LH>No. 2 Side Airbag Sensor Assembly LHewd_type=component;type=c;code=S2;pinno=4,3
S2-4 (BCL+) - S2-3 (BCL-) Always 1 MΩ or higher
- Result:
-
Proceed to OK NG
Post-procedure1
None
OK
NG
Pre-procedure1
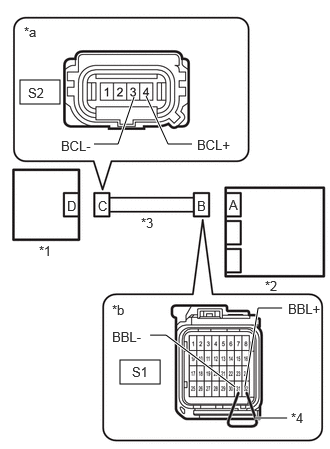
| *1 | No. 2 Side Airbag Sensor Assembly LH |
| *2 | Airbag ECU Assembly |
| *3 | Wire Harness |
| *4 | Service Wire |
| *a | Front view of wire harness connector (to No. 2 Side Airbag Sensor Assembly LH) |
| *b | Front view of wire harness connector (to Airbag ECU Assembly) |
Using a service wire, connect terminals 32 (BBL+) and 31 (BBL-) of connector B.
- NOTICE:
-
Do not forcibly insert the service wire into the terminals of the connector when connecting a service wire.
Procedure1
Measure the resistance according to the value(s) in the table below.
- Standard Resistance:
-
Tester Connection Condition Specified Condition Click Location & Routing(S2)Location & Routingewd_type=routing;type=c;code=S2
Click Connector(S2)Body>No. 2 Floor Wire / Step Rear Floor Wire LH>No. 2 Side Airbag Sensor Assembly LHewd_type=component;type=c;code=S2;pinno=4,3
S2-4 (BCL+) - S2-3 (BCL-) Always Below 1 Ω
- Result:
-
Proceed to OK NG
Post-procedure1
Disconnect the service wire from connector B.
OK
NG
Pre-procedure1
| *1 | No. 2 Side Airbag Sensor Assembly LH |
| *2 | Airbag ECU Assembly |
| *3 | Wire Harness |
| *a | Front view of wire harness connector (to No. 2 Side Airbag Sensor Assembly LH) |
| *b | Front view of wire harness connector (to Airbag ECU Assembly) |
None
Procedure1
Measure the resistance according to the value(s) in the table below.
- Standard Resistance:
-
Tester Connection Condition Specified Condition Click Location & Routing(S2)Location & Routingewd_type=routing;type=c;code=S2
Click Connector(S2)Body>No. 2 Floor Wire / Step Rear Floor Wire LH>No. 2 Side Airbag Sensor Assembly LHewd_type=component;type=c;code=S2;pinno=4,3
S2-4 (BCL+) - Body ground Always 1 MΩ or higher S2-3 (BCL-) - Body ground Always 1 MΩ or higher
- Result:
-
Proceed to OK NG
Post-procedure1
None
OK
NG
Pre-procedure1
| *1 | No. 2 Side Airbag Sensor Assembly LH |
| *2 | Airbag ECU Assembly |
| *3 | Wire Harness |
| *a | Front view of wire harness connector (to No. 2 Side Airbag Sensor Assembly LH) |
| *b | Front view of wire harness connector (to Airbag ECU Assembly) |
Connect the cable to the negative (-) battery terminal, and wait for at least 2 seconds.
Turn the ignition switch to ON.
Procedure1
Measure the voltage according to the value(s) in the table below.
- Standard Voltage:
-
Tester Connection Switch Condition Specified Condition Click Location & Routing(S2)Location & Routingewd_type=routing;type=c;code=S2
Click Connector(S2)Body>No. 2 Floor Wire / Step Rear Floor Wire LH>No. 2 Side Airbag Sensor Assembly LHewd_type=component;type=c;code=S2;pinno=4,3
S2-4 (BCL+) - Body ground Ignition switch ON Below 1 V S2-3 (BCL-) - Body ground Ignition switch ON Below 1 V
- Result:
-
Proceed to OK NG
Post-procedure1
Turn the ignition switch off.
Disconnect the cable from the negative (-) battery terminal, and wait for at least 60 seconds.
OK
NG
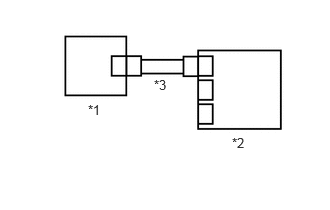
| *1 | No. 2 Side Airbag Sensor Assembly RH |
| *2 | Airbag ECU Assembly |
| *3 | Wire Harness |
Connect the S1 airbag ECU assembly connector.
Connect the S2 No. 2 side airbag sensor assembly LH connector.
Interchange the rear airbag assembly LH with RH and connect the connectors.
Connect the cable to the negative (-) battery terminal.
Turn the ignition switch to ON, and wait for at least 60 seconds.
Clear the DTCs stored in memory.
- Body Electrical > SRS Airbag > Clear DTCs
- 50002 444
- Result:
-
Proceed to NEXT
NEXT
Pre-procedure1
Turn the ignition switch off.
Turn the ignition switch to ON, and wait for at least 60 seconds.
Procedure1
Check for DTCs.
- Body Electrical > SRS Airbag > Trouble Codes
- 50001 444
- Result:
-
Result Proceed to DTC B009387 and B009B87 are output A DTC B009887 and B009E87 are output B
- HINT:
-
Codes other than DTCs B009387, B009887, B009B87 and B009E87 may be output at this time, but they are not related to this check.
Post-procedure1
Turn the ignition switch off.
Disconnect the cable from the negative (-) battery terminal, and wait for at least 60 seconds.
Return the No. 2 side airbag sensor assembly RH and LH to their original positions and connect the connectors.
A
B
Click hereVehicle Interior>SUPPLEMENTAL RESTRAINT SYSTEMS>SIDE AIRBAG SENSOR (for Quarter Pillar)>REMOVAL
Pre-procedure1
Connect the cable to the negative (-) battery terminal.
Turn the ignition switch to ON, and wait for at least 60 seconds.
Procedure1
Check for DTCs.
- Body Electrical > SRS Airbag > Trouble Codes
- 50001 444
- Result:
-
Result Proceed to DTC B009387 and B009B87 are output A DTC B009387 and B009B87 are not output B
Post-procedure1
Turn the ignition switch off.
Disconnect the cable from the negative (-) battery terminal, and wait for at least 60 seconds.
A
B
Click hereGeneral>INTRODUCTION>HOW TO TROUBLESHOOT ECU CONTROLLED SYSTEMS>HOW TO PROCEED WITH TROUBLESHOOTING